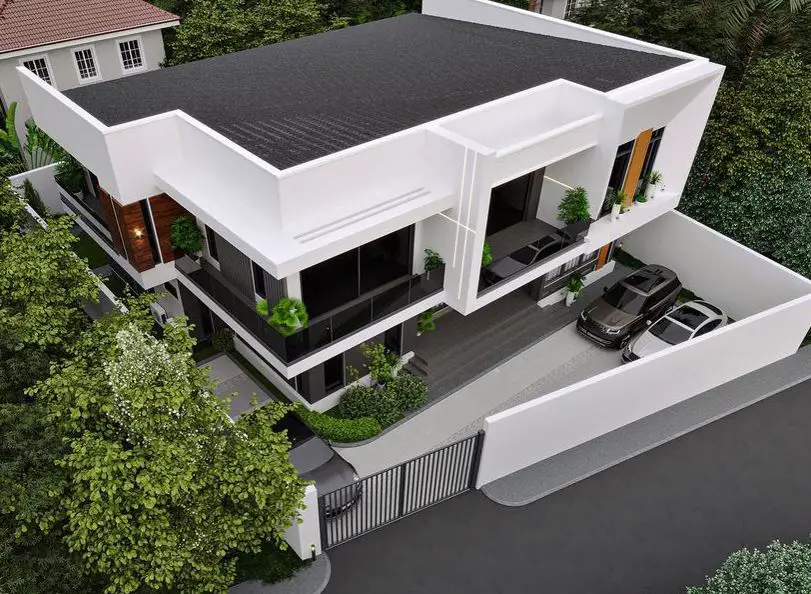
A hidden roof is a flat roof whose parapet walls have been raised so that the roof covering of the building is not visible from an elevation view. A flat roof is generally referred to as a roof whose slope (pitch) is less than 10 degrees. A flat roof with eaves or facia visible from the elevation may not be considered a hidden roof.
Flat roofs are characterized by their lack of pitch and are instead described as having a fall or, in the case of multiple slopes, falls. The inclination of a flat roof is usually not expressed as an angle but rather as a vertical drop in millimetres over a specified horizontal distance in millimetres.
Hidden roofs are aesthetically pleasing and are often associated with contemporary building construction. Furthermore, they are cheaper when compared with pitched roofs due to their lower material and labour demands. Therefore, a prominent advantage of a concealed roofline is its capacity to bestow a sleek and contemporary aesthetic upon a building.

By hiding the roofline and eaves with a parapet wall, the design can establish a seamless and unhindered visual transition from the walls to the roof. This approach is particularly efficient in buildings characterized by uncomplicated, clean lines and minimalist aesthetics. In addition to its aesthetic merits, a hidden roof can also offer functional benefits, such as enhanced energy efficiency and resistance to the elements.

However, hidden roofs are also considered problematic due to their susceptibility to leakage, and this is a nightmare for many homeowners and contractors. Moreover, they tend to demand more maintenance when compared with pitched roofs.
Roof leaks and water damage pose a significant threat to the integrity of a property. Even a small quantity of water that penetrates the roofing material can lead to severe damage to the roof frame, ceilings, building walls, and interior spaces.
However, when properly detailed and constructed, hidden roofs can maintain adequate water tightness, and demand limited maintenance throughout its design life. As a result of its construction requirements, most hidden roofs will require a roof gutter or an area where rainwater can collect before being discharged through a fubora drain to a PVC pipe.
It is important to note that in some construction works, the parapet is allowed to cover the front and side elevations, while the eaves are allowed to project at the rear elevation. In this case, the roof of the building can only be seen from the rear elevation, and roof gutters are not required in this case.
As a result, the water tightness of the roof gutter is crucial. Another critical area where leakage can occur is at the joints between the roof covering and the parapet wall. The aim of this article is to provide standard detailing and construction tips to achieve a water-tight and leakage-free hidden roof construction.
Materials for Construction of Hidden Roof
Hidden roof covering can be constructed using a variety of materials such as:
- Reinforced concrete flat roofs
- Tile and slate materials
- Plain tiles
- Interlocking tiles
- Stone-coated aluminium shingles
- Long-span aluminium sheets, etc.
However, the most common material in Nigeria and Africa as a whole for the construction of hidden roofs is the long-span aluminium roofing sheet. For good performance and durability, the roofing sheet should have a minimum gauge of 0.55 mm. In some cases, stone-coated roofing shingles have also been used, however at a more dire economic cost.
In luxury buildings, institutional buildings, commercial buildings, or highrise buildings, reinforced concrete flat roofs are more common. Tiles and slate materials are not common roofing construction materials in Nigeria.
However, for regular residential buildings such as duplexes and bungalows, long-span aluminium roofing sheets supported by timber rafters and purlins are very common. There are various ways of giving a fall to a flat roof built in timber, but the most common way is to slope the roof rafters to the desired angle as shown in the Figure below.

Vertical struts or diagonal web members are cut to the required height to connect the top chord (rafter) to the bottom chord (tie beam). The sizes of the rafter and bottom chord are functions of structural design which depend on the span of the roof and the loading. However, the common sizes are 2″ x 4″ (50 mm x 100mm) or 2″ x 6″ (50mm x 150mm).
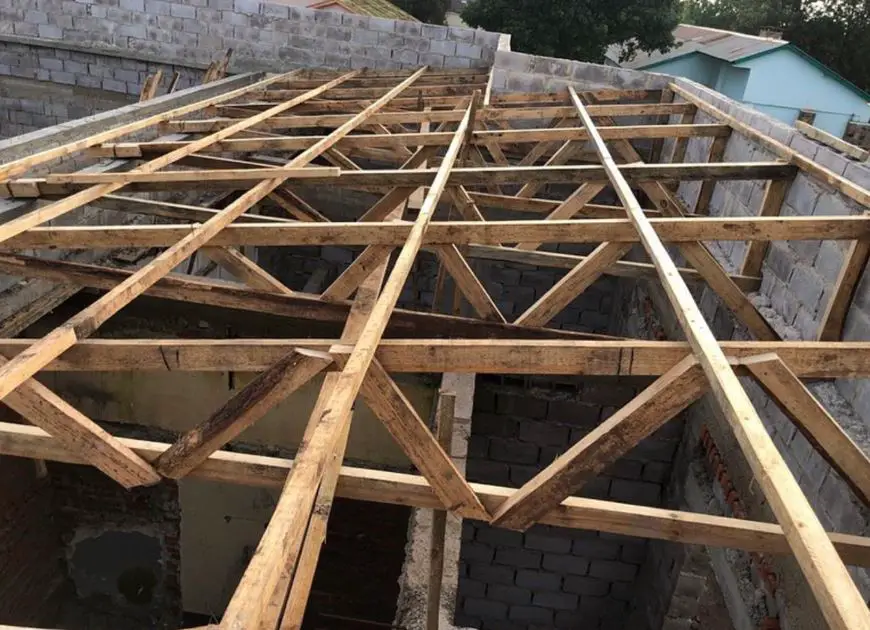
Depending on the design requirements, there may or may not be diagonal web members. Furthermore, bridging of the bottom chord (tie beam) will be required if the span is large. This is to avoid excessive deflection of the roof or collapse when loaded.
Having said this, one of the primary causes of flat roof leaks is improper installation of the roofing system. All flat roofs are designed with a slight slope to facilitate proper water drainage. However, if the roof features multiple levels, deflected portion, or a combination of flat and sloped sections, water can accumulate at the junctions of these different roof elements.
Therefore, it is important to ensure that the timber elements are properly constructed with a consistent uniform slope, and will not be susceptible to deflection that will cause ponding on the roof.
The roof gutters are commonly constructed using reinforced concrete or other materials. As we mentioned at the beginning of this article, the most critical leakage locations of hidden roofs are the roof gutter areas and the connection of the parapet wall and the roof. Let us discuss the proper detailing and construction of these elements.
Detailing and Construction of RC Roof Gutters
Unless carefully designed, reinforced concrete is not a water-tight material. The two major factors that influence the water permeability of concrete are the intrinsic porosity and the presence of cracks. First and foremost, it is considered normal for concrete to crack due to its weak tensile strength. However, the crack width and crack spacing must be controlled so that its negative effects on the performance of the structure will be mitigated.
Secondly, the constituents of the concrete mixture (cement, sand, coarse aggregate ratio) and the water/cement ratio of the concrete mixture affect the strength and porosity of the concrete.
Furthermore, the degree of consolidation (vibration) during placement and the presence/absence of honeycombs will also affect the strength and porosity of the concrete. A weaker concrete will have higher permeability than a strong dense concrete mass.

As a result of this, a conscious effort must be made to ensure that the concrete gutter of a hidden roof will be watertight. This can be achieved in two ways:
(1) By providing a continuous layer of waterproofing protection on the walls and bases of the roof gutter. In this way, the waterproofing layer or element prevents direct contact between the concrete and the water. This is known as Type A protection.
(2) By designing the roof gutter such that the maximum crack width will be limited to 0.15 mm. A qualified structural engineer should be contacted for this purpose. He will provide details and specifications for the concrete mixture, sizes and spacings of reinforcements, and the locations for water bars (water stops). This approach is known as Type B protection.

Guidelines and Tips for Effective Roof Gutter Construction
The following general precautions or guidelines should be followed during the construction of the roof gutter of a hidden roof.
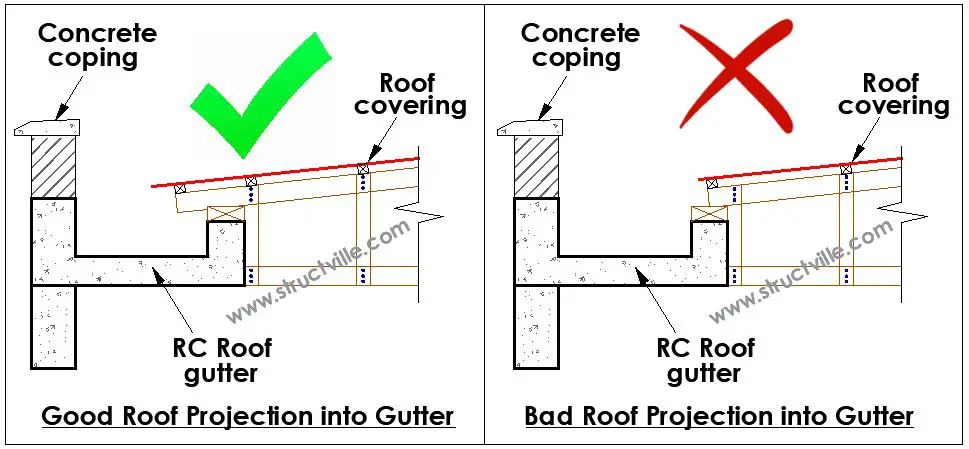
(1) The edge of the roof covering must extend fully into the roof gutter. It is bad practice for rainwater from the roof covering to drop directly on top of the walls of the gutter.
(2) The exterior and interior walls of the roof gutter that makes up the parapet wall must be constructed with reinforced concrete and not masonry sandcrete block. After a height of about 225mm with reinforced concrete, the remaining height can be made up with sandcrete block.
(3) The base of the roof gutter must be properly sloped towards the fubora drain or discharge pipe. Adequate support, reinforcements, and structural thickness must be provided to the concrete elements to prevent excessive deflection, sagging, or failure of the roof gutter.
(4) The water/cement ratio of the concrete for the roof gutter should be limited to 0.5. Waterproofing admixture may be incorporated into the concrete.
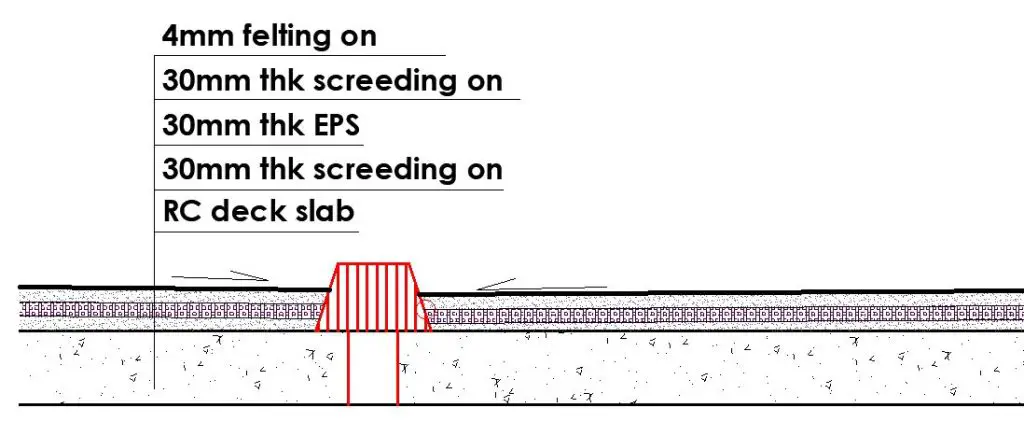
(6) When using Type A protection, the following approach is recommended for roof gutters and flat roof slabs:
- Place a 25 mm thick screeding on the interior surface of the roof gutter or on top of the flat roof slab. The screeding should be laid to fall towards the drain, and should be mixed with waterproofing admixture.
- Place a 30mm thick high-density polystyrene on top of the screeding. The joints between the polystyrene should be sealed using epoxy adhesive glue.
- Place another 30 mm thick screeding on top of the polystyrene sheet.
- Install a 4mm thick plastomeric bituminous waterproofing membrane (felting) on top of the screeding. The felting should be lapped at a minimum distance of 150mm, and must always be on top towards the fall.
(7) It is very important to note that tiling alone (as commonly done) is not sufficient to provide adequate water tightness for roof gutters and flat roof slabs.
Detailing and Construction of Wall-Roof Joints
The joint between the parapet wall and the roof is another critical location that is very prone to leakage. The following guidelines can be adopted for water tightness and minimal leakage:
(1) Ensure that the roof covering projects at least 25 mm into the parapet wall.
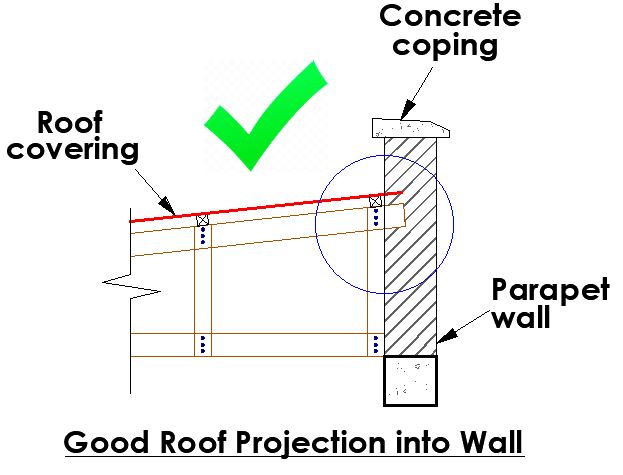
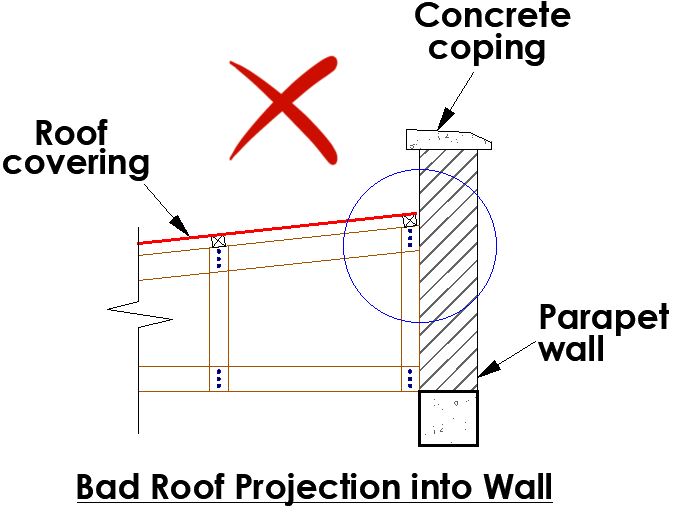
(2) Plaster the interior face of the parapet wall.
(3) Install a Z-shape aluminium flashing of at least 0.99 mm gauge to run from the top of the coping to the face of the roof covering as shown in the figure below.
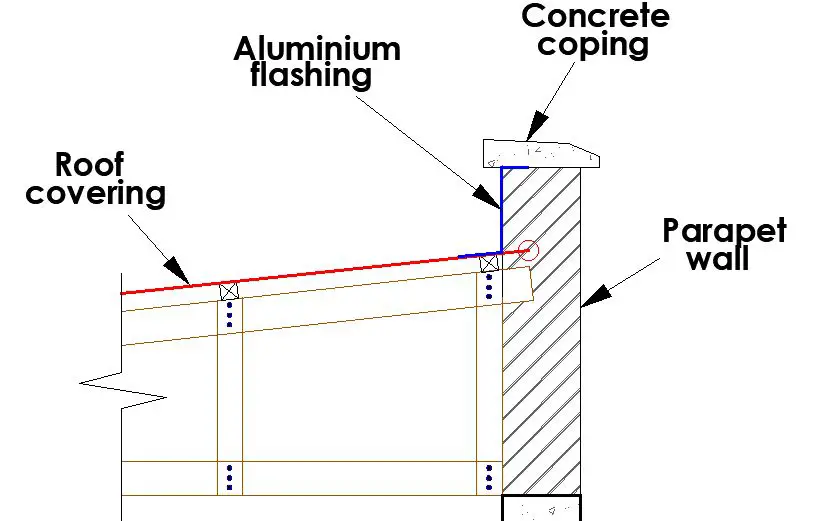
When coping is not desired in the construction, the aluminium fishing can be made to wrap around the top of the parapet wall as shown below.

(4) Where the height coping to the top of the roof covering is too high, the top of the aluminium flashing can be embedded into the parapet wall and sloped along the way. This is common along the sides of a building.

(5) The practice of tiling the interior face of the parapet walls may not be as effective as installing aluminium flashing to completely protect the wall and edges. The aluminium flashing should project sufficiently into the roof covering.
Conclusion
Every building project is unique. A hidden roof, while aesthetically pleasing, requires careful planning and execution to ensure its longevity and functionality. Proper installation, including adequate drainage and insulation, is important to prevent leaks and maintain the structural integrity of the building.
By addressing potential challenges and adhering to best practices described in this article, homeowners and builders can reap the benefits of a concealed roofline without compromising the building’s performance or appearance.









What a brief knowledge I learned
my brother thanks for this information 🙏. I really appreciate