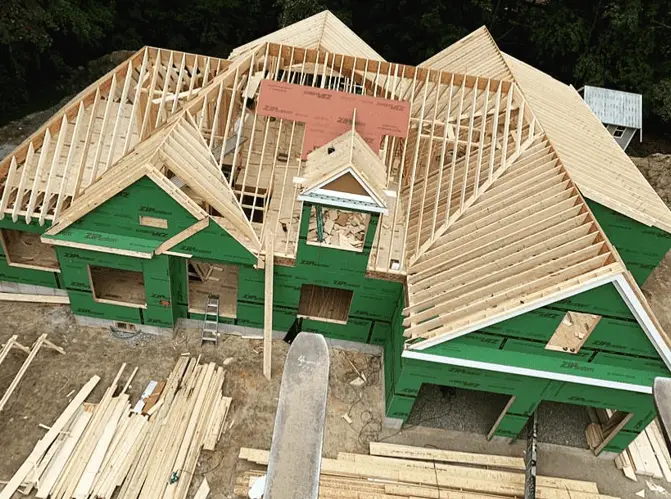
Rafters are loading bearing structural members that are used in roof construction. They typically run from the ridge board or hip of the roof at a sloping angle to the roof wall plate, columns, or roof beams, depending on the support system adopted for the entire roof structure.
By implication, rafters receive the load from the roof covering/sheeting, accessories, and other services that may be attached to it. They are also important members for resisting upward wind pressure on roofs. Rafters can be constructed using steel or timber. Furthermore, they are constructed in series and laid parallel to each other at usually a constant spacing. The spacing of rafters can be determined from the design requirements, type of roof sheeting to employed, type and spacing of purlins, availability of materials, etc.
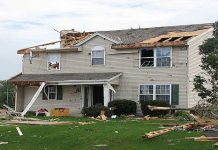
Under heavy gravity loads, rafters have a tendency to flatten outwards on the walls. This is generally a case of structural failure of rafters, and can lead to the collapse of the walls if the spans are longer and the walls are thinner. To overcome this problem, coupled rafters have been used, which are two opposing rafters joined together by a horizontal tie beam.
However, such roofs were structurally unstable, and since they lacked longitudinal support, they were prone to racking, or horizontal movement-induced collapse. Timber roof trusses were developed later, during the Middle Ages. A cross-braced timber roof truss creates a stable, rigid unit. It should, in theory, balance all lateral forces against one another and only thrust directly downwards on the supporting walls.
Functions of Rafters
The functions of rafters in a roof are as follows;
- Serve as a load bearing member for the loads and services on the roof
- Safely support the purlins and the roof sheeting/coverings
- Provide rigidity and stability to the roof structure
- Safely resist imposed loads from wind and snow
- Be capable of resisting movements due to moisture or thermal variation
- Be durable so as to give satisfactory performance and reduce maintenance to a minimum
Types of Rafters
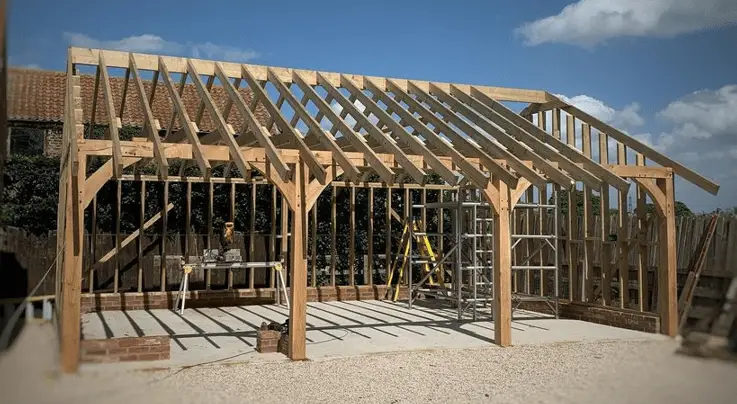
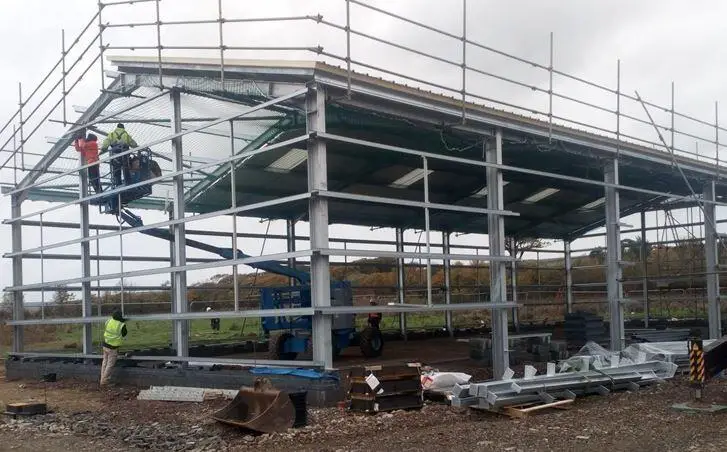
Rafters are usually constructed using timber or steel. Steel rafters are popular in the construction of portal frames, where they are directly supported by steel columns and stanchions. Timber rafters are more popular in the construction of residential homes, small offices, or other smaller structures.
Steel Rafters
Steel rafters in portal frames are usually subjected to significant bending moment and shear forces from the dead and imposed loads from the roof. In order to increase the rigidity of the rafters, haunches are introduced at the eaves and at the apex. Lateral stability of the rafters are enhanced by purlins or cross-bracings. In some cases steel curved rafters are used in the design of industrial steel structures.
Timber Rafters
Timber rafters are popular options in timber/wooden roof structures. Rafters are part of a basic wood framing system and are made of wood lumber. The common rafters form the sloped sides of the triangle on a traditional gable roof, which has a triangular shape. Many common, or general purpose, rafters make up each roof. The number of common rafter units needed for each project is mostly determined by the roof’s size and scope, as well as the distance each unit rafter must span. Timber rafters rely on nails or screws for connection.
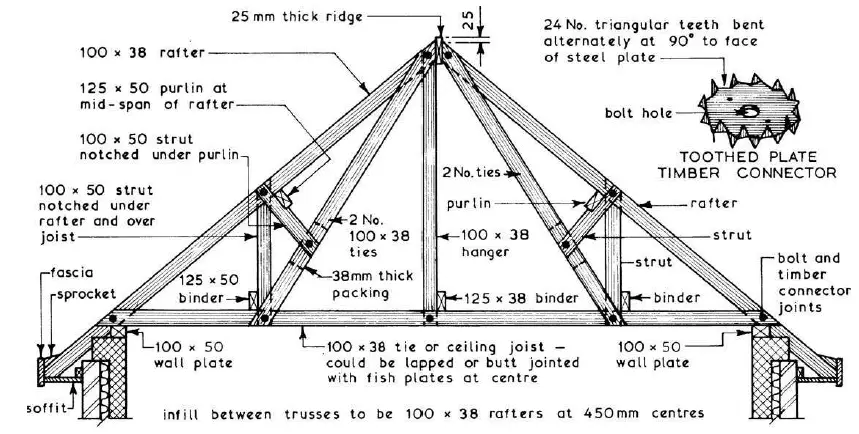
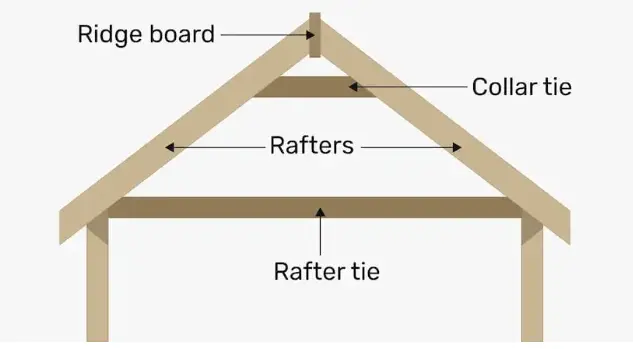
Trussed rafters are generally employed for large scale timber roof construction, but direct timber rafters are more efficient for small scale constructions. Hence, timber rafters are usually constructed in form of A-shape, consisting basically of the rafters, rafter ties, and ridge board/hips.
The rafters and external walls are then connected with ceiling joists. As a result, the area in the roof is left as a vaulted ceiling that may be finished with insulation and drywall. It could also be left as open space in an attic.
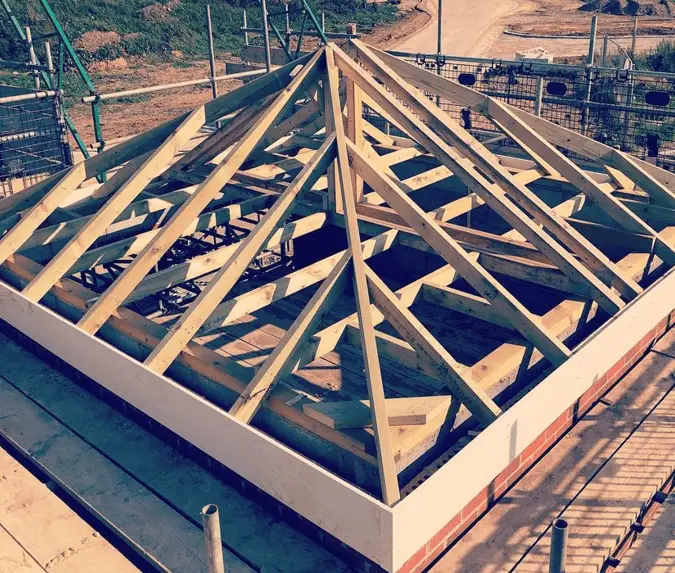
While the most basic gable roof can be built with just one type of timber roof rafter, the most sophisticated roof designs can incorporate different types of timber rafter. The types of timber rafters often employed are;
Principal rafter
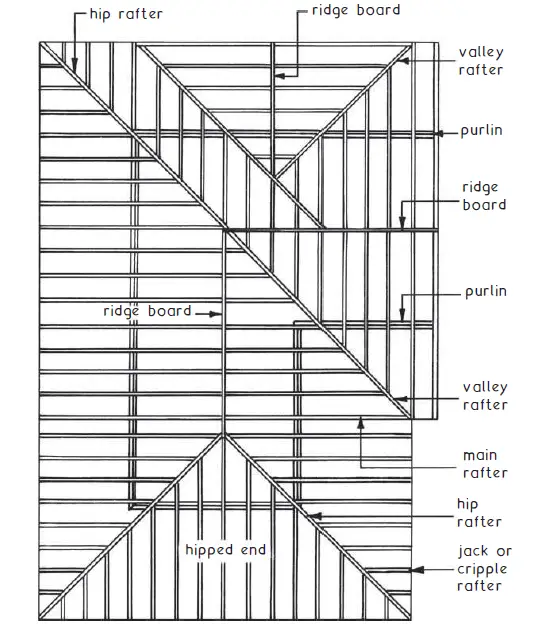
Principal rafters are the largest form of rafter found at the ends of a roof structure in a timber-framed roof. They are commonly used to carry a purlin and sit directly on a tie beam. Principal rafters run from the roof’s ridge to the wall plate; they’re a little heavier than ordinary rafters, and they’re usually framed into a tie beam at a corner post, story post, or chimney post. The principal rafters, when combined with the principal purlins, constitute a very stable roof construction system.
Common rafter
The basic gable roof is constructed using a common rafter. This style of rafter starts at an outside wall and extends all the way to the roof’s ridge board or peak. The common roof rafter is used to calculate the roof’s height and where the ridge board should be installed. The roof is now ready for the next type of rafter once the ridge board has been installed. Smaller rafters located in between the principals at both ends.
Hip rafter
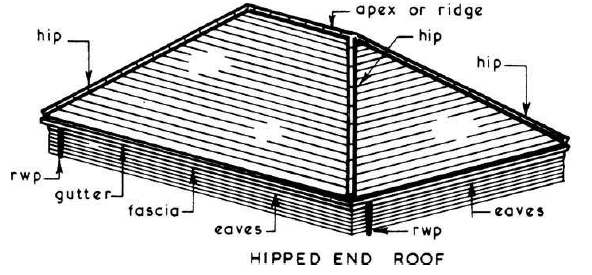
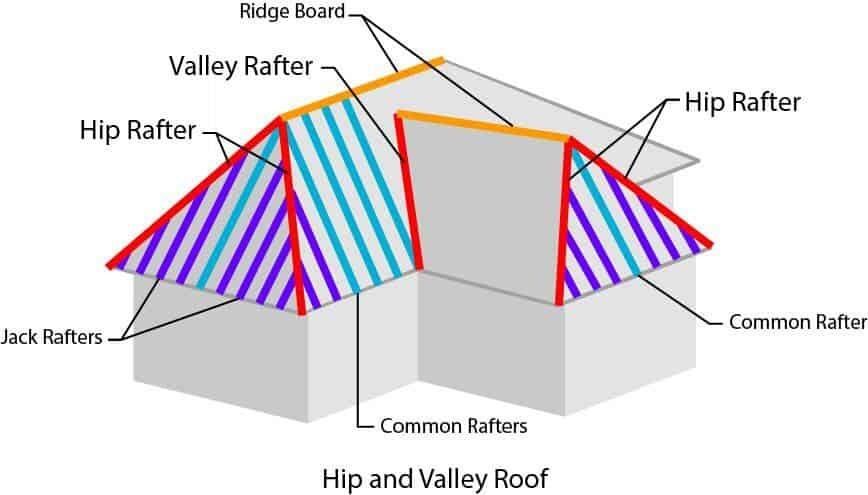
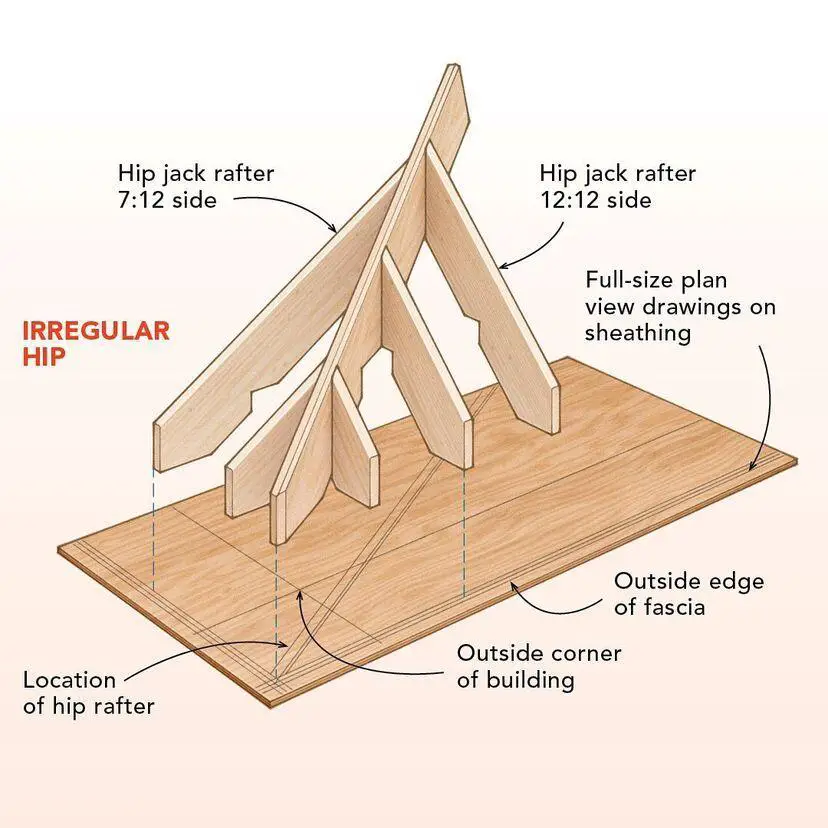
These are rafters that runs diagonally between the roof ridge and the top of the wall plate, forming a hipped roof. A hip rafter connects to the ridge at a 45-degree angle, as opposed to ordinary roof rafters, which run perpendicular to the peak of the roof. Traditional stick-framing techniques can be used to make these rafters, or they can be integrated in a pre-engineered steel or timber truss system.
Valley rafter
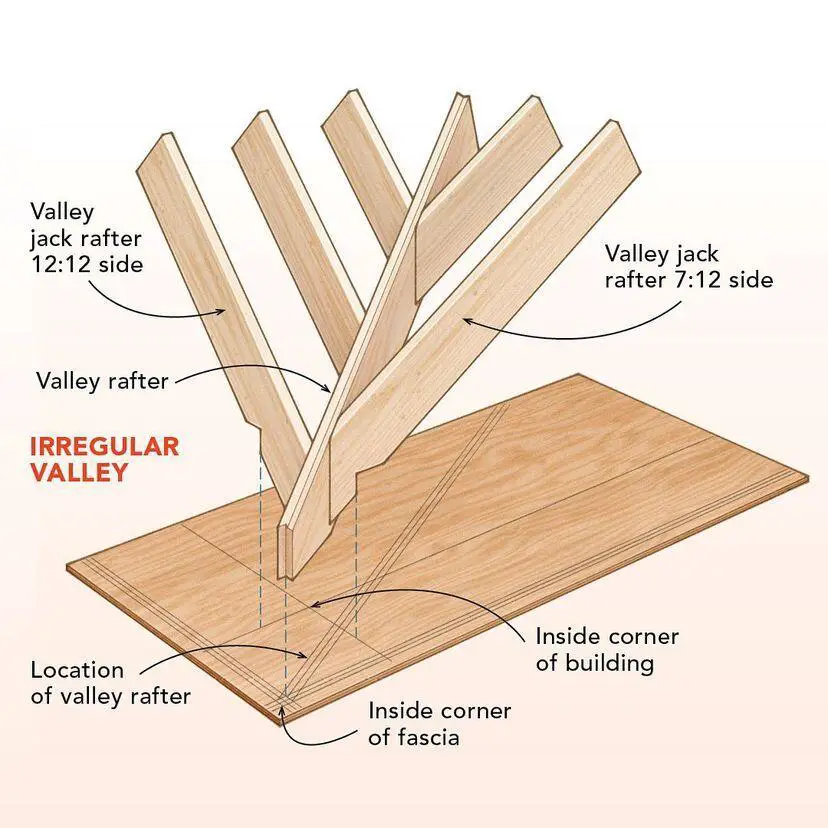
The valley rafter is the rafter in the valley line that joins the ridge to the wall plate along the meeting line of two sloped sides of a roof that are perpendicular to each other in a roof framing system. To put it another way, it’s the main rafter at the bottom of a hip and valley roof.
Jack rafter
A jack rafter is any rafter that is shorter than the whole length of the sloping roof, such as one that begins or ends at a hip or valley. They extend up from the top of the wall plate at a right angle (90°) to abut into an existing hip rafter. A jack rafter is one that has been shortened by falling on a hip rafter or being interrupted by a dormer window.
Barge rafter
This is the outermost rafter on a gable end and is occasionally utilised to form a roof overhang. It is one of the two rafters that support the portion of a gable roof that extends beyond the gable wall.
Rafter Design and Spacing
Rafters are designed to be structurally stable under gravity and horizontal loads, without undergoing excessive deflection or failure. The design of rafters often involves selecting the appropriate timber class, dimensions, and spacing that will safely support the roof load for a given roof span. In most cases, tables are available for the selection of rafters.
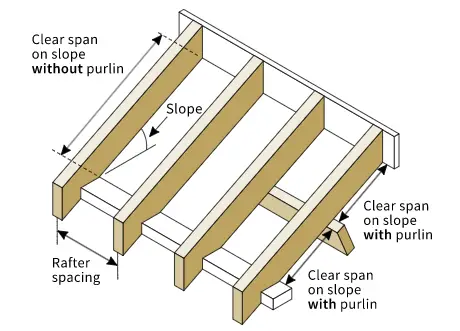
Definitions
Rafter span
This is the un-supported length of the rafter along its slope – the diagonal or hypotenuse of a right triangle.
Rafter run
This is the horizontal or level distance covered by the rafter – the bottom chord or base of a right triangle.
Roof span
A roof span is normally the same as the building width between the outer edges of the wall top plates.
Roof slope
Roof slope is the degree of change in height as a ratio of horizontal distance traveled, usually expressed as inches of rise per foot of horizontal run, or cm of rise per m of horizontal run.
Rafter Design Tables
Using regularised UK timber dimensions, it is possible to determine the maximum span of timber rafters subjected to different values of live loads according to BS 5268-7.5.
Table 1: Maximum Clear Span of Rafter when slope is more than 15 degrees but less than 22.5 degrees (Timber class: C16; Imposed load = 0.5 – 0.75 kN/m2)
| Rafter Size Width x Depth (mm) | 400 mm spacing | 450 mm spacing | 600 mm spacing |
| 38 × 95 | 1.798 | 1.752 | 1.633 |
| 38 × 120 | 2.505 | 2.430 | 2.242 |
| 38 × 145 | 3.171 | 3.048 | 2.706 |
| 38 × 170 | 3.710 | 3.568 | 3.145 |
| 38 × 195 | 4.247 | 4.086 | 3.579 |
| 44 × 95 | 2.009 | 1.954 | 1.816 |
| 44 × 120 | 2.760 | 2.654 | 2.410 |
| 44 × 145 | 3.328 | 3.201 | 2.907 |
| 44 × 170 | 3.893 | 3.746 | 3.379 |
| 44 × 195 | 4.456 | 4.288 | 3.845 |
| 47 × 95 | 2.109 | 2.050 | 1.903 |
| 47 × 120 | 2.821 | 2.713 | 2.464 |
| 47 × 145 | 3.401 | 3.272 | 2.973 |
| 47 × 170 | 3.978 | 3.828 | 3.480 |
| 47 × 195 | 4.553 | 4.382 | 3.970 |
Table 2: Maximum Clear Span of Rafter (Timber class: C16; Imposed load = 0.75 – 1.00 kN/m2)
| Rafter Size Width x Depth (mm) | 400 mm spacing | 450 mm spacing | 600 mm spacing |
| 38 × 95 | 1.682 | 1.633 | 1.509 |
| 38 × 120 | 2.319 | 2.242 | 2.053 |
| 38 × 145 | 2.969 | 2.862 | 2.503 |
| 38 × 170 | 3.522 | 3.354 | 2.909 |
| 38 × 195 | 4.033 | 3.816 | 3.312 |
| 44 × 95 | 1.873 | 1.816 | 1.674 |
| 44 × 120 | 2.565 | 2.477 | 2.251 |
| 44 × 145 | 3.160 | 3.038 | 2.692 |
| 44 × 170 | 3.698 | 3.556 | 3.129 |
| 44 × 195 | 4.234 | 4.072 | 3.561 |
| 47 × 95 | 1.964 | 1.903 | 1.753 |
| 47 × 120 | 2.678 | 2.575 | 2.325 |
| 47 × 145 | 3.230 | 3.106 | 2.782 |
| 47 × 170 | 3.779 | 3.635 | 3.233 |
| 47 × 195 | 4.326 | 4.162 | 3.679 |
Table 3: Maximum Clear Span of Rafter when slope is more than 22.5 degrees but less than 30 degrees (Timber class: C24; Imposed load = 0.5 – 0.75 kN/m2)
| Rafter Size Width x Depth (mm) | 400 mm spacing | 450 mm spacing | 600 mm spacing |
| 38 × 95 | 2.285 | 2.197 | 1.993 |
| 38 × 120 | 2.880 | 2.769 | 2.514 |
| 38 × 145 | 3.472 | 3.339 | 3.034 |
| 38 × 170 | 4.062 | 3.908 | 3.551 |
| 38 × 195 | 4.649 | 4.473 | 4.068 |
| 44 × 95 | 2.399 | 2.307 | 2.095 |
| 44 × 120 | 3.022 | 2.907 | 2.642 |
| 44 × 145 | 3.643 | 3.505 | 3.186 |
| 44 × 170 | 4.260 | 4.100 | 3.729 |
| 44 × 195 | 4.874 | 4.692 | 4.270 |
| 47 × 95 | 2.452 | 2.358 | 2.142 |
| 47 × 120 | 3.089 | 2.971 | 2.701 |
| 47 × 145 | 3.722 | 3.582 | 3.257 |
| 47 × 170 | 4.352 | 4.189 | 3.812 |
| 47 × 195 | 4.978 | 4.794 | 4.364 |
Table 4: Maximum Clear Span of Rafter when slope is more than 22.5 degrees but less than 30 degrees (Timber class: C24; Imposed load = 0.75 – 1.0 kN/m2)
| Rafter Size Width x Depth (mm) | 400 mm spacing | 450 mm spacing | 600 mm spacing |
| 38 × 95 | 2.166 | 2.082 | 1.888 |
| 38 × 120 | 2.731 | 2.625 | 2.382 |
| 38 × 145 | 3.293 | 3.167 | 2.874 |
| 38 × 170 | 3.854 | 3.706 | 3.366 |
| 38 × 195 | 4.412 | 4.244 | 3.856 |
| 44 × 95 | 2.275 | 2.187 | 1.985 |
| 44 × 120 | 2.867 | 2.757 | 2.503 |
| 44 × 145 | 3.457 | 3.325 | 3.020 |
| 44 × 170 | 4.044 | 3.891 | 3.536 |
| 44 × 195 | 4.629 | 4.454 | 4.050 |
| 47 × 95 | 2.325 | 2.236 | 2.029 |
| 47 × 120 | 2.930 | 2.818 | 2.560 |
| 47 × 145 | 3.533 | 3.398 | 3.088 |
| 47 × 170 | 4.132 | 3.976 | 3.615 |
| 47 × 195 | 4.729 | 4.551 | 4.140 |
Assumptions in the Preparation of the Table
- The allowed clear spans were computed using the BS 5268-2:2002 standard and BS 5268-7.5:1990 Structural Use of Timber – Part 2: Code of Practice for Permissible Stress Design, Materials, and Workmanship Section 7.5 Domestic rafters (explains how to use wood for structural purposes).
- The self weight of the rafters is not included in the dead loads given at the top of the span table above; however, the rafter self weights are included (in addition to the dead loads) in the calculations used to calculate permissible clear spans.
- Roofs with trussed rafter roofs are not covered by these span tables.
- Only roof systems with four or more rafters are covered by these span tables. Ceiling joists are also expected to be employed to transmit the horizontal component of eaves-level push to adjacent rafters.
- The tile battens affixed to the tops of the rafters are assumed to provide enough lateral restraint and distribute lateral stresses in these span tables.
- The calculations used to create these span tables presume that the rafters are not continuous over the purlins, but that they can be continuous over the supporting purlin if necessary.
- Holes and notches in the rafters can only be drilled or cut if they are proven to be adequate by specialised calculations.
- These span tables do not apply to wood that has been completely exposed to the outdoors.
- Wane is allowed in all parts covered in these span tables, as approved by BS 4978:2007+A2:2017.
- Rafters must have a 35mm minimum end bearing.
- The imposed load should be calculated in accordance with BS 6399:Part 3:1988 Code of practise for imposed roof loads; as a rule of thumb, for altitudes not exceeding 100m, a uniformly distributed load of 0.75 kN/m2 can be used, and for most other areas exceeding 100m but not exceeding 200m, a uniformly distributed load of 1 kN/m2 can be used.
- Because there are no brittle finishes on the underside of the rafters, such as plasterboard, the effects of deflection under concentrated (point) load are not need to be considered as per BS 5268-7.5 clause 4.3.
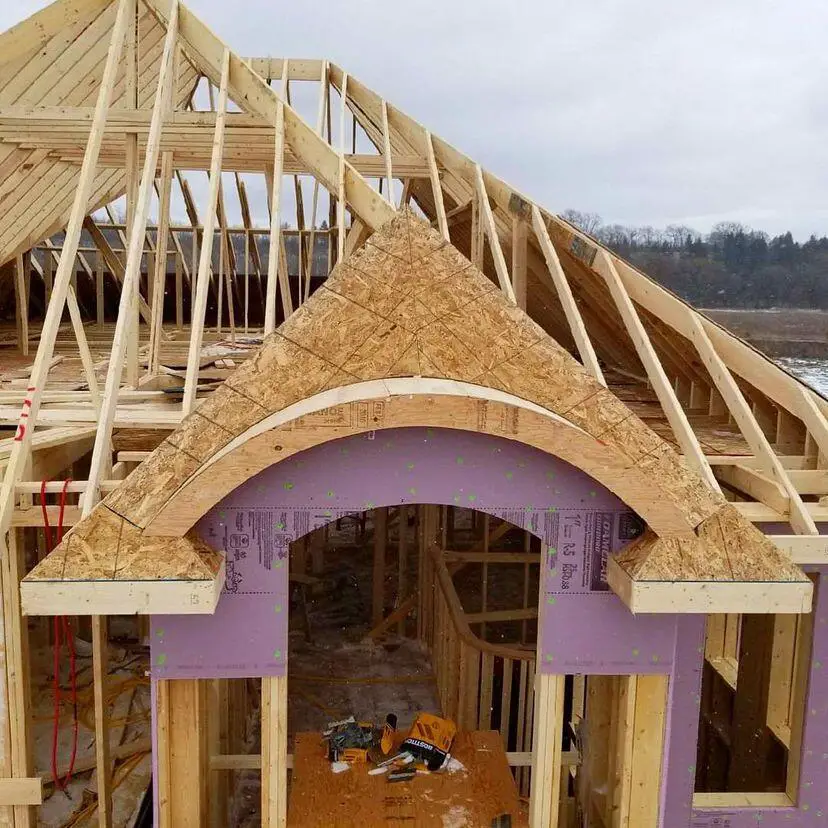
Installation of Rafters
The following steps may be followed in the installation of rafters;
- Nail a 2-by-4 board up the centre of the gable-end wall to serve as a ridge board bracing. The board should be taller than the total height of the wall and roof rise.
- Place your ridge beam or rafter ties perpendicular to your rafter pattern across the walls.
- With the ridge ends facing up, lean your rafters along the outside walls. You’ll have easy access to them up on the roof as a result of this.
- Bring your gable-end rafters up to the rafter ties and put one nail through them. Ensure that the heel cut is flush with the wall plate.
- Lean the rafters that have been fastened in against each other. Nothing is holding them up, so your assistant will have to hold them in place.
- As with the gable-end rafters, go to the opposite end of the ridge board and nail two opposing rafters to their respective rafter ties and lean them against each other.
- Raise one end of the ridge board to the intersection of the two rafters.
- Attach the rafters to the ridge board using nails.
- Slip the ridge beam between the two rafters at the first rafter course and nail it in place.
- These two common rafters have enough support at this time to stand up on their own. Nail the remaining rafters to the ridge board, making sure they’re evenly spaced.
- Install collar ties, purlins, sway braces, and other supports as needed or required by code once the rafters are securely connected.

