Grillage analysis presents a sufficiently accurate method of analysing bridge decks for estimation of design bending moment, torsion, shears force etc, and has been adapted for use in most computer software around the world. Basically, the grillage analogy method uses the stiffness approach for analyzing the bridge decks (Jaggerwal and Bajpai, 2014). The whole bridge deck is divided into a number of longitudinal and transverse beams (planar grids).
In grillage analysis, the elements of a grid are assumed to be rigidly connected, so that the original angles between elements connected together at a node remain unchanged. Both torsional and bending moment continuity then exist at the node point of a grid (Qaqish et al, 2008). The method has proved to be reliable and versatile for a wide variety of bridge decks. Conceptually, the grillage analogy method attempts to discretize the continuous or dispersed stiffness of the bridge and concentrates it into discrete longitudinal and transverse members.
According to Shreedhar and Kharde (2013), the basic steps in carrying out grillage analysis are as follows;
- Idealization of the physical deck into equivalent grillage
- Evaluation of equivalent elastic inertia of members of grillage
- Application and transfer of loads to various nodes of grillage
- Determination of force responses and design envelopes and
- Interpretation of results.
Some basic guidelines in carrying out grillage analysis are as follows;
- Gridlines are placed along the centre line of the existing beams, if any and along the centre line of the leftover slab, as in the case of T-girder decking.
- Longitudinal gridlines at either edge are placed at 0.3D from the edge for slab bridges, where D is the depth of the deck.
- Gridlines should be placed along lines joining bearings.
- A minimum of five grid lines are generally adopted in each direction.
- Gridlines are ordinarily taken at right angles.
- Gridlines in general should coincide with the centre of gravity of the section. Some shifts, if it simplifies the idealisation, can be made.
- Over continuous supports, closer transverse grids may be adopted. This is so because the change is more dependent upon the bending moment profile.
- For better results, the side ratios i.e. the ratio of the grid spacing in the longitudinal and transverse directions should preferably lie between 1.0 to 2.0.
Methodology
While it is easy to visualise a grillage model of a bridge deck, there must be a careful thought process especially when you want to model on software like StaadPro. In this post, we are going to carry out a grillage analysis for the bridge deck model shown below.
The intermediate transverse beams are assumed to be 700mm deep, and 300mm wide. The profile of the bridge can be assumed to be of the form shown below;
To adequately present the grillage analogy of the bridge deck, we will discretize the deck as shown in the image below. If you have AUTOCAD, it is advisable to carefully map out your grids and verify all dimensions and sections before proceeding to Staad Pro for modelling. In the image shown below, I have used AUTOCAD to show the disposition of my gridlines, and the sections they are representing are given in the legends that follow.
The legend that gives the description of the lines is given below;
Having known these, we can now go over to Staad Pro for the modelling;
Step 1: Launch Staad and identify the model as a space structure
Step 2: Create the nodes on the plan view to reflect the general arrangement
Step 3: Connect all the nodes as adequate
This lands us somewhere here as shown below. Make sure you utilise the ‘connect along’ command for speed of execution.
Step 4: Assign supports
Since only the main girders will be sitting on bearings, we will model this by placing one support on a pin, and the other on a roller. You can obtain roller support by using the ‘enforced but’ command. This gives you the option of releasing other support constraints and leaving only the vertical reaction. What we obtain is shown below.
Step 5: Create properties and assign them to where they belong
By looking at the legends above, you can create the section properties, and assign them to where they belong. If any section is not available in Staad by default. You just have to input the section properties manually. Note that for the slab sections, you can use the rectangle option to define it, we have a T-beam by default in Staad, while we will have to define the L-section manually.
An example for the T-section model is shown below;
Step 6: Apply the traffic loads and analyse
In grillage analysis, uniformly distributed loads are applied on the main girders, while tandem loads are better applied as moving loads. For instance using the Eurocodes, the tandem load of 300kN is applied on notional lane 1 (150 kN per axle at disatance of 1.2m) with a width of 2.0m. You can define the moving load as you wish based on the code of practice you are using. Staad automatically distributes this load as appropriate to the members.
How to Apply Load Model 1 on Highway Bridges
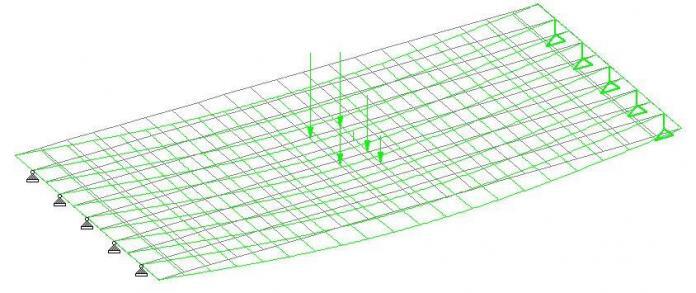
For our model above, this only has been applied (other loads have been neglected for brevity), and deflection of the grillage at different locations is as shown in the images below;
The deflection profile when the load is at another location is as shown below;
In such a similar way, you can view the internal forces when the load is at different locations. You can verify that we are interested in the location of the load that will produce the worst effect on the structure.
N/B: Some dummy members from the initial model were removed.
So we will stop this post here for now, see you later…..
References
[1] Jaggerwal H. And Bajpai Y (2014): Effects of skewness on Three Span Reinforced Concrete T-Girder Bridges. International Journal of Computational Engineering Research. ISSN(e): 2250-3005 Vol 04 Issue 8 pp 1-9
[2] Qaqish M., Fadda E., Akawwi E. (2008): Design of T-beam Bridge by Finite Element Method and AASHTO specification. KMITL Science Journal Vol 8 No 1 (January- June 2008) pp24-34
[3] Shreedhar R., Rashmi Kharde (2013): Comparative study of Grillage method and Finite Element Method of RCC Bridge Deck. International Journal of Scientific & Engineering Research Volume 4, Issue 2, February-2013 1 ISSN 2229-5518
[4] Kalyanshetti M.G., Bhosale (2013): Alternative Forms of Two Lane T-Beam Bridge Superstructure – Study by Grillage Analogy. International Journal of Latest Trends in Engineering and Technology (IJLTET) Vol. 5 Issue 3 ISSN: 2278-621X pp 88-96





• Amazing Article! I have bookmarked this article page as i received good information from this. All the best for the upcoming articles. I will be waiting for your new articles..
CoBie adaptation in USA
Interference Analysis in USA
MEP F modelling in USA
Revit Modeling in USA
Fabrication Drawings preparation in USA
Shop Drawings Preparation in USA
Structural Analysis in USA
Good article. Grillage analysis explained very simply and clearly thank you
Thanks for the explanation, I really appreciate it. Can you please show me how to account for elastomeric bearing on the piers in staad pro when doing a 3 span continuous bridge?
excellent and helpful to all civil engineering students
Good Engineering Analysis. Keep it up.