8.7 C
New York
Monday, October 28, 2024
Home Blog Page 41

Effects of Wind on Telecom Masts

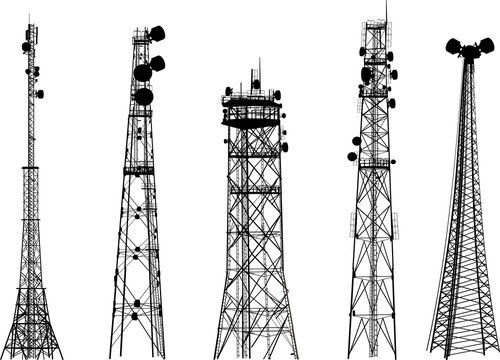
Telecommunication masts or towers are tall structures that are designed for the transmission of telecommunication signals or for radio/television broadcasting. Telecom masts are usually made of steel structures of which the members can be made of hot rolled angle sections or circular hollow tube sections. Due to their height above the ground, the effect of wind is quite significant in the design of telecom masts and may govern the structural design.

Telecom masts can collapse for a variety of reasons of which wind can be one of them. According to Balczo et al (2006),

There are very few cases where masts collapsed, and the reasons for them are in most cases not the wind forces which were taken according to the standard into consideration at stress analyses, but coincidence of other fatal circumstances. … Out of 225 mast failures in Europe only 7 were caused by wind overload. It is also thought-provoking that the wind-storm in 1999 in Denmark caused no collapse of any masts although a number of masts should have been crashed according to the stress analyses carried out by using Eurocode.

Read Also…
Structural stability of a braced ten-storey steel frame
How to apply wind load on high-rise buildings

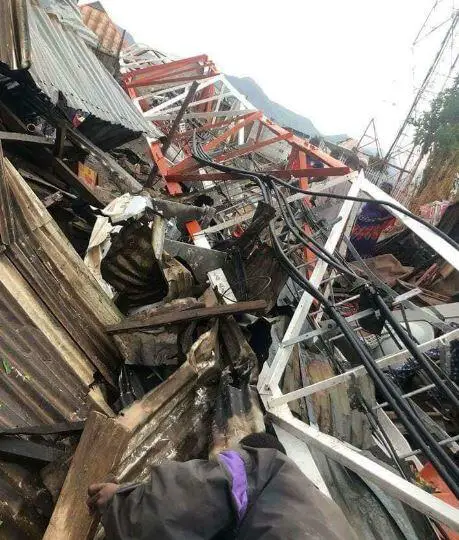
However, in Nigeria, a telecom mast was reported to have collapsed in Jalingo after a heavy storm in May 2018, which led to loss of lives. A similar incident was also reported in Edo State in the year 2018, after a heavy storm. However, no technical analysis was done to evaluate the cause of the collapse of the telecommunication masts.
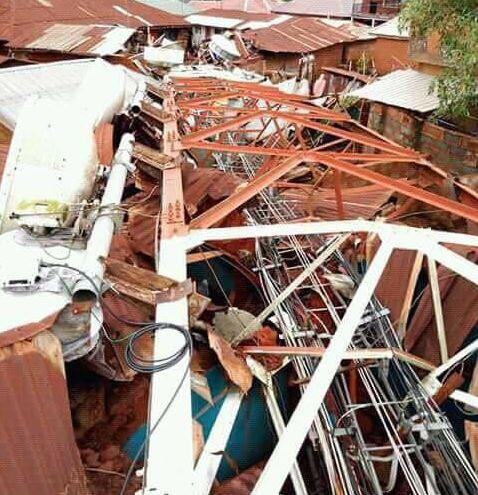
failed telecom masts
Collapsed Telecom mast in Edo State, Nigeria (May, 2018)
telecom mast collapse 3
Collapsed telecom mast in Jalingo, Nigeria (May, 2018)

Different structural configurations can be adopted for telecom masts but it appears that the structural efficiency of all configurations is not the same. Therefore, this article aims to explore the effect of wind on different configurations of steel telecom masts.

In Europe, wind action on telecom mast can be evaluated according to the procedure described in EN 1991-1-4:2005 (Eurocode 1 Part 4) with emphasis on clause 7.11 of the code. In America, this can be evaluated according to the procedure described in ASCE-7 (2010).

In this article, the response of cross-bracing configuration (X-braced) and V-bracing structural configuration to wind load will be investigated using Staad Pro software and ASCE-7-2002.

The models used in the study are shown below.

Model 1: X-braced telecom masts
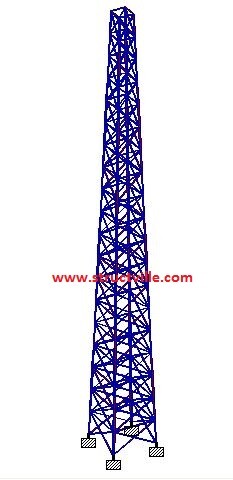
A4 1

Type: X-Bracing
Height: 30 m
Width at the base: 3m x 3m
Width at the top: 1m x 1m
Section of the legs: UA 100 x 100 x 8
Section of the horizontal bracings and diagonals: UA 50 x 50 x 6
Design wind speed: 50 m/s
Building classification category: II
Exposure category: Category B
Solidity ratio: 20.6 %
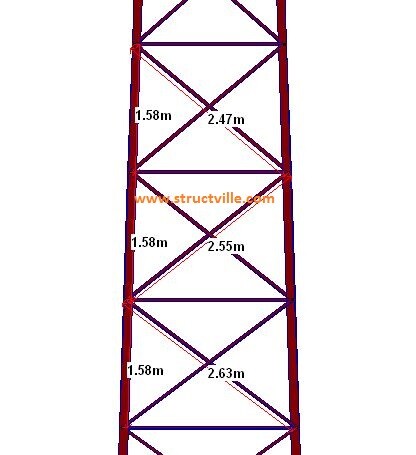
A2 1

The following results were obtained when analysed for self-weight and the effect of wind load.

A1

Maximum deflection at the top = 52.63 mm

The maximum internal forces are shown below;

k1

Model 2: V-braced telecom masts

B4

Type: V-Bracing
Height: 30 m
Width at the base: 3m x 3m
Width at the top: 1m x 1m
Section of the legs: UA 100 x 100 x 8
Section of the horizontal bracings and diagonals: UA 50 x 50 x 6
Design wind speed: 50 m/s
Building classification category: II
Exposure category: Category B
Solidity ratio: 19.51 %

B2

When analysed for the effect of wind, the result below was obtained;

B1

Maximum deflection at the top = 42.802 mm

The maximum internal forces are shown below;

k2

The table of comparison is shown below;

Action EffectX-BracingV-Bracing% Difference
Deflection (mm)52.6342.8018.67%
Maximum axial tension (kN)82.61565.88320.25 %
Maximum axial compression (kN)91.47874.09519.00%

From the table above, it can be seen that under the same conditions, V-braced masts perform better than X-braced masts under the effect of the wind.

When a lateral load is applied to an X-braced frame, the diagonal braces are subjected to compression while the horizontal web acts as the axial tension member in order to maintain the frame structure in equilibrium under lateral load. For V-braced frames (chevron bracing), one of the braces resists the tension while the other brace resists compression at each storey.

Both the tension and compression brace distribute the lateral load equally in the elastic range before the buckling point. However, the tension brace will remain in tension while the compression brace will lose all the axial load capacity after buckling. This contributes to the unbalanced distributed lateral load and can cause a large bending moment in the intersection of the beam and braces.

However, V-braced frames possess high elastic stiffness and strength when compared with X-braced frames.

Lapping of Reinforcements and Use of Rebar Couplers – Peculiarities and Differences

In reinforced concrete buildings, it is almost impossible to carry out construction without lapping reinforcements at one point or another. This is due to obvious reasons such as ease of transportation and handling. Also at very long lengths, reinforcements will become unstable under their own weight when placed in a vertical position. Lapping (reinforcement splicing) is the traditional way that has been used to join two different reinforcements during construction. However, in recent times, mechanical splices (such as rebar couplers) have been introduced to make two different pieces of reinforcements joined together to behave as ‘one continuous unit’.

The three general methods identified for reinforcement splicing are;

  • Lap splices
  • Welded splices, and
  • Mechanical splices

Read Also…
Detailing of columns to Eurocode 2

It is generally known that when reinforcements are lapped traditionally (lap splices), the two rebars will depend on the bond of the concrete for load transfer. However, with the use of mechanical splices concrete is not needed for load transfer since the two bars tend to behave as ‘continuous unit’. Furthermore, the idea of lapping is inherently wasteful and may lead to heavy congestion of reinforcement in a section of a concrete member. On the other hand, welding of bars is considered a more expensive alternative which may depend on the chemical properties of the reinforcing bar for adequate weldability.

detailing at laps
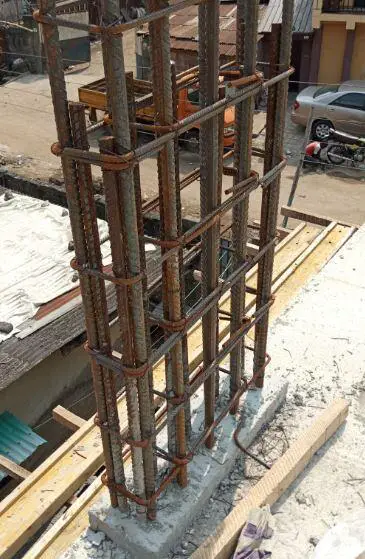
Lap region of a concrete column

The advantages of using mechanical splices over lap splices in reinforcements are;

(1) Enhanced Structural Performance

The structural integrity of joints connected with the use of mechanical splices is enhanced since the connection does not need to rely entirely on concrete bond for load transfer. In seismic applications, mechanical splices tend to maintain structural integrity when bars are stressed into the inelastic range. On the other hand, lap splices can infringe into the plastic hinge region, which is in violation of code limitations.

(2) Saves design effort

In reinforced concrete design, the engineer is expected to carry out calculation of lap length, which can depend on the size and type of the reinforcement, the grade of the concrete, the bond condition, and concrete cover. But with the use of mechanical splices, such computational effort is eliminated.

rbar
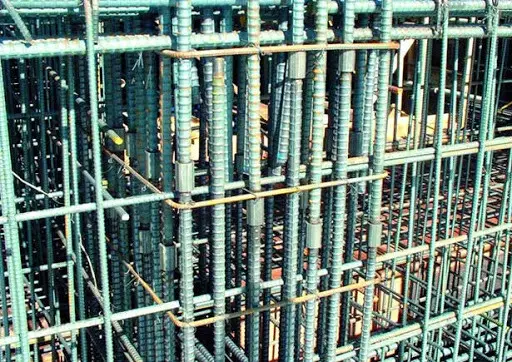
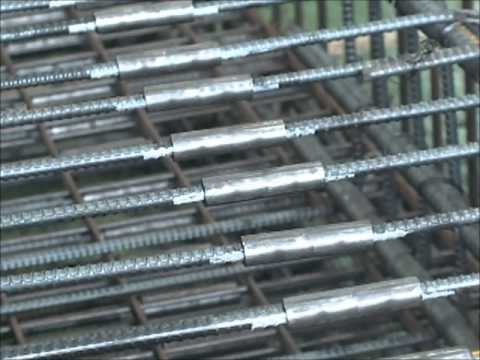
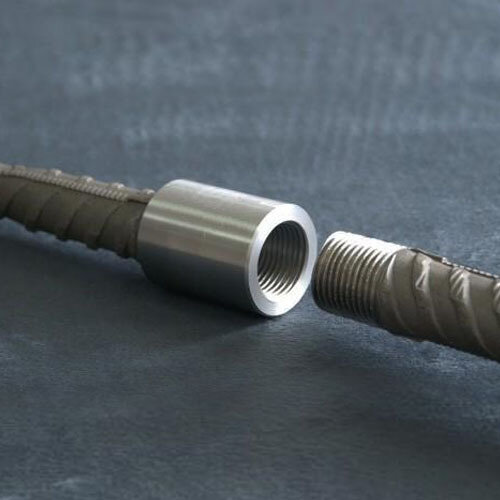
Rebars joined using mechanical couplers

(3) Savings in Materials

With the use of mechanical splices, reinforcement bars do not overlap, thereby leading to savings in materials.

(4) Reduction in bar congestion

Lapping of reinforcement effectively doubles the steel-to-concrete ratio, and the resulting congestion can make the placement and consolidation of concrete difficult. Furthermore, the code limits the area of reinforcement in lap regions of columns to 0.08Ac. Using rebar couplers completely eliminates this challenge.

A peculiar disadvantage of mechanical splices is the extra step of preparation of bars required before couplers are installed. A special care is needed in cutting the threads correctly and to protect the threads from corrosion before installing the couplers as these reasons could lead to improper fixing of couplers.

REBAR COUPLER
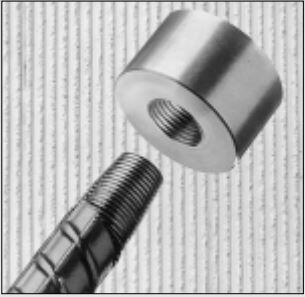
Typical threaded end of a rebar for coupling

However in a research carried out in Sri Lanka in the year 2018, the additional cost incurred in preparation of bars which includes the cost of two machineries (forging machine and thread cutting machine) and additional workmanship (one electrician and an unskilled labourer), seems to produce attractive cost benefits compared to lap splicing for larger diameter bars such as 32 mm and 40 mm.

rebar coupler 500x500 1

In a study to check the failure pattern of reinforcements joined using couplers, two failure modes were identified which are;

  • Failure of the rebar, and
  • Failure of connection

However, it was found that the failure stress of the bars which failed due to failure of connection is greater than the yield stress of steel and closer to the fracture point of steel. Due to the fact that the design stress of rebars is taken as the yield stress of steel and also due to the reduced stress in steel when steel are in contact with concrete, the risk of failure due to improper fixing of couplers may not be critical.

Water Bars (Water Stops) – Uses, Types, and Applications

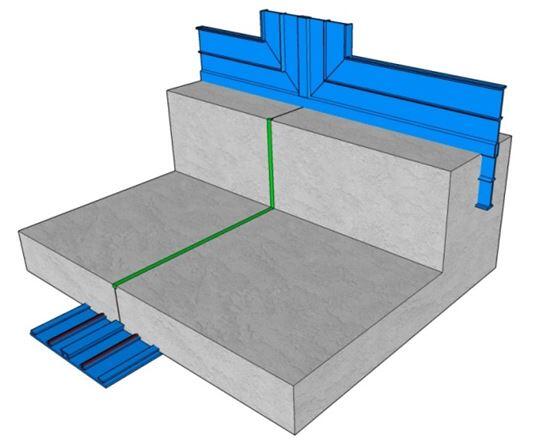
In reinforced concrete water retaining/excluding structures, a potential source of leakage or water ingress is the construction joint, and that is why water bars (also called water stops) must be provided whether there is risk of ground water or not. Water bars are barriers that are provided in construction joint of concrete structures to prevent the egress or ingress of water into the structure.

Typical water stop details 1
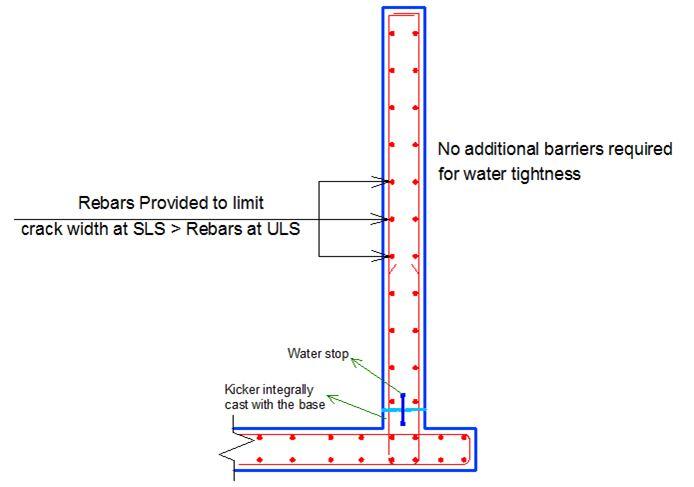
Water bar arrangement in a water retaining structure

Constructions joints are usually created due to the difficulty in casting multiple members of a water retaining structure on the same day (such as casting tank base and walls on the same day). Apart providing reinforcements to limit crack width to 0.2mm and providing water stops, good workmanship is important because inadequacies such as honeycombs, poor compaction, foreign materials in the concrete, poor installation of water bars etc can compromise the entire effort.

Read Also…
Calculation of crack width and crack spacing in reinforced concrete

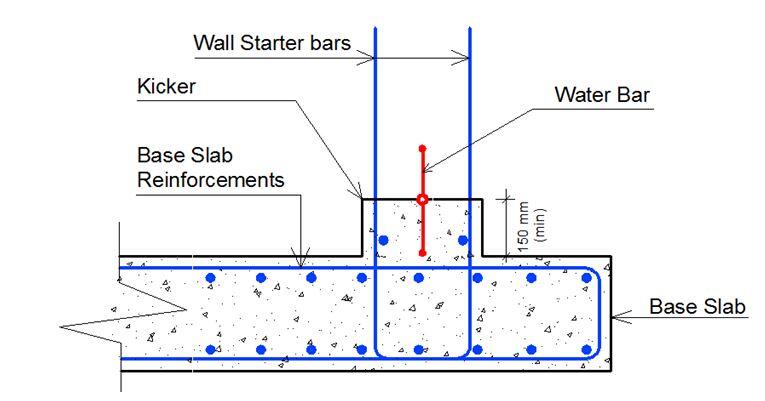
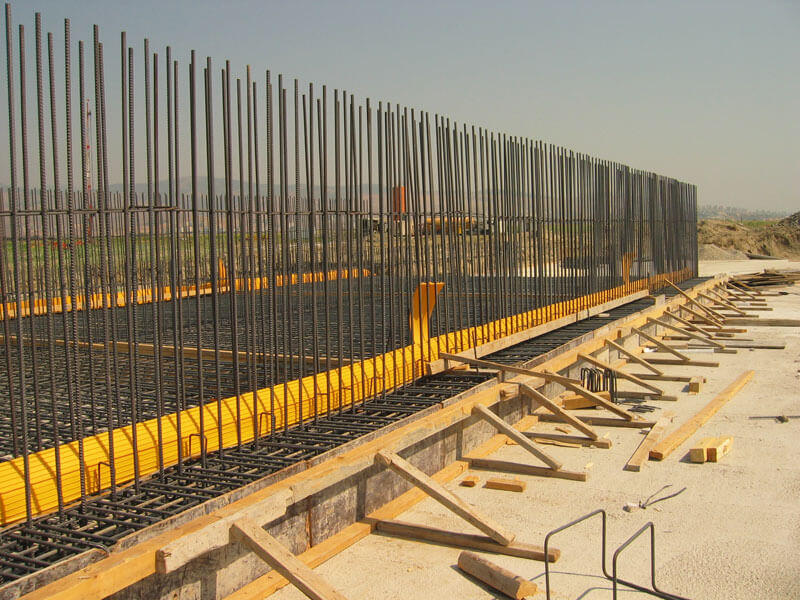
In the construction of tanks and swimming pools, the construction joint between the walls and the base is facilitated with the use of kickers, which are best cast monolithically with the base slab. Kickers should be at least 150 mm thick, and should incorporate the water bars. Kickerless construction can be carried out by some contractors, but that will increase the risk of water penetration. However, hydrophilic (water swellable) water bars can be used when there is no kicker, and this has performed well in construction from experience.  Accurate positioning of PVC water bar is important in this case.

kicker details and water bar installation
Typical water bar and kicker details

Types of Water Stops

The most popular types of water stops are;

  • Preformed strips water stops
  • Hydrophilic or swellable water stops
  • Cementitious crystalline water stops
  • Injectable water stops

(a) Preformed Strips Water Stops

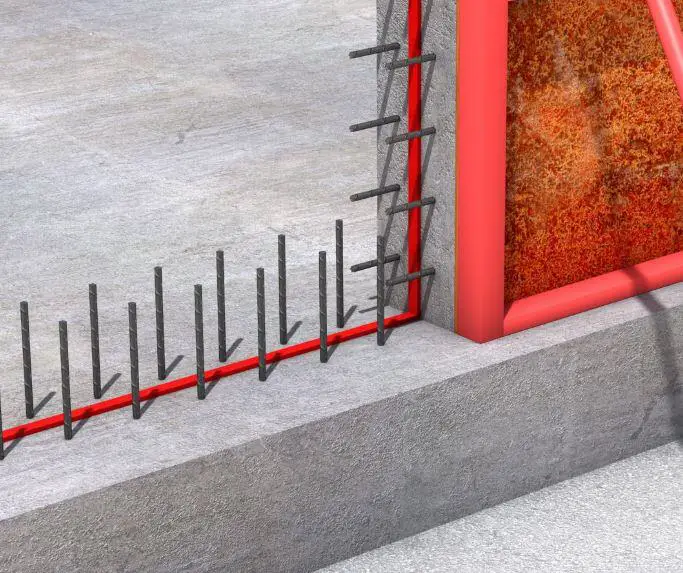
Preformed strips are made of impermeable but durable materials which are embedded in the concrete during concreting. Typically they are installed at the construction joints to provide watertight seal during movements within the joint. These are popularly called water bars. Water bars are usually made of flexible PVC material or steel, with the former being more popular. However, care must taken during placement to ensure that the flexible PVC water bar does not collapse during placement of concrete. This is the advantage that steel water bar has over PVC water bar . Steel water bar is usually made of 1.5 mm thick black steel or stainless steel, which by virtue of its stiffness remains permanently in place during concreting.

pvc water bar
PVC water bar arrangement
water stop
Typical application of PVC water bar in construction

Preformed water stops are better used with kickers as described above.

(b) Hydrophilic/Swellable Water Stops

These water stops are produced with hydrophilic material which swells and develops a sealing pressure when it comes in contact with water. They are usually bonded or nailed to the old concrete before the first pour of the new concrete and their use is limited to joints where the movement is low. Swellable water bars are popular in kickerless construction.

hydrophilic water bar 1
Hydrophilic or swellable water bar

For swellable water bars to be effective, the strip must lie flush with the substrate (hardened concrete). Appropriate care must also be taken at the joints to ensure that there will be no room for water penetration.

(c) Cementitious Crystalline Water Stops

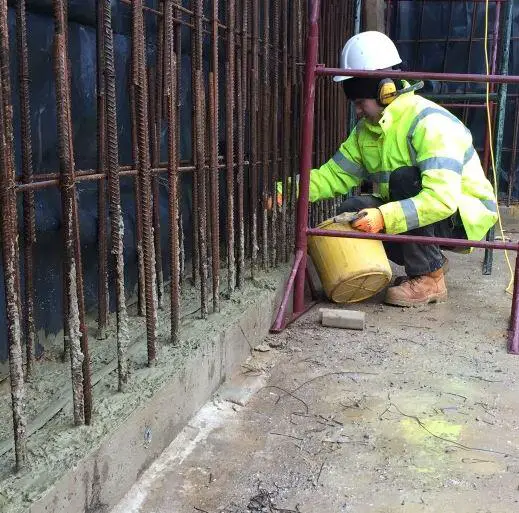
The water stopping action of this material is from salt crystallisation in the presence of water within the pores and capillaries of the concrete.  They are prepared by mixing cement, fillers, and chemicals on site as slurry, which is then applied on the surface of the old concrete before pouring the new concrete. They are not suitable for use in expansion joints but construction joints only.

KWS application
Cementitious crystalline water stops

(d) Injectable Water Stops

With this method, resins or other proprietary fluid in injected under pressure through perforated or permeable hoses/tubes that have been preinstalled on the old concrete before the pour of the new concrete. This is done after temperature and shrinkage movements have stabilised sufficiently, and the resin flows out of the hose into cracks, fissures or holes in the joint, thereby sealing the water paths in the joint. This is suitable for construction joints only.

injectable water bar
Injectable water stops

Structville Announces Webinar on Design of Roof Trusses (July, 2020)

In our core commitment to provide a flexible platform for learning, improvement, and disseminating civil engineering knowledge, we are delighted to announce that we will be holding our webinar for the month of July, 2020. Details are as follows;

Theme: Structural Design of Roof Trusses
Date: Saturday, 4th July, 2020
Time: 7:00 pm (WAT)
Platform: Zoom
Fee: NGN 1,500 only ($5.00 USD)

Features:

  • Introduction to structural behaviour of trusses
  • Types of trusses
  • Analysis of trusses
  • Design of Steel trusses
  • Interactive question and answer sessions
  • Detailing of trusses and connections

To book a space for this webinar, click HERE.

For more information, contact:
WhatsApp: +2347053638996
E-mail: info@structville.com

3DGENERALROOF

Over a time of about 4 years, www.structville.com has published over 200 free unique articles on different topics in civil engineering, and continues to get better. We sincerely appreciate the patronage and support we have received over the years, as more and more people all over the world continue to benefit from the services we offer. We look forward to an exciting future together in the civil engineering community. God bless us all.

WhatsApp Image 2020 06 26 at 2.54.37 PM 1

Massive Diaphragm Wall Reinforcement Installation (Video and Discussion)

A video was recently shared on Linkedin showing a huge and long reinforcement cage for a diaphragm wall being put in place. Please watch the video below.

Some professionals who viewed the video suggested that the reinforcement cage would have be done in segments, in order to guarantee the quality of the concreting. To understand the perspectives properly, let us look at what a diaphragm wall is.

Diaphragm wall is a continuous reinforced concrete wall constructed under the ground. The depth of a diaphragm walls can get up to 25m-50m, and they are constructed in-situ, panel by panel. As a result, the excavation works begin with the mechanical grep being lowered to the ground by a crawler crane and taking excavation. Some of the functions of diaphragm walls are;

  • As a retaining wall
  • As a cut-off provision to support deep excavation
  • As the final wall for basement or other underground structure (e.g. tunnel and shaft)
  • As a separating structure between major underground facilities
  • As a form of foundation (barrette pile – rectangular pile)

Knowing that such construction and concreting must be done at great depth which may not be easily accessible for human inspection, it would be impractical to prepare the reinforcement cage in segments. The option for quality work to ensure properly consolidated concrete will have to come from the contractor through professional concreting and carefulness using pumps. Let us look at some of the comments from the post.

Why? are they trying to save on lap joints? this structure can be cast cheaply on hop up instead of using hugely expensive cranes. And how will they keep it safe while they are casting it not to mention tensile forces from all that rebar flapping around..

It’s diaphragm wall & tremie will be used to pour concrete to avoid segregation of concrete due to higher level. On time casting Ensures integrity and no weak point in structure as after casting excavation will be done on one side, other side would add large earth pressure.

Wow that is a deep one, the concrete pour must be exceptionally well controlled to ensure no voiding

Someone asked,

Unbelievable… How all this height of reinforcing steel cage stable? …. we need explanation

The response given to the question is shown below;

Standard procedure for a diaphragm wall completed in sections. There will be spacers to keep the cage in position. If you go onto any installer web page you will see the procedure in detail or watch on youtube
Other important comments are as follows;

This is for Diaphragm wall. Placing concrete is not the problem . The main problem if any defects happens that’s the challenge.

Appears to be for a diaphragm wall or the like, hence the trench. Tremie pipes would likely be used for the placing of the concrete.

There is no vibrators used in such castings. Pouring concrete using tremie pipes in. Especially the pit is filled with slurry or fluids to support unstable soil strata until concreting.

Really a daring try.. Assuming the concreting by ultra high performance SSC without vibrators. But what it’s going to shore for what depth. Also I assume the above comment on segments are for rebar cages not the concreting or construction as the diaphragm walls shall go in single pore (please correct me if wrong). So the question is what for this not how!

In 1970 Diaphram wall of length 25+ meter were cast in Kolkata Metro Project using tremie for concrete placement. The entire pit was dug using grab cutter and used to be filled with bentonite slurry for stability of the pit.

I understand that Self Compacting concrete with allowable aggregate with allowable degree of strength gain during pour without cold joints will be a good option.

Very interesting video. Diaphragm walls have been used in UK reaching depths about 40m in circular shape. From the design point of view, it has been a challenge in all aspects as numerical modelling, groundwater strategy, tolerances, etc

Thank you so much for reading. I hope you have learnt something from the discussion. If you have some time to spare, you can take some free online quiz to refresh your mind on some important topics in Civil Engineering.

Difference Between Bridge and Culvert

It is generally said that all culverts are bridges but not all bridges are culverts. Bridges are structures that are designed to span over physical obstacles such as water bodies, valleys, or existing highways (fly over bridges). The commonest distinction that is made between bridges and culverts is that the span of culverts is not expected to exceed 6 m, otherwise it should be regarded as a small bridge.

According to the American Association of State Highway and Transportation Officials (AASHTO) the definition of bridges includes culverts with openings measuring more than 6.1 m (20 ft) along the centerline of the road, and also includes multiple pipes where the distance between openings is less than or equal to half of the pipe opening. What this means is that in some cases, multi-cell culverts can also meet the definition of a bridge. However, every site condition is unique and there can be cases where this distinction cannot be very express. But in specific terms, culverts are smaller structures with peculiar features when compared with bridges which are more elaborate structures.

The traditional definition of culvert has been based on span length instead of function.

A culvert is defined in the Standard Specifications as any structure, whether of single- or multiple-span construction, with an interior width of 6.096 m (20 ft.) or less when the measurement is made horizontally along the center line of the roadway from face-to-face of abutments or sidewalls. Structures spanning more than 6.096 m (20 ft.) along the center line of the roadway are considered bridges.

It will be interesting to look at some of the distinctions between the components of bridges and culverts, especially for a water body crossing.  

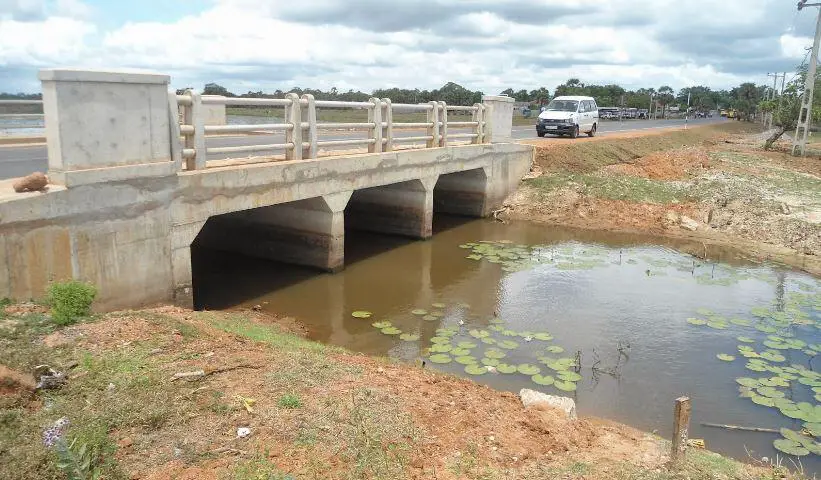
A typical bridge will consist of a bridge deck and abutment. There may or may not be intermediate piers depending on the span and the structural scheme adopted. The structural component of a bridge which interacts with the soil are the mainly the abutments and wing walls only. However for culverts, all parts of the culvert interacts with the surrounding soil, or in some cases, all parts will interact with the surrounding soil except the top slab. This is mainly because culverts are tunnel-like structures and are generally referred to as buried structures.

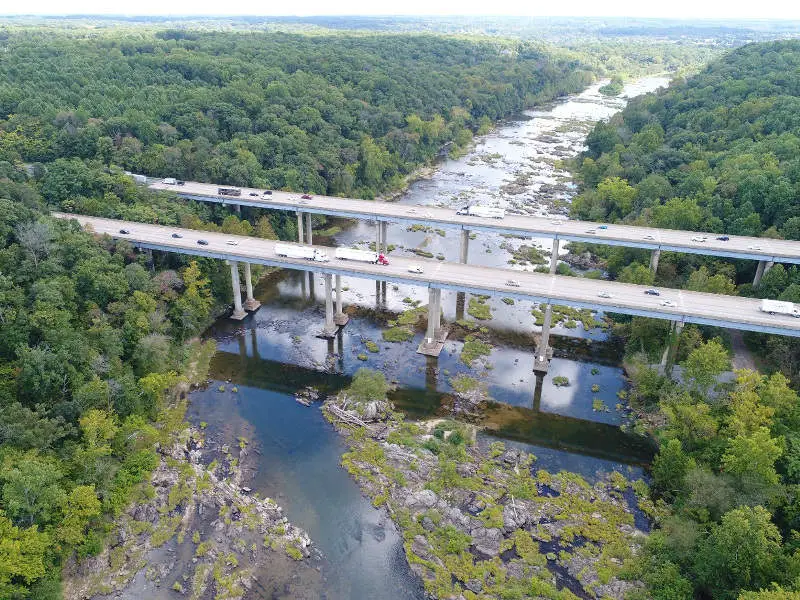
River crossing bridge

Deep foundations or special foundations are usually required for transferring the load from bridge decks to the soil, but the loads from box culverts are usually transferred to the surrounding soils without the need for additional special foundation. The bottom slab of culverts usually acts as the medium for conveying storm water and as the foundation as the same time. In essence, spread footings are usually very adequate for box culverts. Also, the friction between the side walls of a culvert and the surrounding soil offers some shaft resistance in supporting the buried structure, that is why a backfill material must be of very high quality. When a large volume of water is anticipated with considerably deep stream bed, box culverts cannot be an option.

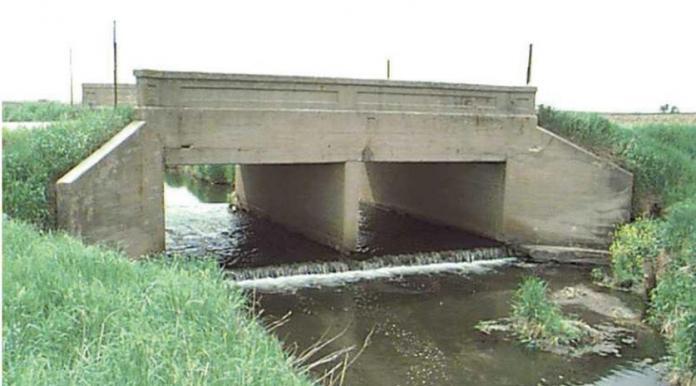
Typical culvert
Typical multi-cell culvert

Culverts receive less attention than bridges because they are buried structures, and when they are performing satisfactorily, they are easily forgotten. Furthermore, the failure of culverts is usually less disastrous and expensive than failure of bridges. However, failure of culverts crossing a road can pose life threatening and environmental hazards to human beings and animals.

Hydraulically, culverts are designed for peak flow with the consideration that the inlet is fully submerged. This is for proper performance and discharge of the flow but such considerations are not made for bridges. For bridges crossing a water body, the basic consideration will be to ensure that the deck doesn’t get submerged, or other considerations to ensure that boats, canoes, and floating debris can flow through freely without impacting the bridge deck. Data of the highest water level of the stream is usually very sufficient for this.

NEW!!! Thank you for reading. If you have some time, take our newly introduced free and mind refreshing quiz HERE.

Wheel Load Dispersal on Box Culverts

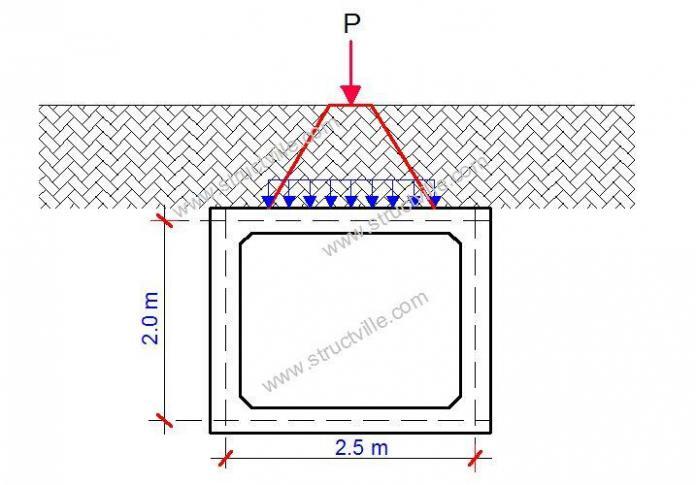
Typically, anyone who wishes to design box culverts should be very familiar with design loading for bridges. In the UK and European Union, the person should be familiar with BS 5400 Part 2 and EN 1992-2. This is because the traffic actions transferred to the members of a box culvert are very similar to that of bridges, and of course taking into account the peculiarities of box culverts due to the fact that they are usually buried under the ground. Hence, traffic actions such as wheel load is dispersed to the roof slab of the culvert as uniformly distributed load depending on the thickness of the earthfill.

The loadings on a box culvert according BS 5400:Part 2 and implemented by BD 37 are ;

(i) Permanent Loads

  • Dead Loads
  • Superimposed Dead Loads
  • Horizontal Earth Pressure
  • Hydrostatic Pressure and
  • Buoyancy
  • Differential Settlement Effects

(ii) Vertical Live Loads

  • HA or HB loads on the
  • carriageway
  • Footway and Cycle Track Loading
  • Accidental Wheel Loading
  • Construction Traffic

(iii) Horizontal Live Loads

  • Live Load Surcharge
  • Traction
  • Temperature Effects
  • Parapet Collision
  • Accidental Skidding
  • Centrifugal Load

For the sake of this article, our attention will be on vertical wheel load dispersal on box culverts.

HA and HB Carriageway Loading

The nominal carriageway loading shall be HA or HB Loading as described in BD 37, whichever is the more onerous.

(a) HA Loading

(i) Where the depth of cover (H) is 0.6 m or less, HA loading shall consist of the HA UDL/KEL combination. No dispersion through the fill of either the HA UDL or the HA knife edge load shall be applied.

(ii) For cover depths exceeding 0.6 m, the HA UDL/KEL combination does not adequately model traffic loading. In these circumstances the HA UDL/KEL combination shall be replaced by 30 Units of HB loading, dispersed through the fill as described in paragraph (c) below.

(iii) Account shall also be taken of the single 100 kN HA wheel load, (dispersed through the fill as described in paragraph (c) below), where this has a more severe effect on the member under consideration than the loads described in (i) or (ii) above.

(b) HB Loading

(i) 45 Units of HB loading shall be applied on structures on Trunk Roads and Motorways. On structures on other Public Highways, 30 Units shall be applied unless a higher value is specified by the Overseeing Organisation.

(ii) A minimum of 30 Units of HB loading shall be applied to all structures including those that are designated to carry HA loading only.

(c) Dispersal of Wheel and Axle loads through the Fill

(i) All wheel loads shall be assumed to be uniformly distributed at ground level over a contact area, circular or square in shape, based on an effective pressure of 1.1N/mm2.

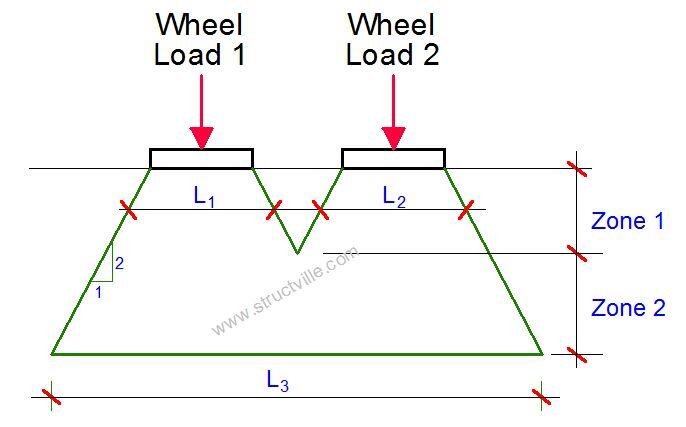
(ii) Dispersion of a wheel load through the fill may be assumed to occur both longitudinally and transversely from the limits of the contact area at ground level to the level of the top of the roof at a slope of 2 vertically to 1 horizontally as shown in Figure 2.3. Where the dispersion zones of the individual wheels overlap, they may be combined and distributed jointly as shown in Figure 2.3 (Zone 2). This applies to adjacent wheels on the same axle and to wheels on succeeding axles.

(iii) Where however any individual wheel is located close to the edge of the structure such that its 2:1 dispersal zone is curtailed by a headwall, the increase in pressure near to the headwall shall be taken into account. This may be done by assuming that the load is dispersed transversely over the curtailed width of the 2:1 dispersal zone.

(v) A wheel load not directly over the part of the structure being considered shall be included if its dispersion zone falls over the part of the structure.

Load dispersal schematic diagram
Schematic diagram of wheel load dispersion on culverts

(d) Dispersal of the Wheel and Axle Loads through the Roof Slab.

Where the dispersed width of the wheel or axle at roof level is less than the spacing between adjacent joints (Lj), a further lateral dispersal of the load may be made at 45o down to the neutral axis of the roof slab (at depth hna) so that:

A single wheel is dispersed over a total width of C + H + 2hna
An axle is dispersed over a total width of C + (n-1)S + H + 2hna

where:
n is the number of wheels on an axle
S is the wheel spacing and
hna is the depth from the top of the roof to the neutral axis which may for convenience be approximated to half the overall roof depth.

Dispersion through the slab at 45o cannot occur through a longitudinal joint. The above approach does not account for the distribution properties of the structure itself.

Solved Example on Wheel Load Dispersal

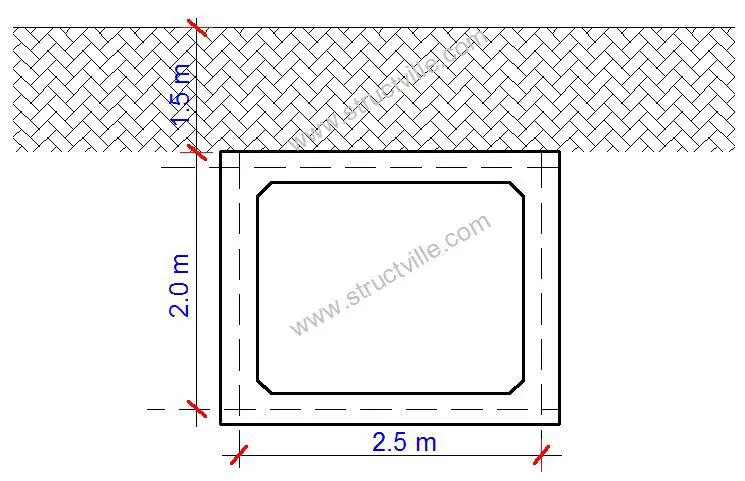
Let us consider a box culvert with the dimensions shown below. The cover of thickness of earthfill above the culvert is 1.5 m. Obtain the wheel load distribution at the roof of the culvert.

box culvert solved

Since the thickness of the cover is greater than 0.6m, we shall consider 30 units of HB or single 100 kN HA load dispersed through the culvert, and then 45 units of HB. The most onerous will govern the design.

HA 100kN wheel load

Contact patch area to produce 1.1 N/mm2 = √(100000/1.1) = 302 × 302 mm

Using 2:1 rule, the load will be dispersed to the roof of the culvert as follows;

Dispersed area on top of box = 302 + [2 × (1500/2)] = 1802 × 1802 mm

Let us assume that the thickness of the roof slab is 300 mm, and assuming that the neutral axis is 150 mm;

Dispersed width to neutral axis of box = C + H + 2hna = 302 + 1500 + (2 x 150) = 2102 mm

Wheel load on dispersed area = 100/2.1022 = 22.632 kN/m2

45 units of HB load

HB wheel load configuration

Wheel load = 45 × (10/4) = 112.5 KN

Contact patch area to produce 1.1 N/mm2 = √(112500/1.1) = 320 × 320 mm

Let us assume that there are no longitudinal joints in the structure. Therefore the code allows a transverse distribution down to the neutral axis of the roof slab (estimated as half the depth of the slab).

Depth from carriageway level to neutral axis of roof slab = 1500 + (300/2) = 1650 mm

In HB loading, 4 wheels on each axle are spaced at 1 m so, at 1:2 gradient, the transverse dispersal lines will overlap at a depth = 1000 – 320 = 680 mm < 1650 mm hence overlap and need to consider 4 wheels.

An axle is dispersed over a total width of C + (n-1)S + H + 2hna= 320 + (4 – 1) x 1000 + 1500 + 2(150) = 5120 mm
Alternatively;
Transverse dispersal of axle load = 3000 + 320 + (2 × 1500/2) + (2 × 300/2) = 5120 mm

Front and rear pair of axles are spaced at 1.8 m so, at 1:2 gradient, the longitudinal dispersal lines will overlap at a depth = 1800 – 320 = 1480 mm < 1650 mm hence we need to consider the front and rear pair of axles.

Longitudinal dispersal of axle load = C + (n-1)S + H + 2hna= 320 + (2 – 1) x 1800 + 1500 + 2(150) = 3920 mm

A little consideration will show that the dispersed length falls outside the width of the culvert, but we still go ahead to use it.

Axle load on dispersed area = 8 × 112.5 / (5.120 × 3.92) = 44.84 kN/m2

Therefore, HB loading is critical. This shows that value of 44.84 kN/m2 should be factored as appropriate, and applied on top of the culvert as a UDL for design purposes (depending on the load case of interest).

High Temperature Behaviour of Concrete Produced with Desert Sand

There has always been some issues with the use of desert sand as a construction material due to the fact that it is too rounded and uniformly graded to be suitable for construction purposes. Concrete produced from desert sand can exhibit lower strength, poor cohesion, poor slump, and poor workability when compared with River Sand. However, researchers from the College of Civil and Hydraulic Engineering, Ningxia University, China have evaluated the behaviour of concrete produced with desert sand when subjected to high temperature. The study was published in Springer – International Journal of Concrete Structures and Materials.

There have been speculations and researches on the application of desert sand in the production of ‘low carbon concrete‘, but the researchers from Ningxia suggests that desert sand has been successfully used for construction in China, citing some publications.

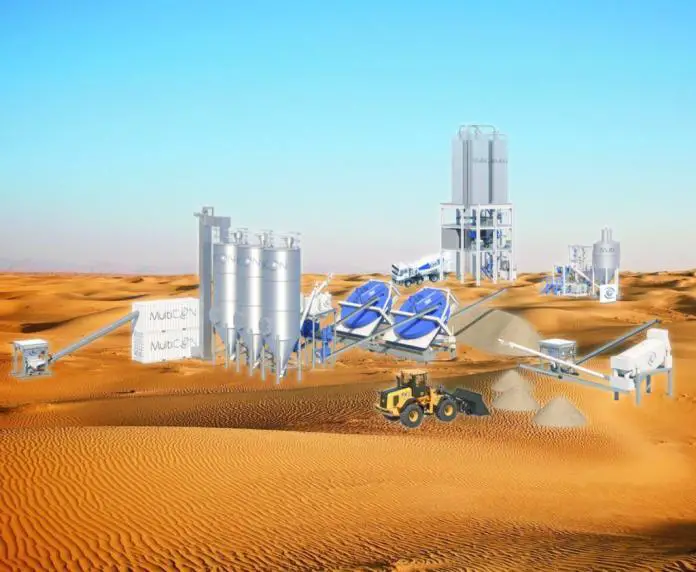
desert sand
Desert Sand

At higher temperature, the properties of concrete are usually altered. Therefore, the knowledge of the mechanical properties and behaviour of concrete at elevated temperature is important due to fire events that can occur in buildings. In previous research works, the compressive strength of ordinary and high-performance concrete have been observed to generally declined with temperature. However, the strength reduction of ordinary concrete was higher than that of high-performance concrete.

To carry out the experiment, the researchers used desert sand from Mu Us Sandy land in Yanchi Country as the fine aggregate, grade 42.5R cement, and 10-20 mm diamater crushed rock coarse aggregate.. They went ahead to study the effects of desert sand replacement rate (DSRR), temperature, and cooling regime on the elasticity modulus under static compression, cubic compressive strength and prismatic compressive strength of concrete. The influence of temperature on the microstructure of concrete produced with desert sand was also analyzed using X-ray diffraction (XRD) and Scanning Electron Microscope (SEM). After curing the samples for 28 days, CSL-26-17 heating furnace with a ultimate temperature of 1600 °C was used to carry out elevated temperature test. Target temperatures were 100 °C, 300 °C, 500 °C and 700 °C.

The results showed that the cubic compressive strength of concrete produced with desert sand increased firstly, and then declined with temperature. Whereas, the prismatic compressive strength and elasticity modulus of concrete produced with desert sand under static compression declined with temperature.

Furthermore, it was observed that the elasticity modulus under static compression, cubic compressive strength and prismatic compressive strength of concrete produced with desert sand after elevated temperature increased firstly, and then declined with DSRR. When DSRR was equal to 40%, the elasticity modulus under static compression, cubic compressive strength and prismatic compressive strength of concrete produced with desert sand reached the maximum value.

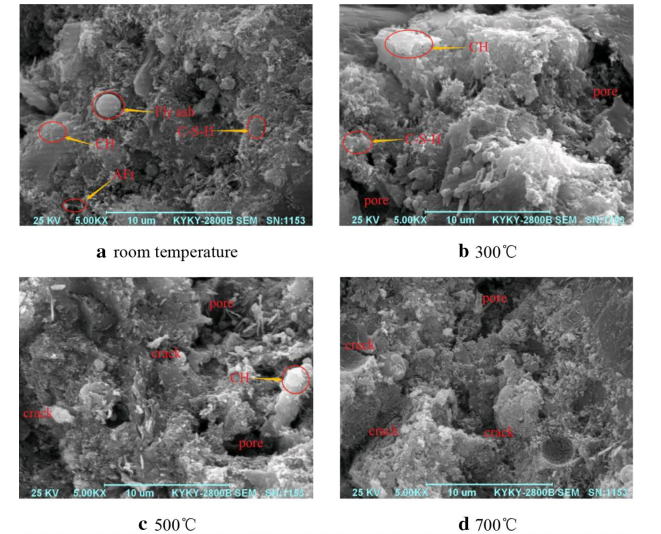
SEM view of desert sanc concrete at different temperatures 1
SEM of desert sand concrete at different temperatures (Liu et al,, 2020)

From microscopic observations, concrete produced with desert sand at room temperature was structurally-complete and had good compactness. The interface between coarse aggregate and cement mortar became more distinct after 300 °C. After 500 °C, the dimension of intact layered CH decreased and Many small pores were produced. After 700 °C, cement matrix became more shriveled and white large crystals CH were scarce.

Disclaimer
The contents of this research work has been presented on www.strutctville.com because it is licensed under a Creative Commons Attribution 4.0 International License, which permits use, sharing, adaptation, distribution and reproduction in any medium or format, as long as you give appropriate credit to the original author(s) and the source, provide a link to the Creative Commons licence, and indicate if changes were made. The images or other third party material in this article are included in the article’s Creative Commons licence, unless indicated otherwise in a credit line to the material.
To view a copy of this licence, visit http://creativecommons.org/licenses/by/4.0

Reference
Haifeng Liu, Xiaolong Chen, Jialing Che, Ning Liu and Minghu Zhang (2020): Mechanical Performances of Concrete Produced with Desert Sand After Elevated Temperature. International Journal of Concrete Structures and Materials. (2020) 14:26 https://doi.org/10.1186/s40069-020-00402-3

Vanity Walls in Toilets as an Alternative Route for Waste Pipes

For a building to be useful, the structural integrity and building services such as plumbing, electrical fittings, HVAC, etc must be functional and efficient. Unfortunately, it is common to see MEP services and pipes clash with structural members such as beams and columns in buildings. However, this can be prevented or handled in the design stage through the use of Building Information Modelling (BIM). One of the commonest solutions to avoid the clash of columns and water closet (WC) waste pipes is through the use of vanity walls behind the WC.

Read Also…
3D Building Services Systems Integration in Design of Buildings
Building Collapse – Have you exhausted your factors of safety?

Traditionally, vanities are fittings that are provided in rooms or water closets to aid storage, provide counter top and improve aesthetics. They can be wall mounted or supported on the floor, but they are typically placed next to the wall of a building, hence the name vanity walls.

vanity
Vanity around a sink in a bathroom

In our own context, the aim of the vanity is to conceal the waste pipe of the WC, and to also avoid clashing of the waste pipe with the columns of the building. This is usually dependent on how the architect positioned the WC. Some contractors observe the very bad practice of chiseling structural members to allow pipes and services pass through. This is completely unacceptable and should be discouraged.

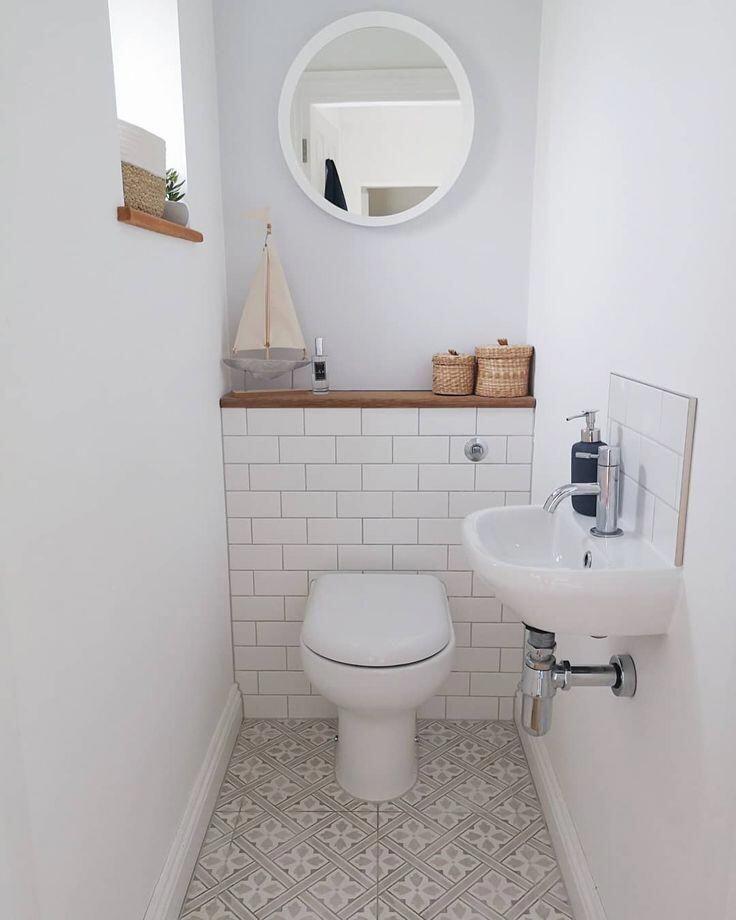
Some modern designs of WC require vanity walls by default (to accommodate the water cistern), but in some cases vanities can be constructed using properly finished sandcrete walls to provide an alternative route for waste pipes, especially when the position of the WC is not very favourable. To be favourable to plumbers, WC’s are usually positioned to back an external wall. However, when a WC is backing an internal wall, the waste pipe may clash with some sensitive structural members, and vanities may be needed. The height of the vanity can be properly raised to accommodate the flush cistern, and the top can also provide some storage as shown in the image below.

wc 1
Vanity accommodating WC waste pipe, cistern tank, and providing counter top storage

We are going to use an example to show how vanities can be used to avoid waste pipe conflict with columns.

Floor plan 1
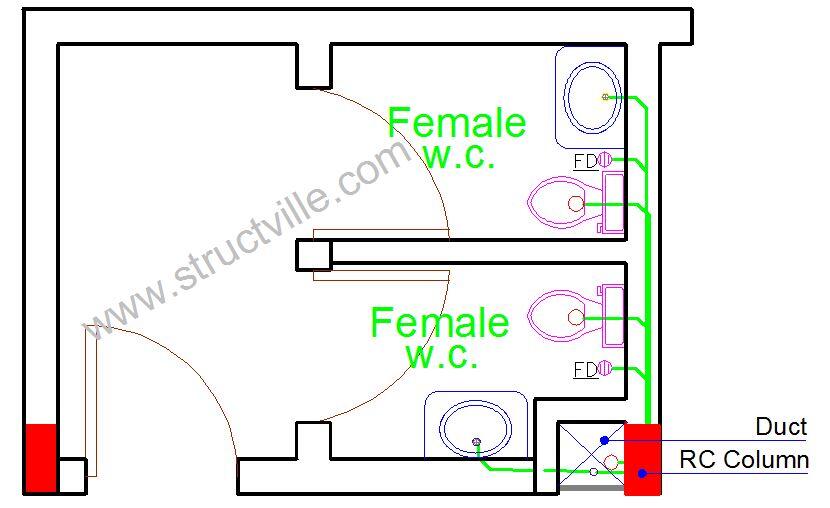
Original drawing showing route of waste pipes

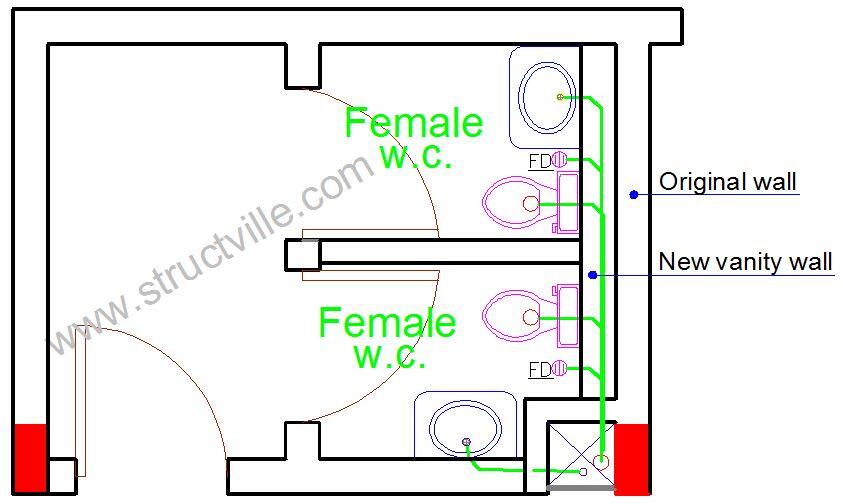
In the floor plan shown above, a WC is provided adjacent to an internal wall, and the location of the duct is as shown in the plan layout. A little observation of the preliminary drawing shows that the route of the discharge pipe (in green lines) is conflicting with the column close to the duct (all columns are highlighted in red). To solve this problem, a vanity wall can be provided adjacent to the main wall as shown below. The new route of the waste pipes as they pass through non-structural members directly to the duct can also be observed in the new layout.

Floor plan 2
Introduction of vanity walls as an alternative route for waste pipe

The only disadvantage of this method is that the size of the toilet will be reduced by size of the vanity wall introduced, but it is usually a viable solution.

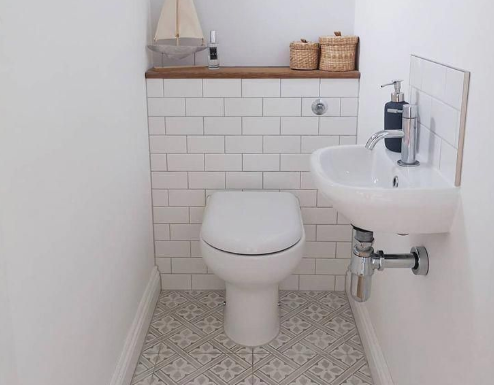
vanity wall 2
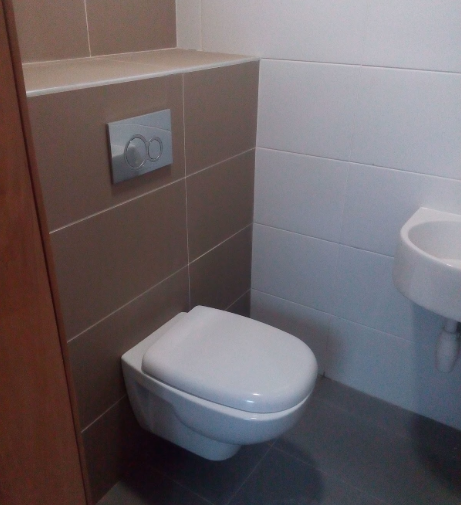
Toilet with vanity walls

Building construction requires good technical coordination among all the consultants at the design stage. By so doing, all potential conflicts and difficulties that can be encountered during construction will be minimised.

The Two Aspects of Civil Engineering – How Do You Hire the Right Person?

The civil engineering industry is wide and unique. There are different fields in civil engineering such as structures, highway and transportation, water resources, environmental, and geotechnical engineering. Each of these fields appear unique in their own way, but one common thing among them is that there will always be design, and then execution (construction). Therefore, I will describe the two aspects of civil engineering as design and construction. Having experienced both faces of the industry, I can confidently talk about the characteristics of each aspect.

Read Also…
What is site-instruction?
Top civil engineering consultancy firms in Nigeria

A design engineer/consultant

A design engineer deals with lines, shapes, figures, numbers, calculations, regulations, and codes of practice. This is usually done on a paper or on a computer. The final output of a design engineer is a construction drawing or model which is taken to site for execution. Therefore, a design engineer must be technically skilled with good analytical capacity. He should be computer literate, and good with numbers. A knowledge of the requirements of the building code of practice is a must, and he should have the basic ones on his fingertips without consulting any literature. His knowledge in his area of expertise should be vast.

For instance, a structural engineering consultant should be able to talk about the stresses he is expecting in any part of a structure, and the acceptable disposition of reinforcements. A geotechnical engineer on looking at soil report and diameter of a pile should be able to say something about the expected range of safe working load of the pile. A water resources and environmental engineer should be able to stand on his feet and talk about effluent water treatment design of an industry and so many more.

These people are the consultants, and they do not do the dirty job in civil engineering. Since they are mainly office guys, they should always dress smart, and be able to communicate eloquently. Whenever they visit a construction site, it is usually for inspection, supervision, sign-off, or site meetings. Anybody who is not intellectually smart has no business being in consultancy. This is because they are the people that the man on site will call once there is any challenge, and he should be able to say something meaningful while standing on his feet. Construction projects are usually time-bound, and there should be no room for delay from any stakeholder. If the challenge on site is a major one, he should be able to issue the right instruction and then provide the solution in the shortest possible time. This is because he made the design.

design engineer

The expected qualities and characteristics of a civil engineering consultant are as follows;

  • Good communication skills (written and oral)
  • Strong analytical skills
  • Sound theoretical knowledge of civil engineering
  • Good knowledge of latest industry codes and standards
  • Good computer skills
  • Ability to make good engineering judgement
  • Ability to provide technical leadership
  • Confidence and integrity

Civil engineers who will end up in the design office as consultants usually have a minimum CGPA of 3.5 on a 5.0 scale. This does not mean that people will lower class of degree cannot be consultants if they develop themselves. They are usually mathematically sound, and find topics in structural engineering interesting. They can be software enthusiast, always looking out for the latest engineering software that will make their work easier. Typical consultants may have a hard time adjusting to full time site conditions, especially if they have not had a prior site experience. Furthermore, they can be distracted by designs and other unrelated activities when given a site to manage.

Read Also…
Cement Standards and Applications in Nigeria
How to plaster a block wall

Site engineers/construction managers

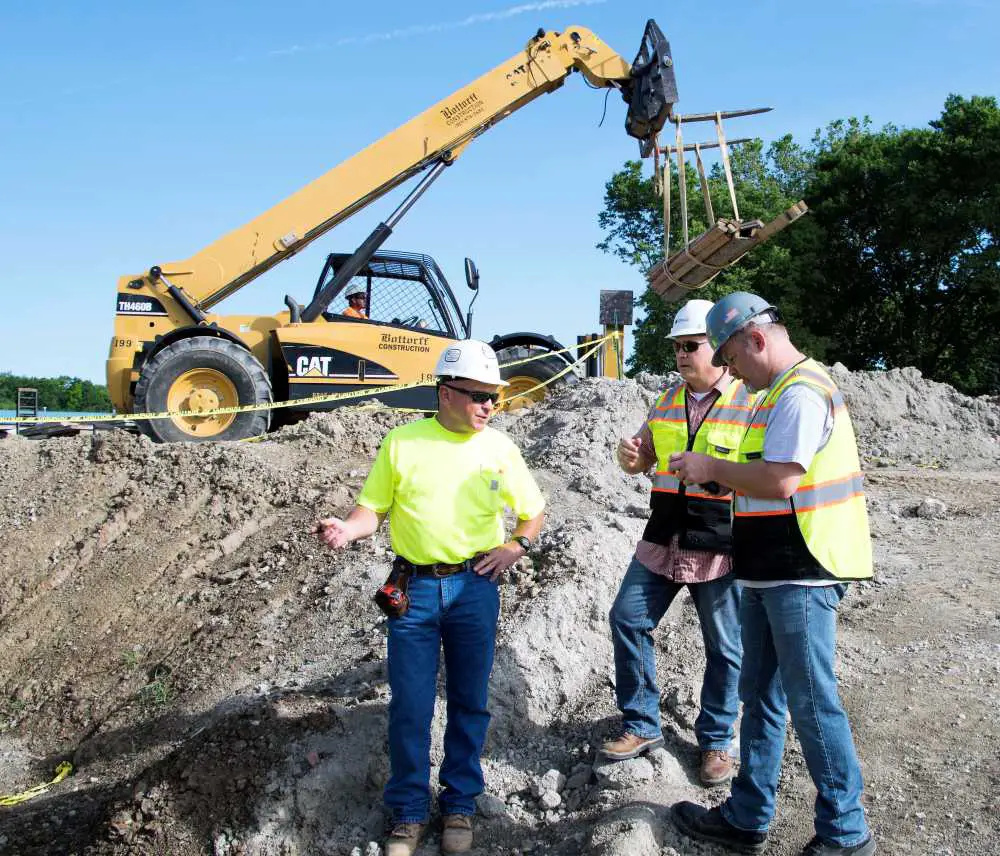
A contractor takes over a site after receiving the approved drawings and contractual terms to go ahead and build what the consultant has designed. A site manager deals with a lot of issues that are wider than what a design engineer faces. He is interested in understanding ALL the technicalities in the drawings handed over to him. Building construction drawings comprise of architectural drawings, structural drawings, mechanical drawings, and electrical drawings. He is also expected to have construction methodology document and standard safety policy documents. As a matter of fact, all the ‘madness’ experienced by people in different professions is experienced by the man on site.

construction 2

A site manager is always dealing with workers, sub-contractors, logistics, quality control, safety, time, technical accuracy, and general management. While technical ability is the key characteristic of a design engineer, managing people is the key characteristic of a site manager. This is because his success or failure depends on people.

As a result of this, people from other related professions such as architecture, building, and quantity surveying can function satisfactorily as site managers provided they follow instructions. The fundamental ability needed by a site manager is the capacity to read and understand construction drawings properly. Once he can do that satisfactorily, the rest has to do with his leadership and managerial skills. A site engineer is expected to meet his targets, and must always have a working plan of achieving them.

The expected qualities of a site manager are as follows;

  • Focus and result oriented
  • Human multitasking
  • Good people management skills
  • Integrity and resolve to always do the right thing and not cut corners
  • Good technical ability
  • Resources management
  • Good communications skills (written and oral)
  • Being proactive
  • Team player
  • Ability to think ahead
  • Good organisation and planning skills
  • Positive vibes and energy
  • Possession of relevant construction skills and use of common site equipment/tools

The highest technical skill required of a site manager is the ability to produce as accurately as possible, what the consultant has designed. With experience, he can however make suggestions on how the construction can be made better. This however is a function of training. A site manager with background in building or architecture will be more natural with the shell of a structure such as masonry works and finishes, while someone with structural engineering background will be more natural with the core of the structure such as reinforcements, concrete mixes, and formwork. What an architect will call the structural engineering consultant for might not bother someone with civil engineering background.

A site manager must always have an open communication line, and makes a lot of phone calls in a typical day at work. He is meant to coordinate the activities of sub-contractors such as electricians, plumbers, HVAC contractors, carpenters, interior decorators, etc. He is also meant to coordinate logistics and delivery of materials to site. During site meetings and inspections, he is supposed to lead the team around the site, and offer report on the progress of work, his targets, and the challenges they are facing. Typically, a good site manager should see challenges ahead of time and work against them from the onset. However, with the dynamics of a typical construction site, whenever an unexpected challenge comes up during construction, he should rise to the challenge and solve it immediately.

site construction manager

With all these, it is therefore obvious that site managers do not work alone. It is basically about people, and he is meant to offer leadership and direction at all levels. A site manager may not necessarily be a high flying academic guru. The key thing in hiring a site manager should be the person’s passion for construction, and his basic training.

A typical site manager doesn’t like to do designs, and will prefer to work with someone else’s drawing. Making designs during an ongoing project is a distraction for a site manager. A site engineer should be focused on the project a hand, and typically thinks about the project and makes plans for the following day before sleeping. His first activity in the morning could be calling a sub-contractor or supplier to know if he is already on his way to site.

Therefore, recruiters should watch out for the passion of the person they are hiring. Being passionate for either design or construction does not make you less an engineer. Do not fall for the stereotype that you should excel in both; it is not necessarily the true. Design and construction are two special but closely related aspects of engineering. From experience however, people with site experience tend to make better and more efficient design than people without site experience.

Find your passion, monetize it properly, work hard, and live your dream life. God bless civil engineers all over the world.