8.7 C
New York
Monday, October 28, 2024
Home Blog Page 63

Structural Analysis of Determinate Arch-Frame Compound Structure

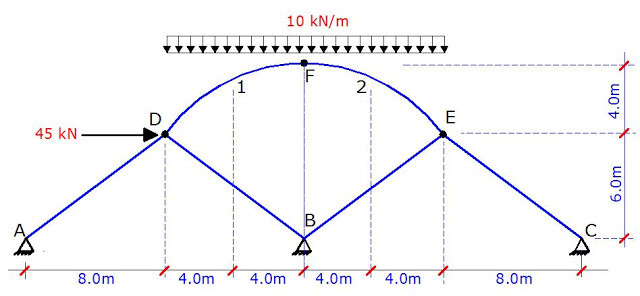
A parabolic arch structure is hinged on two interacting trusses as shown in the image above. The arch is also hinged at the crown (point F). We are expected to obtain the internal forces acting on the structure due to the externally applied uniform load on the arch, and the horizontal
concentrated load at point D. Since the arch is hinged on the truss, we can decompose the structure, and analyse the arch as a three-hinged arch, after which we transfer the support reactions from the arch to the truss. The detached arch structure is as shown below;

SUB%2BARCH%2BSTRUCTURE

Support Reactions

∑ME = 0
16Dy – (10 × 162)/2 = 0
Therefore, Dy = 1280/16 = 80 KN
A little consideration from symmetry will also show that Ey = 80 KN

∑MFL = 0
8Dy – 4Dx – (10 × 82)/2 = 0
8(80) – 4Dx – (10 × 82)/2 = 0
– 4Dx + 320 = 0
Therefore, Dx = 320/4 = 80 KN = Ex

Geometric Properties of the Arch Section

The ordinate of the arch at any given horizontal length section is given by;

y = [4yc (Lxx2)] / L2

Where yc is the height of the crown of the arch
y = [(4 × 4) × (16xx2)]/162 = x – (x2/16)

dy/dx = y’ = 1 – x/8

At x = 0; y = 0
y’ = 1 – 0/8 = 1
sin⁡θ = y’/√(1 + y’2) = 1/√(1 + 12) = 0.7071
cos⁡θ = 1/√(1 + y’2) = 1/√(1 + 12) = 0.7071

At x = 4m;
y = x – x2/16 = 4 – (42/16) = 3m
y’ = 1 – 4/8 = 0.5
sin⁡θ = y’/√(1 + y’2) = 0.5/√(1 + 0.52) = 0.4472
cos⁡θ = 1/√(1 + y’2) = 1/√(1 + 0.52) = 0.8944

At x = 8m;
y = x – x2/16 = 8 – (82/16) = 4m
y’ = 1 – 8/8 = 0
sin⁡θ = y’/√(1 + y’2) = 0/√(1 + 0.52 ) = 0
cos⁡θ = 1/√(1 + y’2) = 1/√(1 + 0) = 1.0

At x = 12m;
y = x – x2/16 = 12 – (122/16) = 3m
y’= 1 – x/8 = 1 – 12/8 = -0.5
sin⁡θ = y’/√(1 + y’2) = (-0.5)/√(1 + 0.52) = -0.4472
cos⁡θ = 1/√(1 + y’2) = 1/√(1 + 0.52 ) = 0.8944

At x = 16m;
y = x – x2/16 = 16 – (162/16) = 0
y’= 1 – 16/8 = 1 – 12/8 = -1.0
sin⁡θ = y’/√(1 + y’2) = (-1.0)/√(1 + 12 ) = -0.7071
cos⁡θ = 1/√(1 + y’2) = 1/√(1 + 12 ) = 0.7071

Internal Stresses in the Arch StructureBending Moment
MD = 0
M1 = (80 × 4) – (80 × 3) – (10 × 42)/2 = 0
MF = (80 × 8) – (80 × 4) – (10 × 82)/2 = 0
M2 = (80 × 12) – (80 × 3) – (10 × 122)/2 = 0
ME = 0

Shear force
Qi = ∑V cos⁡θ – ∑H sin⁡θ
QD = (80 ×0.7071) – (80 × 0.7071) = 0 (No shear)
Q1L = Q1R [80 – (10 × 4)] × 0.8944 – (80 × 0.4472) = 0 (No shear)
QF = [80 – (10 × 8)] × 1.0 – (80 × 0) = 0 (No shear)
Q2L = Q3R = [80 – (10 × 12)] × 0.8944 – (80 × -0.4472) = 0 (No shear)
QE = [80 – (10 × 16)] × 0.7071 – (80 × -0.7071) = 0 (No shear)

Axial force
Ni = -∑V sin⁡θ – ∑H cos⁡θ
ND = -(80 × 0.7071) – (80 × 0.7071) = -113.136 KN (Compression)
N1L = -[80 – (10 × 4)] × 0.4472 – (80 × 0.8944) = -89.44 KN
NF = -[80 – (10 × 8)] × 0 – (80 × 1) = -80 KN (Compression)
N2L = N3R = -[80 – (10 × 12)] × -0.4472 – (80 × 0.8944) = -89.44 KN
NE = -[80 – (10 × 16)] × -0.7071 – (80 × 0.7071) = -113.136 KN

We now transfer the reactive forces from the arch section to the the supporting trusses below;

sub%2Btruss%2Bstructure

θ = tan-1⁡(6/8) = 36.869°
cos⁡θ = 0.8
sin⁡θ = 0.6

Analysis of Joint D

joint%2BD

∑FX = 0
-35 – 0.8FAD + 0.8FDB = 0
– 0.8FAD + 0.8FDB = 35 —————- (1)

∑FY = 0
-80 – 0.6FAD – 0.6FDB = 0
– 0.6FAD – 0.6FDB = 80 —————- (2)

Solving (1) and (2) simultaneously;
FAD = -88.542 KN (Compression)
FDB = -44.792 KN (Compression)

Analysis of joint E

JOINT%2BE

∑FX = 0
80 – 0.8FBE + 0.8FEC = 0
– 0.8FBE + 0.8FEC = 80 —————- (3)

∑FY = 0
-80 – 0.6FBE – 0.6FEC = 0
– 0.6FBE – 0.6FEC = 80 —————- (4)

Solving (3) and (4) simultaneously;
FBE = -16.667 KN (Compression)
FDB = -116.667 KN (Compression)

Support Reactions

We will obtain the support reactions by resolving the joints.

Support A

SUPPORT%2BA

∑FY = 0
Ay + 0.6FAD = 0
Ay – (0.6 × 88.542) = 0
Ay = 53.1252 KN

∑FX = 0
Ax + 0.8FAD = 0
Ax – (0.8 × 88.542) = 0
Ax = 70.8336 KN

Support B

SUPPORT%2BB

∑FX = 0
Bx – 0.8FBD + 0.8FBE = 0
Bx – (0.8 × -44.792) + (0.8 × -16.667) = 0
Bx = -22.5 KN

∑FY = 0
By + 0.6FBD + 0.6FBE = 0
By – (0.6 × 44.792) – (0.6 × 16.667) = 0
By = -36.8754 KN

Support C

SUPPORT%2BC

∑FY = 0
Cy + 0.6FEC = 0
Cy – (0.6 × 116.667) = 0
Cy = 70 KN

∑FX = 0
-Cx – 0.8FEC = 0
-Cx – (0.8 × -116.667) = 0
Cx = 93.333 KN

Equilibrium Verification

∑FY ↓ = (10 × 16) = 160 KN
∑FY ↑ = Ay + By + Cy = 53.1252 + 36.8754 + 70 = 160 KN

∑FX → = 45 + 70.833 = 115.833 KN
∑FX ← = 22.5 + 93.333 = 115.833 KN

Internal Stresses Diagram

As you can see, there are no bending moment and shear forces on the structure, therefore, the axial force diagram is as given below;

AXIAL%2BFORCE%2BDIAGRAM
Thank you for reading. We love you and keep visiting us.
Connect on our Facebook page

Design of Steel Beams According to BS 5950 – 1: 2000

Universal beam sections are normally employed in buildings to carry floor and wall load. Loads on beams may include the load from slab, walls, building services, and their own self-weight. It is necessary for structural beams to satisfy ultimate and serviceability limit state requirements. This post gives a solved design example of a laterally restrained beam according to BS 5950.

The structural design of steel beams to BS 5950 involves following specific guidelines and principles outlined in the British Standard. BS 5950 is a widely used code of practice for the design of steel structures in the United Kingdom, but has been replaced by Eurocode 3 (EN 1993-1-1).

When designing steel beams, several factors are considered to ensure structural integrity and safety. These factors include determining the appropriate loadings, selecting the appropriate section shape and size, analyzing the beam’s resistance to bending, shear, and deflection, and ensuring proper connection details.

The code specifies various load combinations, such as dead loads, live loads, wind loads, and imposed loads, that need to be considered during the design process. In terms of section selection, the code provides tables and charts to determine the suitable steel section based on the applied loads and required span. These sections include universal beams (UB), universal columns (UC), and parallel flange channels (PFC), among others. The appropriate section is chosen based on its moment resistance, shear capacity, and deflection limits.

Design calculations involve checking the beam’s capacity to resist bending, shear, and deflection. These calculations consider the applied loads, section properties, and material properties of the steel. The code provides formulas and design charts to assess these aspects.

Steel Beam Design Example

A laterally restrained beam 9m long that is simply supported at both ends support a dead uniformly distributed load of 15 kN/m and an imposed load uniformly distributed load of 5 kN/m. It also carries a dead load of 20 kN at a distance of 2.5m from both ends. Provide a suitable UB to satisfy ultimate and serviceability limit state requirements (Py = 275 N/mm2).

Solution
At ultimate limit state;
Concentrated dead load = 1.4Gk = 1.4 × 20 = 28 kN
Uniformly distributed load = 1.4Gk + 1.6Qk = 1.4(15) + 1.6(5) = 29 kN/m

Steel%2BULS


Support Reactions
Let ∑MB = 0; anticlockwise negative
(9 × Ay) – (29 × 9 × 4.5) – (28 × 6.5) – (28 × 2.5) = 0
Ay = 158.5 kN

Let ∑MA = 0; clockwise negative
(9 × By) – (29 × 9 × 4.5) – (28 × 6.5) – (28 × 2.5) = 0
By = 158.5 kN

Internal Stresses
Moment
MA = 0 (Hinged support)
MC = MD = (158.5 × 2.5) – (29 × 2.5 × 1.25) = 305.625 kNm
Mmidspan = (158.5 × 4.5) – (29 × 4.5 × 2.25) – (28 ×2) = 363.625 kNm

Shear
QA = Ay = 158.5 KN
QCL = 158.5 – (29 × 2.5) = 86 kN
QCR = 158.5 – (29 × 2.5) – 28 = 58 kN
QDL = 158.5 – (29 × 6.5) – 28 = -58 kN
QDR = 158.5 – (29 × 6.5) – 28 – 28 = – 86 kN
QB = 158.5 – (29 × 9) – 28 – 28 = – 158.5 kN

Internal Forces Diagram

Bending%2BMoment%2BDiagram%2BSteel%2BBeam


Structural Design to BS 5950

Py = 275 N/mm2

Initial selection of section
Moment Capacity of section Mc = PyS ——- (1)

Where S is the plastic modulus of the section
Which implies that S = Mc/Py = (363.625 × 10⁶)/275 = 1320963.636 mm3 = 1320.963 cm3

With this we can go to the steel sections table and select a section that has a plastic modulus that is slightly higher than 1320.963 cm3
Try section UB 457 × 191 × 67 (S = 1470 cm3)

Properties of the section;
Ixx = 29400 cm4
Zxx = 1300 cm3
Mass per metre = 67.1 kg/m
D = 453.4mm
B = 189.9mm
t = 8.5mm
T = 12.7mm
r = 10.2mm
d = 407.6mm

Strength classification
Since T = 12.7mm < 16mm, Py = 275 N/mm2
Hence ε = √(275/Py) = √(275/275) = 1.0

Section classification
Flange
b/T = 7.48 < 9ε; Flange is plastic class 1
Web
d/t = 48 < 80ε; Web is also plastic class 1

Shear Capacity
As d/t = 48 < 70ε, shear buckling need not be considered (clause 4.4.4)

Shear Capacity Pv = 0.6PyAv  —– (2)

P= 0.6PytD = 0.6 × 275 × 8.5 × 453.4 = 635893.5 N = 635.89 kN

But design shear force Fv = 158.5 kN
Since Fv(158.5) < Pv(635.89), section is ok for shear.

Now, 0.6Pv = 0.6 × 635.89 = 381.54 kN
Since Fv(158.5 kN) < 0.6Pv(381.54 kN), we have low shear load.

Moment Capacity
Design Moment = 363.625 kNm

Moment capacity of section UB 457 × 191 × 67 (S = 1470 cm3 = 1470 × 103 mm3)

Mc = PyS = 275 × 1470 × 103 = 404.25 × 10⁶ N.mm = 404.25 kNm
1.2PyZ = 1.2 × 275 × 1300 × 103 = 429 × 106 N.mm = 429.00 kNm

Mc (404.25 kNm) < 1.2PyZ (429.00 kNm) Hence section is ok

Evaluating extra moment due to self-weight of the beam
Self-weight of the beam Sw = 67.1 kg/m = 0.658 kN/m (UDL on the beam)
Moment due to self weight (Msw) = (ql2)/8 = (0.658 × 92)/8 = 6.66 kNm

(363.625 + 6.66) < Mc (404.25 kNm) < 1.2PyZ (429.00 kNm) Hence section is ok for moment resistance.

Deflection Check
We check deflection for the unfactored imposed load; E = 205 kN/mm2 = 205 × 106 KN/m2; Ixx = 29400 cm4 = 29400 × 10-8 m4

SLS

The maximum deflection for this structure occurs at the midspan and it is given by;
δ = (5ql4)/384EI = (5 × 5 × 94) / (384 × 205 × 106 × 29400 × 10-8) = 7.087 × 10⁻³ m = 7.087 mm

Permissible deflection; L/360 = 9000/360 = 25mm
7.087mm < 25mm. Hence deflection is satisfactory.

Web bearing
According to Clause 4.5.2 of BS 5950-1:2000, the bearing resistance Pbw is given by:

Pbw = (b1 + nk)tPyw   —– (3)

Where;
b1 is the stiff bearing length
n = 5 (at the point of concentrated loads) except at the end of a member and n = 2 + 0.6be/k ≤ 5 at the end of the member
be is the distance to the end of the member from the end of the stiff bearing
k = (T + r) for rolled I- or H-sections
T is the thickness of the flange
t is the web thickness
Pyw is the design strength of the web

Web bearing at the supports
Let us assume that beam sits on 200 mm bearing, and be = 20mm

Web%2Bbearing

k = (T + r) = 12.7 + 10.2 = 22.9mm;
Hence n = 2 + 0.6(20/22.9) = 2.52mm < 5mm.
Pbw = (b1 + nk)tPyw
Pbw = [200 + 2.52(22.9)] × 8.5 × 275 = 602392.45 N = 602.392 kN
Pbw (602.392 kN) > Fv (158.5 kN) Hence it is ok

Contact stress at supports
Pcs = [b1 × 2(r +T )]Py = [200 × 2(22.9)] × 275 = 2519000N = 2519 kN
Pcs (2519 KN) > Fv (158.5 KN) Hence contact stress is ok

Web buckling

Web%2Bbuckling

According to clause 4.5.3.1 of BS 5950, provided the distance αe from the concentrated load or reaction to the nearer end of the member is at least 0.7d, and if the flange through which the load or reaction is applied is effectively restrained against both;

(a) rotation relative to the web
(b) lateral movement relative to the other flange

The buckling resistance of an unstiffened web is given by;

Px = [25εt/√(b1 + nk)d] Pbw —– (4)
When αe < 0.7d, the buckling resistance of an unstiffened web is given by;

Px = [(αe + 0.7d)/1.4d] × [25εt/√(b1 + nk)d)] Pbw ————- (5)

Therefore, αe = 20mm + (200/2) = 120mm
0.7d = 0.7 × 407.6 = 285.32mm
αe(120mm) < 0.7d(285.32mm). Hence equation (5) applies;

Px = [(120 + 285.32)/(1.4 × 407.6)] × [(25 × 1 × 8.5 )/√((200 + 2.52 × 22.9) × 407.6)] × 602.392 = 280.538 kN

Px(280.538 kN) > Fv(158.5 kN) Hence it is ok.

Thank you for reading, and feel free to share.

Like Our Facebook page
www.facebook.com/structville

How to Calculate the Lap Length of Reinforcements

Reinforced concrete structures rely on the effective transfer of stress between steel reinforcement bars. Lap splices, where two reinforcement bars overlap within the concrete element, are a common method to achieve this continuity. Lapping of reinforcement is a frequent occurrence in construction due to supply length limitations, construction joints, stage construction, and ease of handling of rebars.

Therefore, determining the appropriate lap length is important for ensuring structural integrity and preventing premature failure. This article discusses how to calculate the lap length for reinforcements in concrete structures.

Factors Influencing Lap Length

Several factors influence the required lap length:

  • Reinforcement diameter (Φ): Larger diameter bars require longer lap lengths for effective stress transfer.
  • Concrete grade (fck): Higher concrete strength allows for shorter lap lengths due to improved bond characteristics.
  • Reinforcement yield strength (fyk): Higher yield strength steel requires longer lap lengths to develop its full capacity.
  • Concrete cover: The thickness of the concrete cover influences the bond transfer and hence, the anchorage length.
  • Bond condition: The orientation of the reinforcement (straight or bent) and the concrete cover can lead to a good or poor bond condition which can influence the anchorage length of reinforcements.
  • Confinement conditions: The presence of stirrups or ties around the lap splice can significantly reduce the required lap length.
  • Type of Lap Splice: Standard lap splices require longer lengths compared to hooked or welded lap splices.

Methods of Calculating Lap Length

Different design codes and standards provide methods for calculating lap length. Here’s a breakdown of two common approaches:

1. Basic Lap Length Formula:
This simplified method often serves as a preliminary estimate:

Lap Length (L) = 50d

Where:
d = Reinforcement diameter (mm)

This formula assumes standard lap splices in normal concrete conditions.

2. Code-Based Calculations:
Detailed calculations are typically based on specific design codes like Eurocode 2 (EC2) or ACI 318. These codes provide equations and tables that consider various factors influencing lap length:

EC2 Method:
EC2 employs a formula that incorporates the bar diameter, concrete grade, steel yield strength, and a factor accounting for the percentage of bars lapped in one section.

ACI 318 Method:
ACI 318 provides tables with tabulated lap lengths based on bar diameter, concrete strength, and type of splice (standard, hooked, or welded).

Note:

  • Minimum Lap Length: Codes often specify minimum lap lengths regardless of calculations.
  • Development Length: Lap length should be greater than or equal to the development length of the bar, which is the minimum length required for the bar to develop its full yield strength in the surrounding concrete.
  • Longitudinal Spacing of Bars: The spacing between lapped bars within the overlap zone can affect the required lap length.
  • Lightweight Concrete: Adjustments are often necessary for lap lengths in lightweight concrete due to its lower bond strength.

Anchorage Length

Apart from the lapping of steel reinforcements, reinforcing bars should be well anchored so that the bond forces are safely transmitted to the concrete to avoid longitudinal cracking or spalling. The length of rebar required to achieve adequate transfer of forces is known as the anchorage length. Transverse reinforcement shall be provided if necessary.

Apart from straight bars, other shapes that are specified in the code are;

(a) standard bend,
(b) standard hook, and
(c) standard loop.

The detailing rules and the equivalent anchorage length for each of these standard shapes are defined in EN1992-1-1 Figure 8.1. Types of anchorage are shown in the figure below (Figure 8.1 EC2).

Anchoarage%2BLength%2Brequirements

For bent bars, the basic tension anchorage length is measured along the centreline of the bar from the section in question to the end of the bar, where:

lbd = α1 α2 α3 α4 α5 lb,req ≥ lb,min ———— (1)

where;
lb,min is the minimum anchorage length taken as follows:
In tension, the greatest of 0.3lb,rqd or 10ϕ or 100mm
In compression, the greatest of 0.6lb,rqd or 10ϕ or 100mm

lb,rqd is the basic anchorage length given by;
lb,rqd = (ϕ/4) σsd/fbd ————– (2)

Where;
σsd = The design strength in the bar (take 0.87fyk)
fbd = The design ultimate bond stress (for ribbed bars = 2.25η1 η2 fctd)
fctd = Design concrete tensile strength
fctd = 0.21fck(2/3) for fck ≤ 50 N/mm2
η1 is a coefficient related to the quality of the bond condition and the position of the bar during concreting
η1 = 1.0 when ‘good’ conditions are obtained and
η1 = 0.7 for all other cases and for bars in structural elements built with slip-forms, unless it can be shown that ‘good’ bond conditions exist
η2 is related to the bar diameter:
η2 = 1.0 for φ ≤ 32 mm
η2 = (132 – φ)/100 for φ > 32 mm

‘Good’ bond conditions are applicable when any of the following conditions are fulfilled:

(a) Vertical bars or almost vertical bars inclined at an angle 45° ≤ α ≤ 90° from the horizontal,
(b) bars that are located up to 250 mm from the bottom of the formwork for elements with height h ≤ 600 mm, or
(c) bars that are located at least 300 mm from the free surface during concreting for elements with height h > 600 mm.

‘Poor’ bond conditions are applicable for all other cases and also for bars in structural elements built with slip-forms, unless it can be shown that ‘good’ bond conditions exist. The different bond regions are shown in the figure above that is reproduced from EN1992-1-1 Figure 8.2.

Description%2Bof%2Bbond%2Bconditins%2BEC2

α1 is for the effect of the form of the bars assuming adequate cover.
α2 is for the effect of concrete minimum cover.

Effect%2Bof%2Bconcrete%2Bcover

α3 is for the effect of confinement by transverse reinforcement
α4 is for the influence of one or more welded transverse bars ( φt > 0.6φ) along the design anchorage length lbd
α5 is for the effect of the pressure transverse to the plane of splitting along the design anchorage length.

The values of these coefficients can be adequately obtained by following the Table below;

Values%2Bof%2Banchorage%2Bcoefficients

l0,min = max{0.3α6 lb,rqd; 15ϕ; 200}

α6 = √(ρ1/25) but between 1.0 and 1.5
where ρ1 is the % of reinforcement lapped within 0.65l0 from the centre of the lap

percentage%2Bof%2Blapped%2Bbars%2Beurocode%2B2

Values of α1, α2, α3 and α5 may be taken as for the calculation of anchorage length but for the calculation of α3, ΣAst,min should be taken as 1.0As(σsd/fyd), with As = area of one lapped bar.

SOLVED EXAMPLE FOR ANCHORAGE LENGTH
Calculate the design tension anchorage length of T16mm bar (fyk = 460 N/mm2, concrete cover = 35 mm, Concrete cylinder strength fck = 25 N/mm2) for;

(a) When it is a straight bar
(b) When it is bent into any other shape
Assume good bond conditions

Solution
lbd = α1 α2 α3 α4 α5 lb,req ≥ lb,min
lb,rqd = (ϕ/4) σsd/fbd
fbd =2.25η1 η2 fctd
η1 = 1.0 ‘Good’ bond conditions
η2 = 1.0 bar size ≤ 32

fctd = (αct fctk 0.05)/γc ————— (3)

where;
fctk 0.05 = characteristic tensile strength of concrete at 28 days = 1.8 N/mm2 (Table 3.1 EC2)
γc = partial (safety) factor for concrete = 1.5
αct = coefficient taking account of long-term effects on the tensile strength, this is an NDP with a recommended value of 1.

fctd = (1.0 × 1.8)/1.5 = 1.2 N/mm2
fbd = 2.25 × 1.0 × 1.0 × 1.2 = 2.7 N/mm2

lb,rqd = (ϕ/4) σsd/fbd
σsd = 0.87 × 460 = 400.2 N/mm2>br/> lb,rqd = (ϕ × 400.2 )/(4 × 2.7) = 37.05ϕ

Therefore;

lbd = α1 α2 α3 α4 α5(37.05ϕ)

(a) For straight bar
α1 = 1.0
α2 = 1.0 – 0.15 (Cd – ϕ)/ ϕ
α2 = 1.0 – 0.15 (35 – 16)/16 = 0.8218
α3 = 1.0 conservative value with K = 0
α4 = 1.0 N/A
α5 = 1.0 conservative value

lbd = 0.8218 × (37.05ϕ) = 30.4ϕ = 30.4 × 16 = 486.4 mm
Say 500 mm

(b) For other shape bar
α1 = 1.0 bCd; = 35 is ≤ 3ϕ = 3 × 16 = 48
α2 = 1.0 – 0.15 (Cd – 3ϕ)/ ϕ ≤ 1.0
α2 = 1.0 – 0.15 (35 – 48)/16 = 1.121 ≤ 1.0
α3 = 1.0 conservative value with K = 0
α4 = 1.0 N/A
α5 = 1.0 conservative value
lbd = 1.0 × (37.05ϕ) = 37.05ϕ = 37.05 × 16 = 592 mm
Say 600mm

Compression anchorage1 = α2 = α3 = α4 = α5 = 1.0)
lbd = 37.05ϕ

For poor bond conditions
Anchorage for ‘Poor’ bond conditions = ‘Good’/0.7

Good bond conditionsPoor bond conditions
Concrete class• Straight bars in tension / compression

• Other-than-straight bars in compression
• Other-than-straight bars in tension and adequate cover cd > 3Φ• Straight bars in tension/compression

• Other-than-straight bars in compression
• Other-than-straight bars in tension and adequate cover cd > 3Φ
C16/2055Φ39Φ78Φ55Φ
C20/2547Φ33Φ67Φ47Φ
C25/3041Φ29Φ58Φ41Φ
C30/3736Φ26Φ52Φ36Φ
C35/4533Φ23Φ47Φ33Φ
C40/5030Φ21Φ43Φ30Φ

Example on the calculation of lap length of 4X16mm bars of a column in a multi-storey building
Since the bars are in compression,
α1 α2 α3 α5  = 1.0
As calculated above,  lbd = 37.05ϕ

Let us say that over 50% of reinforcement is lapped within 0.65l0 from the centre of the lap
Hence, we will  take α= 1.5

Lap length therefore = 1.5  × 37.05ϕ = 55.57ϕ = 55.57 × 16 = 889.2mm
Say 900 mm

Thank you so much for visiting. You can like our facebook page on
www.facebook.com/structville

How to Calculate the Number of Blocks Required to Complete a 3 Bedroom Flat

Sandcrete blocks are very popular construction materials for the construction of walls in buildings. They can serve as load-bearing elements or as mere partition panels. There are different types and sizes of sandcrete blocks that are employed in building construction. The size of the block (dimensions) can be a factor in determining the number of blocks required to successfully complete a building.

In order to properly know the cost of constructing a building, it is very important to know the number of blocks that will be able to complete the building. The number of blocks required to construct a building is largely dependent on the type of block, size of the building, area of walls to be built, etc.

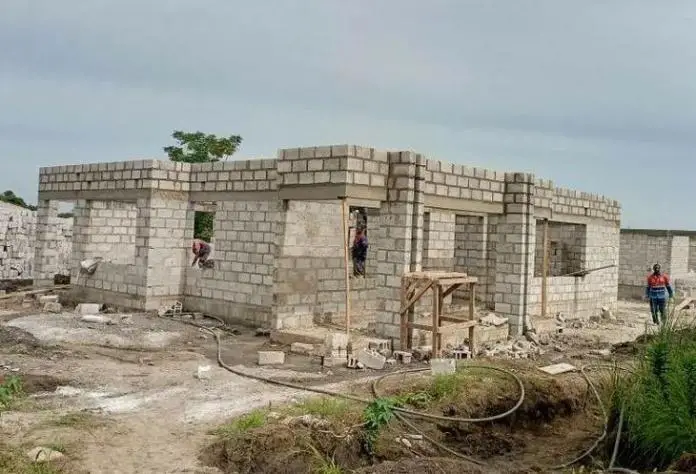
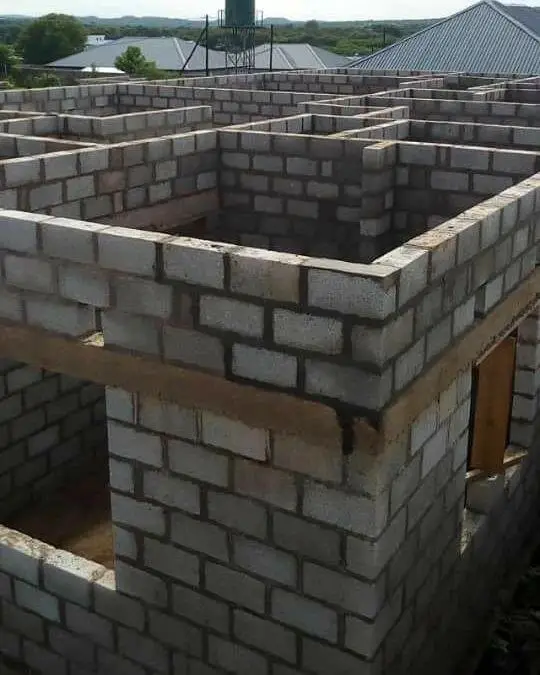
on going bungalow construction
Figure 1: On-going bungalow construction

In this article, we are going to present a very simple approach to determining the number of blocks required to complete a three-bedroom flat. The floor plan of a three-bedroom flat is shown below, which can comfortably sit on a plot of land of 450 m2. The building consists of a sitting room, three bedrooms (all en-suite), a visitor’s toilet, a dining, a kitchen, a store, and sit-out areas. It is required to estimate the quantity of 6 inches blocks (without holes) required to complete the project.

FLOOR%2BPLAN
Figure 2: Floor plan of a 3-bedroom flat

The data from the building is as shown below;

DOORS
Door type 1 (D1) = 1 number (Dimension = 2100 × 1200)
Door type 2 (D2) = 6 numbers (Dimension = 2100 × 900)
Door type 3 (D3) = 4 numbers (Dimension = 2100 × 700)

WINDOWS
Window Type 1 (W1) = 12 numbers (Dimension = 1200 × 1200)
Window Type 2 (W2) = 4 numbers (Dimension = 600 × 600)

Storey height (height of the building from floor to ceiling) = 3000 mm

Foundation details of the bungalow are given below.

Foundation%2Bto%2BDPC
Figure 3: Foundation details of the building

A section through the wall of the building is given below;

Section%2BThrough%2Bwall
Figure 4: Section of the wall

We are going to carry out the calculation in three main phases of construction of bungalow which are;

  • Foundation to DPC
  • DPC to lintel level, and
  • Lintel level to overhead level.

Estimation of the number blocks

The simplest approach is to estimate the number of blocks required in a metre square of wall.

The planar dimensions of a standard block in Nigeria is (450mm × 225mm).

6%2Binches%2Bblock%2Bwithout%2Bholes
Figure 5: Typical dimensions of 6 inches blocks in Nigeria

The planar area of 1 block = (0.225 × 0.45) = 0.10125 m2
Therefore one metre square of a wall will contain;
1/0.10125 = 9.876

Therefore, one metre square of wall will contain approximately 10 blocks.

PHASE 1: FOUNDATION TO DPC

At this stage, the total length of the walls of the building and the height of the walls at the substructure level are considered. There are no openings, and the entire foundation excavation length is considered. For the building we are considering, the foundation layout is as shown below;

FOUNDATION%2BPLAN
Figure 6: Foundation layout of a three-bedroom flat

Using any method of your choice, you can calculate the total length of the walls at the foundation level.
This is approximately equal to 100256 mm = 100.256m from my calculations.

The height of the wall from foundation to DPC (ignoring thickness of mortar) as shown in Figure 3 = 900mm = 0.9m

Therefore, the total area of wall = 100.256m ×  0.9m = 90.2304m2
If 10 blocks are required for 1m2 of a wall, therefore (10 × 90.2304) = 903 blocks is required for 90.2304m2 of wall.

The number of blocks required to raise the building from foundation to DPC = 903 blocks (disregarding damages/waste).

PHASE 2: DPC TO LINTEL LEVEL

In this phase, we will consider the effects of openings in the buildings which includes the doors, windows, and other openings as specified in the drawing. These openings are seen in the verandah areas and some of the internal spaces in the building. The same process of calculating the total length of walls is also adopted, after which we minus the area of the openings.

Bungalow at lintel level
Figure 7: Bungalow at lintel level

This process is shown below;

Total Length of walls (excluding areas with no walls like verandahs) = 87420 mm = 87.42m

Height of wall = 2100 = 2.1m
Therefore area of wall = (87.42 × 2.1) = 183.582 m2
Total area of all doors from building data = 19.74 m2
Total area of all windows from building data = 18.72 m2

Therefore the net area of walls = 183.582 m2 – 19.74 m2 – 18.72 m2 = 145.122 m2

Hence, the total number of blocks required to take the building from DPC to lintel level = 145.122 × 10 = 1451.22 = 1452 blocks (disregarding wastes)

PHASE 3: LINTEL LEVEL TO OVERHEAD LEVEL

Here, we are going to assume that the building will be chained at the lintel level (this means that the entire level of the building will be cast and reinforced with steel at the lintel level. This offers the advantage of helping the building behave as a unit, and helps in reducing cracking in the building).

Obviously, the length of the wall in this case will not consider openings, so we are going to make use of 100.256m as calculated from the foundation level.

Hence, the length of walls = 100.256m
Height of wall = 675mm = 0.675m

Total area of walls = (100.256 × 0.675) = 67.6728 m2

Hence, the total number of blocks required to take the building from the lintel level to the roof level = 67.6728 × 10 = 676.728 = 677 blocks.

Ultimately, the total number of blocks required to complete the construction of a three-bedrooms flat = 903 + 1452 + 677 = 3032 blocks (disregarding wastage).

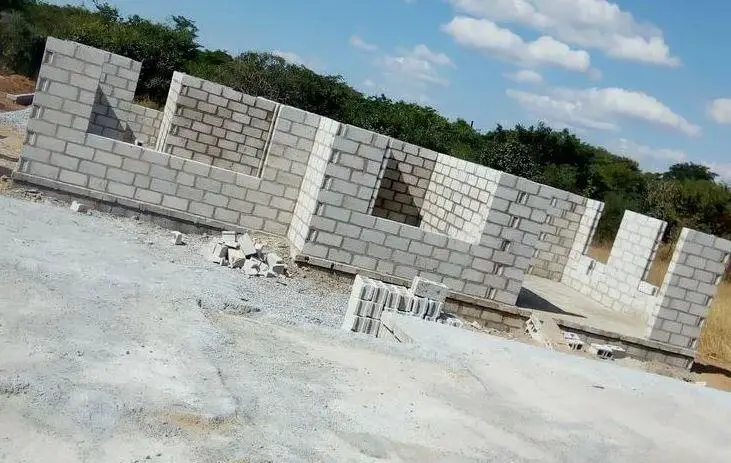
BB96016D 458D 4C07 A5AB C2A7BBC128F0
Figure 8: Bungalow with completed block work

To consider wastage, you can make a 20% increase, so that the number of blocks to be moulded or bought = 1.2 × 3032 = 3638 blocks. However, when you are moulding and can guarantee the quality of blocks to be moulded, 10% increase will be satisfactory for the job.

READ ALSO IN THIS BLOG; 

Thank you for visiting us, and God bless.
 Like our Facebook page on www.facebook.com/structville

How to Estimate the Quantity of Sand and Cement Required for Moulding Blocks

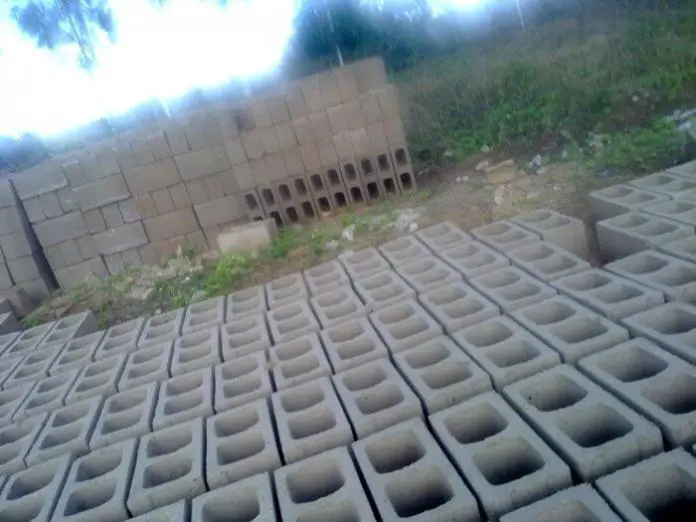
In Nigeria, the 9 inches hollow block (450mm x 225mm x 225mm) is normally used for the construction of blockwork of buildings exceeding one storey. The length of the block is 450mm (18 inches), the height is 225mm (9 inches), and the width is 225mm (9 inches). Contractors and builders are often faced with the challenge of either buying blocks for construction or moulding it on their own. When the conditions are right, builders will prefer to mould their own blocks, especially for the purpose of controlling the quality of the blocks, and to reduce the cost of transportation.

Let us assume that you have decided to mould your own blocks, and you have been faced with the challenge of estimating the quantity of cement and sand to purchase that will satisfy the construction requirement. This article will give you a guide on how to estimate the quantity of sand and cement required for moulding blocks in Nigeria. I am going to work through the steps, so that you will be able to make calculations just in case you are using any other size of block.

Initial data
Number of blocks required = 3000 pieces
Recommended production = 1 bag of cement to produce 35 blocks

Step 1: Calculate the volume of the block

VOLUME%2BOF%2BBLOCK

For the block size shown above;
Volume of  block without holes = (0.45 × 0.225 × 0.225) = 0.02278125 m3
Volume of holes = 2(0.225 × 0.125 × 0.15) = 0.0084375 m3
Therefore volume of the block = 0.02278 – 0.0084375 = 0.0143 m3

Step 2: Calculate the volume of the 35 blocks
If the volume of 1 block is 0.0143, the volume of 35 blocks = (0.0143 × 35) = 0.502 m3
 
Step 3: Calculate the volume sand required for the 35 blocks
The volume of 1 bag of cement is 34.72 litres = 0.03472m3.
This is obtained by knowing that the mass of 1 bag of cement = 50kg, and the density = 1440 kg/m3

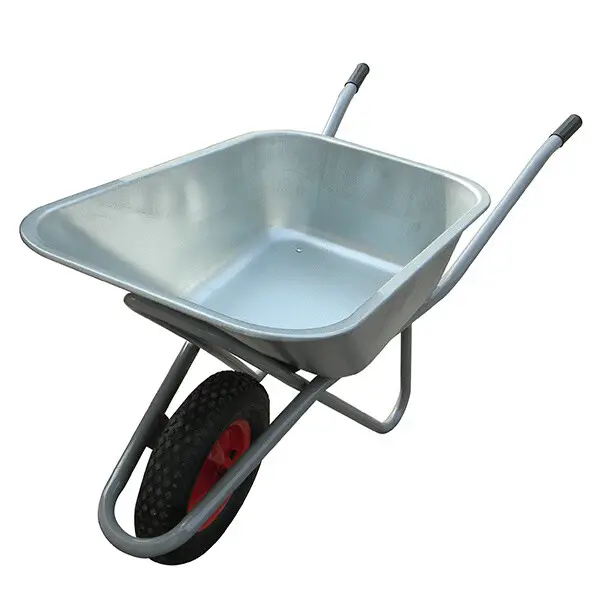
The volume of a standard builder’s wheelbarrow is 0.065 m3 (unheaped). We assume that approximately 2 bags of cement (4 head pans of cement) will fill one builder’s wheelbarrow. Now, we can estimate the number of wheelbarrow trips of sand that the moulder should provide in order to make 35 blocks from one bag of cement.

Builders Wheelbarrow
Builder’s wheelbarrow

Total volume of 35 blocks required = 0.502 m3

Let the number of wheel barrow trips of sand be x

Hence, (volume of 1 bag of cement) + (Total volume of sand) = Volume of 35 blocks
Hence, 0.03472 + x(0.065) = 0.502 m3
On solving, x = 7.1889 unheaped wheelbarrow trips of sand
The volume of sand required to make 35 blocks = 7.1889 × 0.065 = 0.46728 m3

However, note that this leads to a mix ratio of about 1:14 which will not be very good when subjected to a compressive strength test. The ideal mix ratio for blocks for proper strength should be about 1:10 or 1 bag to 25 blocks.


Step 4: Calculate the total volume of materials required
We can therefore estimate the quantity of materials to be purchased;

If 1 bag of cement is needed for 35 blocks, therefore 86 bags of cement is needed to mould 3000 blocks (gotten by 3000/35)

If 0.46728 m3 of sand is required to make 35 blocks, therefore, 41 m3 of sand (about 67.60 tonnes assuming the density of dry sand = 1600 kg/m3) is needed to make 3000 blocks.

For a 5 tonne tipper of 3.8 m3 capacity, we have to order for 11 trips of sharp sand.

You have to be very sure of the size of the tipper that will be delivering the sand to you in order to make your estimates more reasonable. On the other hand, you can make the considerations for variations between the weight of materials when wet and when dry. However, this will never be critical for block moulding based on experience. But in concrete it can be very considerable.

Therefore summarily, we need 86 bags of cement and 68 tonnes of sand to mould about 3000 pieces of 9 inches  blocks with holes  (for 1 bag = 35 blocks).

Thank you for reading, and God bless.

READ ALSO IN THIS BLOG
How to calculate the number of blocks required for the construction of a 3 bedroom flat

Visit our Facebook fan page on
www.facebook.com/structville

Design of Slender Columns According to EC2


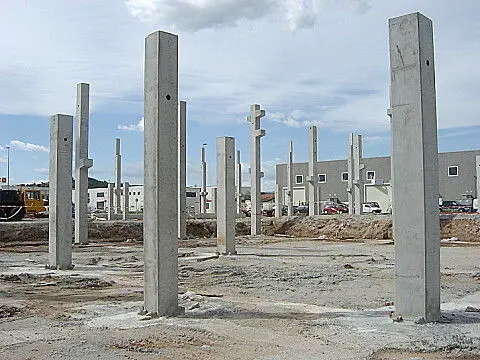
Loads from slabs and beams are transferred to the foundations through the columns. In typical cases, columns are usually rectangular or circular in shape. Normally, they are usually classified as short or slender depending on their slenderness ratio, and this in turn influences their mode of failure. Slender columns are likely to fail by buckling than by crushing.

Columns are either subjected to axial, uniaxial, or biaxial loads depending on the location and/or loading condition. Eurocode 2 demands that we include the effects of imperfections in structural design of columns. Column design is covered in section 5.8 of EN 1992-1-1:2004 (EC2).

Slender Columns Requirements in EC2

Clause 5.8.2 of EN 1992-1-1 deals with members and structures in which the structural behaviour is significantly influenced by second order effects (e.g. columns, walls, piles, arches and shells). Global second order effects are more likely to occur in structures with a flexible bracing system.

Column design in EC2 generally involves determining the slenderness ratio (λ), of the member and checking if it lies below or above a critical value λlim. If the column slenderness ratio lies below (λlim), it can simply be designed to resist the axial action and moment obtained from an elastic analysis, but including the effect of geometric imperfections. These are termed first order effects. However, when the column slenderness exceeds the critical value, additional (second order) moments caused by structural deformations can occur and must also be taken into account.

So in general, second order effects may be ignored if the slenderness λ is below a certain value λlim.

λlim = (20.A.B.C)/√n ——- (1)

Where:
A = 1/(1 + 0.2ϕef) (if ϕef is not known, A = 0.7 may be used)
B = 1+ 2ω (if ω is not known, B = 1.1 may be used)
C = 1.7 – rm (if rm is not known, C = 0.7 may be used)
Where; ϕef = effective creep ratio (0.7 may be used)
ω = Asfyd / (Acfcd); mechanical reinforcement ratio;
As is the total area of longitudinal reinforcement
n = NEd / (Acfcd); relative normal force
rm = M01/M02; moment ratio
M01, M02 are the first order end moments, |M02| ≥ |M01|

If the end moments M01 and M02 give tension on the same side, rm should be taken positive (i.e. C ≤ 1.7), otherwise negative (i.e. C > 1.7). For braced members in which the first order moments arise only from or predominantly due to imperfections or transverse loading rm should be taken as 1.0 (i.e. C = 0.7).

Also, clause 5.8.3.1(2) says that for biaxial bending, the slenderness criterion may be checked separately for each direction. Depending on the outcome of this check, second order effects (a) may be ignored in both directions, (b) should be taken into account in one direction, or (c) should be taken into account in both directions.

Solved Example

Let us consider the structure shown below. The effects of actions on column member BC is as shown below. It is required to design the column using the following data;

fck = 25 N/mm2, fyk = 460 N/mm2, Concrete cover = 35mm

SLENDER%2BCOLUMN%2BSOLVED%2BEXAMPLE

Second moment of area of beam AB = (0.3 × 0.63)/12 = 0.0054 m4
Stiffness of beam AB (since E is constant) = 4I/L = (4 × 0.0054) / 6 = 0.0036
Second moment of area of column BC = (0.3 × 0.63)/12 = 0.0054 m4
Stiffness of column BC (since E is constant) = 4I/L = (4 × 0.0054)/7.5 = 0.00288

Remember that we will have to reduce the stiffness of the beams by half to account for cracking;

Therefore, k1 = 0.00288/0.0018 = 1.6

Since the minimum value of k1 and k2 is 0.1, adopt k1 as 1.6. Let us take k2 as 1.0 for base designed to resist moment.

Take the unrestrained clear height of column as 7000mm

lo = 0.5 × 7000√[(1 + (1.6/(0.45 + 1.6))) × (1 + (1.0/(0.45+ 1.0)))] = 6071 mm

Radius of gyration i = h/√12 = 600/√12 = 173.205
Slenderness ratio λ = 6071/173.205 = 35.051

Critical Slenderness for the x-direction
λlim = (20.A.B.C)/√n
A = 0.7
B = 1.1
C = 1.7 – M01/M02 = 1.7 – (-210/371) = 2.266

n = NEd / (Ac fcd)
NEd = 3500 × 103 N
Ac = 300 × 600= 180000 mm2
fcd = (αcc fck)/1.5 = (0.85 × 25)/1.5 = 14.167 N/mm2
n = (3500 × 103) / (180000 × 14.167) = 1.3725

λlim = (20 × 0.7 × 1.1 × 2.266 )/√1.3725 = 29.786

Since 29.786 < 35.051, second order effects need to be considered in the design

Design Moments
MBot = 210 KNm, MTop = 371 KNm
ei is the geometric imperfection = (θi l0/2) = [(1/200) × (6071/2)] = 15.1775 mm
eiNEd = 15.1775 × 10-3 × 3500 = 53.121 KNm

First order end moment
M01 = MBot + eiNEd = -210 + 53.121 = -156.879 KNm
M02 = MTop + eiNEd = 371 + 53.121 = 424.121 KNm

Equivalent first order moment M0Ed
M0Ed = (0.6M02 + 0.4M01) ≥ 0.4M02 = 0.4 × 424.121 = 169.648 KNm
M0Ed= (0.6 × 424.121 – 0.4 × 156.879) = 191.721 KNm

Nominal second order moment M2
Specified concrete cover = 35mm
Diameter of longitudinal steel = 32 mm
Diameter of links = 10 mm

Thus, the effective depth (d) = h – Cnom – ϕ/2 – ϕlinks
d = 600 – 35 – 16 – 10 = 539 mm

1/r0 = εyd/(0.45 d)
εyd = fyd/Es = (460 /1.15) / (200 × 103) = 0.002
1/r0 = 0.002/(0.45 × 539) = 8.2457 × 10⁻⁶

β = 0.35 + fck/200 – λ/150 (λ is the slenderness ratio)
β = 0.35 + (25/200) – (35.051/150) = 0.2413

Kϕ = 1 + βϕef ≥ 1.0 (ϕef is the effective creep ratio, assume 0.87)
Kϕ = 1 + (0.2413 × 0.87) = 1.2099 ≥ 1.0
Assume Kr = 0.8
1/r = Kr.Kϕ. 1/r0 = 0.8 × 1.2099 × 8.2457 × 10-6 = 7.981 × 10⁻⁶

e2 is the deflection = (1/r) (l02) / 10 = 7.981 × 10-6 × 60712 / 10 = 29.415 mm

M2 = NEd.e2 = 3500 × 29.415 × 10-3 = 102.954 KNm

Design Moment MEd
MEd = maximum of {M0Ed + M2; M02; M01 + 0.5M2}
MEd = maximum of {191.721 + 102.954 = 294.675 kNm; 424.121 kNm; -156.879 + (0.5 × -102.954) = -208.356 kNm}

Longitudinal Steel Area
d2 = Cnom + ϕ/2 + ϕlinks
d2 = 35 + 16 + 10 = 61 mm

d2/h = 61/600 = 0.1016
Reading from chart No 2; d2/h = 0.10;

Column%2BArea%2Bof%2BSteel%2BChart

MEd/(fck bh2) = (424.121 × 10⁶) / (25 × 300 × 6002) = 0.1571
NEd/(fck bh) = (3500 × 103) / (25 × 300 × 600) = 0.777

From the chart, (AsFyk)/(bhfck) = 0.53
Area of longitudinal steel required (As) = (0.53 × 25 × 300 × 600)/460 = 5185 mm2

Provide 6Y32 + 2Y20 (ASprov = 5452 mm2)

As,min = (0.1 NEd)/fyd = (0.1 × 3500 × 1000) / 400 = 875mm2, 0.002bh = 0.002 × 300 × 600 = 360 mm2
As,max = 0.04bh = 0.04 × 300 × 600 = 7200 mm2

Links
Minimum size = 0.25ϕ = 0.25 × 32 = 8mm < 6mm
We are adopting Y10mm as links
Spacing adopted = 300mm less than {b, h, 20ϕ, 400mm} Provide Y10 @ 300 mm links

Thank you for reading
We love you, and we will keep working hard for you.
Like our Facebook page on www.facebook.com/structville

Static Analysis of Suspension Bridges: A solved Example

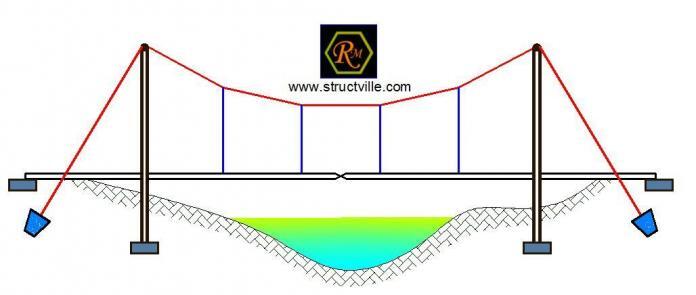
Cables are made from high-strength steel wires that are twisted together.  They offer a flexible structural system, which can resist loads only by axial tension. Cables allow engineers to cover very large spans especially in bridges and other suspended structures . Structurally, cables are extremely efficient because they make the most effective use of structural material in that their loads are carried solely through tension through the wire. Therefore, there is no tendency for buckling to occur either from bending or from compressive axial loads.

As load-bearing elements, cables have several unique features. One of them is that vertical loads give rise to horizontal reactions at the support, which, as in case of an arch, is called the thrust. To accommodate the thrust it is necessary to have a supporting structure. It may be a pillar of a bridge, tower, or pylon. Cables are usually employed in suspension bridges, cable-stayed bridges, tower guy wires, roofs, etc.

In this post a simplified static model of suspension bridge is presented for the purpose of structural analysis and design (linear first order analysis). The girder has an internal hinge at point G.

SUSPENSION%2BBRIDGE%2BMANUAL%2BANALYSIS%2BSOLVED%2BEXAMPLE


GEOMETRICAL PROPERTIES

We know that the thrust at the support of the cables = H = Cx = Dx

GEOMETRIC%2BPROPERTY

We can therefore verify that Cy = Dy = Htan⁡α
You can verify that α = tan-1(4/7) = 29.744°
β = tan-1(3/7) = 23.198°

SUPPORT REACTIONS

∑MB = 0
35Ay + 35Cy – 12Cx + 12Dx – (12 × 352)/2 – (300 × 26) = 0
35Ay + 35Cy – 7350 – 7800 = 0
35Ay + 35(0.5714H) = 15150
35Ay + 20H = 15150 ————– (1)

∑MGL = 0
17.5Ay + 17.5Cy – 12Cx – (12 × 17.52)/2 – (300 × 8.5) + 5H = 0
17.5Ay + 17.5(0.5714H) – 12H + 5H – 1837.5 – 2550 = 0
17.5Ay + 3H = 4387.5 —————– (2)

Solving (1) and (2) simultaneously;
Ay = 172.653 KN; H = 455.537 KN

∑MA = 0
35By + 35Dy – 12Dx + 12Cx – (12 × 352)/2 – (300 × 9) = 0
35By + 35(0.5714H) = 10050
35By + 20H = 10050 ———— (3)

∑MGR = 0
17.5By + 17.5Dy – 12Dx + 5H – (12 × 17.52)/2 = 0
17.5By + 17.5(0.5714H) – 12H + 5H = 1837.5
17.5By + 3H = 1837.5 ————– (4)

Solving (3) and (4) simultaneously;
By = 26.939 KN; H = 455.357 KN

Hence, Cy = Dy = H tan⁡α = 455.357 × 0.5714 = 260.195 KN


ANALYSIS OF THE JOINTS OF THE CABLE

Analysis of support C

JOINT%2BC

∑Fx = 0
-455.357 + FC1 cos29.744 = 0
FC1 = 455.357/cos⁡29.744 = 524.453 KN

Analysis of joint 1

AANGLE


∑Fx = 0
– FC1cos⁡α + F12 cos⁡β = 0
-524.453cos29.744 + F12 cos⁡23.198 = 0
FC1 = (524.453 × cos29.744)/cos⁡23.198 = 495.411 KN

∑Fy = 0
FC1sin⁡α – F12 sin⁡β – P1 = 0
(524.453sin29.744) – (495.411sin⁡23.198) – P1 = 0
P1 = 65.047 KN

Analysis of joint 2

JOINT%2B2

∑Fy = 0
– F12 sin⁡β – P2 = 0
– 495.411sin⁡23.198 – P2 = 0
P2 = 195.147 KN

Therefore, the equivalent loading on the girder is given below;

BRIDGE%2BGIRDER

INTERNAL STRESSES ON GIRDER

Bending Moment on the girder
MA = 0
M1 = (172.635 × 7) – (12 × 72)/2 = 914.445 KNm
ME = (172.635 × 9) – (12 × 92)/2+ (65.047 × 2) = 1197.809 KNm
M2 = (172.635 × 14) – (12 × 142)/2 + (65.047 × 7) – (300 × 5) = 196.219 KNm
MG = (172.635 × 17.5) – (12 × 17.52)/2 + (65.047 × 10.5) – (300 × 8.5) + (195.147 × 3.5) = 0

Coming from the right
MB = 0
M4 = (26.939 × 7) – (12 × 72)/2 = -105.427 KNm
M3 = (26.939 × 14) – (12 × 142)/2 + (65.047 × 7) = -343.525 KNm
MG = (26.939 × 17.5) – (12 × 17.52)/2 + (65.047 × 10.5) + (195.147 × 3.5) = 0

BENDING%2BMOMENT%2BDIAGRAM%2BOF%2BSUSPENSION%2BBRIDGE%2BGIRDER

Shear force on the girder

QA = 172.635 KN
Q1L = 172.635 – (12 × 7) = 88.635 KN
Q1R = 172.635 – (12 × 7) + 65.047 = 153.682 KN
QEL = 172.635 – (12 × 9) + 65.047 = 129.682 KN
QER = 172.635 – (12 × 9) + 65.047 – 300 = -170.318 KN
Q2L = 172.635 – (12 × 14) + 65.047 – 300 = -230.318 KN
Q2R = 172.635 – (12 × 14) + 65.047 – 300 + 195.146 = -35.172 KN
QGL = 172.635 – (12 × 17.5) + 65.047 – 300 + 195.146 = -77.172 KN
Q3R = 172.635 – (12 × 21) + 65.047 – 300 + 195.146 = -119.172 KN
Q3L = 172.635 – (12 × 21) + 65.047 – 300 + 195.146 + 195.146 = 75.974 KN
Q4L = 172.635 – (12 × 28) + 65.047 – 300 + 195.146 + 195.146 = -8.026 KN
Q4R = 172.635 – (12 × 28) + 65.047 – 300 + 195.146 + 195.146 + 65.047 = 57.021 KN
Q4R = 172.635 – (12 × 35) + 65.047 – 300 + 195.146 + 195.146 + 65.047 = -26.939 KN

SHEAR%2BFORCE%2BDIAGRAM%2BOF%2BSUSPENSION%2BBRIDGE%2BGIRDER

Obviously, there are no axial forces in the bridge girder.

Thank you so much for visiting STRUCTVILLE.

We love you, and we will like you to like our facebook page on www.facebook.com/structville.

God bless!!

Plastic Collapse Analysis of Propped Cantilever Beams

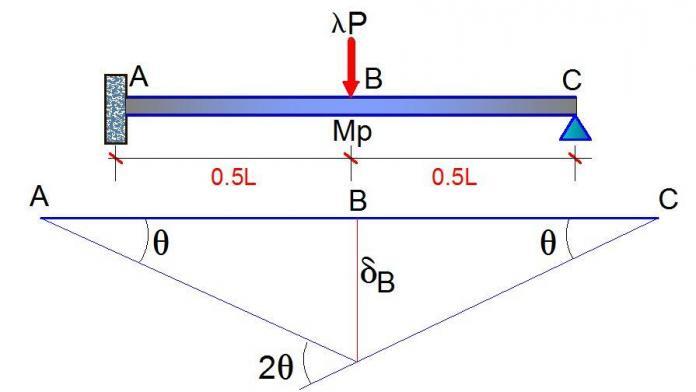
We all know that for a propped cantilever beam, there are two possible locations of plastic hinges – which are at the span (point of maximum moment) and at the fixed support. For the propped cantilever loaded as shown above, the degree is static indeterminacy is 1.

Since the number of possible location of plastic hinges is 2, therefore the number of independent mechanisms is;

P = 2 – 1 = 1 (which is a beam mechanism)

As a result, we are going to carry out our elastic analysis in two stages, so as to determine the load factor at which the beam will form a mechanism and completely collapse. We will start by assuming a value of unity for our load factor (i.e. λ =1.0)

STAGE 1

PLASTIC%2BANALYSIS%2BQUESTION

It is very easy to verify that for the beam loaded as shown above, the fixed end moment at support A = 3PL/16 = (3 × 267 × 8) / 16 = 400.5 KNm

It is also easy to verify that the vertical support reaction at support C (RC) = 5P/16 = (5 × 267)/16 = 83.4375 KNm

Therefore, the maximum span moment at point B (MB) = 83.4375 × 4 = 333.75 KNm
The bending moment is as given below.

PLASTIC%2BBMD

We can also obtain the vertical deflection at point B by quickly placing a unit load at point B on a basic system of the structure (could be a cantilever or a simply supported beam). Then by combining the shapes from the two states of loading using Vereschagin’s rule, we can obtain the deflection at point B. This is given below.

CANTILEVER%2BBASIC%2BSYSTEM

EIδB = 1/6 × 4 [2(400.5) – 333.75] × 4 = 1246
δB = (1246/EI) metres

Therefore, for support A to become plastic, the load factor λA1= MP/ME = 500.625/400.5 = 1.25
Also for section B to become plastic, the load factor λB1 = MP/ME = 500.625/333.75 = 1.5

It is therefore obvious that the first plastic hinge will develop at support A.

Therefore the load at failure of support A = 1.25 × 267 = 333.75 KN
λA1MA = 1.25 × 400.5 = 500.625 KN.m
λA1MB = 1.25 × 333.75 = 417.1875 KN.m

Deflection of beam at failure of support A = δB= (1.25 × 1246)/EI= (1557.5/EI metres)


STAGE 2
Now, support A is assumed to have failed (formed a plastic hinge). We now model it as a real hinge and carry out another elastic analysis.

STAGE%2B2%2BANALYSIS

From statics, the maximum moment of the structure is given by;

PL/4 = ( 267 × 8)/4 = 534 KNm

For section B to become plastic and form a hinge;
λB2 = (M– λA1MB)/ME = (500.625 – 417.1875) / 534 = 0.15625

Therefore, the total load factor at collapse (λ) = λA1 + λB2 = 1.25 + 0.15625 = 1.40625

Also, the load at complete collapse of the beam = 1.40625 × 267 = 375.468 KN

The deflection at collapse = δB= (1.40625 × 1246) / EI= (1752.1875/EI) metres

Verification using the static method

PLASTIC%2BVERIFICATION

From geometrical relations, you can observe that δB = 4θ

Internal work done due to rotations of the structure at full plastic moment = MPθ + MP(2θ) = 3MPθ (the rotation at section C will not count because it is a natural hinge).

External work done by the collapse load = 375.468 × 4θ = 1501.871θ

But External work done = Internal work done;
Therefore, 3MP θ = 1501.871θ

Therefore, MP = 1501.871/3 = 500.624 KNm

This shows that the load factor we obtained from our analysis is correct.

For more interesting articles and complete follow up, like our Facebook page;

www.facebook.com/structville

Design of Doubly Reinforced Beams | Worked Example

Doubly reinforced beams are reinforced concrete beams that incorporate both compression steel (in the compression zone) and tension steel (in the tension zone). This design is typically employed when the required moment capacity of a beam exceeds that which can be provided by singly reinforced beams (those with only tension steel).  

In singly reinforced concrete beams without moment redistribution, k = MEd/fckbd2 is limited to k’ = 0.167. Therefore, once the value of k > k’, the beam must be designed as a doubly reinforced beam. In doubly reinforced beams, compression steel reinforcements are required because the concrete section (in compression) by itself cannot develop the required moment of resistance.

However, when there is a moment redistribution in the section, k > k’ where k’ is dependent on the moment redistribution ratio (δ) and is given by:

k’ = 0.6δ – 0.18δ2 – 0.21 where δ ≤ 1.0

In all cases, it is recommended that k’ be limited to 0.167 to ensure ductile failure. It is important to understand that the redistribution of moments derived from elastic analysis of a reinforced concrete structure accounts for the plastic behaviour of the material as it approaches its ultimate limit state.

To facilitate this plastic response, concrete sections must be designed to permit the formation of plastic hinges upon the yielding of tensile reinforcement. This approach ensures a ductile structure characterized by a gradual failure at the ultimate limit state, rather than a sudden, catastrophic collapse due to compressive failure of the concrete.

To guarantee the formation of plastic hinges and the necessary section rotation for ductile behaviour, Eurocode 2 imposes limitations on the maximum neutral axis depth, xbal. These restrictions ensure that the tensile steel experiences high strains and this promotes the desired plastic response.

The permissible value of xbal is determined based on the desired degree of moment redistribution. According to Eurocode 2, the limit is xbal ≤ 0.8(δ – 0.44)d for fck ≤ C50. However, this limit was modified to xbal as xbal ≤ (δ – 0.4)d in the UK Annex to the EC2.

Design of Doubly Reinforced Beam

To ensure a ductile response and prevent sudden compressive failure of the concrete, it is required that the neutral axis depth should not exceed 0.45 times the effective depth (0.45d). This guideline is typically adopted in the design of sections incorporating compression reinforcement (doubly reinforced beam sections).

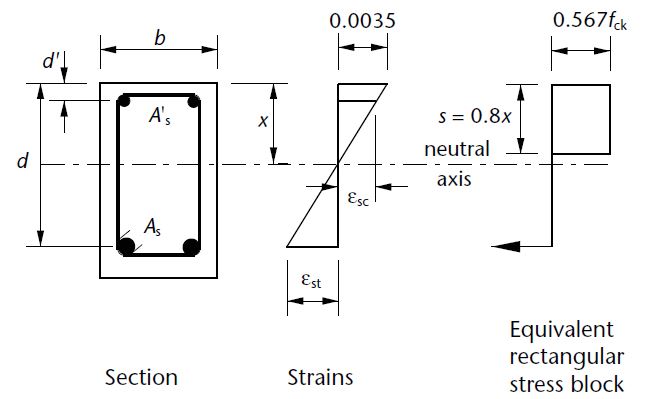
Rectangular stress block for doubly reinforced beam

In the design of reinforced concrete beams, if the design ultimate moment is greater than the ultimate moment of resistance i.e. MEd > Mlim, then compression reinforcement is required. Provided that d2/x ≤ 0.38 (i.e. compression steel has yielded) where d2 is the depth of the compression steel from the compression face and x = (d − z)/0.4

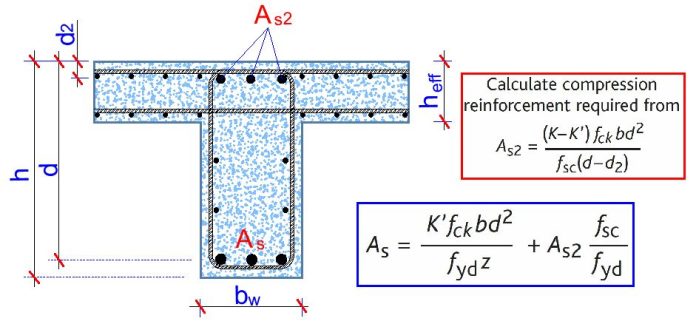
The area of steel in compression, As2, is given by:
As1 = (MEd – Mlim) / (fsc(d – d2)) —- (1)
fsc = Esεsc ≤ 0.87fyk
εsc = steel compressive strain = 0.0035(x – d’)/x
Es = Modulus of elasticity of steel = 200000 N/mm2

Area of tension reinforcement:
As1 = Mlim / (0.87fykz) + As2 (fsc/0.87fyk) —- (2)

Where:
MEd = Design bending moment of the section
Mlim = 0.167fckbd2
z = d[0.5+ √(0.25 – 0.882k’)]
where
k’ = 0.167

Design Example of a Doubly Reinforced Beam

To show how this is done, let us consider the flexural design of support A of the beam loaded as shown below. The depth of the beam is 600 mm, and the width is 400 mm.
fck = 35 N/mm2 ; fyk = 500 N/mm2; concrete cover = 40mm

DOUBLY%2BREINFORCED%2BBEAM%2B%2528QUESTION%2529
DOUBLY%2BREINFORCED%2BBEAM%2B%2528BMD%2529


Top reinforcement (Hogging moment)

Support A (No moment redistribution)
Effective depth (d) = 600 – 40 – 16 – 10 = 534 mm
d2 = 40 + 8 + 10 = 58 mm

MEd = 761.24 kNm

But since the flange is in tension, we use the beam width to calculate the value of k (this applies to all support hogging moments)
k = MEd / (fckbwd2) = (761.24 × 10⁶) / (35 × 400 × 5342) = 0.1906
z = d[0.5+ √((0.25 – 0.882(0.167))] = 0.82d = 0.82 × 534 = 437.88 mm
x = (d − z)/0.4 = (534 − 437.88)/0.4 = 240.3 mm

d2/x = 58/240.3 = 0.241 < 0.38 (therefore reinforcement bar has yielded and fsc = 0.87fyk)

Since k < 0.167, compression is required
Area of compression reinforcement AS2 = (MEd – Mlim) / (0.87fyk (d – d2))

Mlim = 0.167fckbd2 = (0.167 × 35 × 400 × 5342) × 10-6 = 666.69 kNm

AS2 = ((761.24 – 666.69) × 106) / (0.87 × 500 × (534 – 58)) = 457 mm2
Provide 3H16 Bottom (Asprov = 603 mm2)

Area of tension reinforcement As1 = MRd / (0.87fyk z) + AS2
Where z = d[0.5+ √(0.25 – 0.882K’)]
K’ = 0.167
z = d[0.5+ √((0.25 – 0.882(0.167))] = 0.82d

As1 = MRd / (0.87fyk z) + AS2 = ( 666.69 × 10⁶) / (0.87 × 500 × 0.82 × 534) + 457 mm2 = 3957 mm2

Provide 3H32mm + 4H25 mm Top (ASprov = 4376 mm2)

Comparison of Shear Design to EC2 and BS 8110

Eurocode 2 uses the variable strut inclination method for shear design. It is slightly more complex than the procedure in BS 8110 but can result in savings in the amount of shear reinforcement required.

Like BS 8110, Eurocode 2 models shear behaviour using the truss analogy in which the concrete acts as the diagonal struts, the stirrups act as the vertical ties, the tension reinforcement forms the bottom chord, and the compression steel/ concrete forms the top chord. Whereas in BS 8110 the strut angle has a fixed value of 45°, in EC2 it can vary between 21.8° and 45° and it is this feature which is responsible for possible reductions in the volume of shear reinforcement.

Shear design Eurococde 2

The concrete strut angle changes with respect to the magnitude of the shear force applied. The angle decreases with a reduction in shear stress, with a minimum angle of 21.8° (where cot = 2.5) which happens to be the most frequently used design strut angle.

Shear design in Eurocode 2 often involves comparing the design shear stress (vEd) to the concrete shear resistance (vRd,c). If vEd < vRd,c then in the case of one-way spanning slabs no shear reinforcement is required; in the case of beams nominal shear reinforcement is required. vRd,c is dependent on the amount of design tensile reinforcement and the design concrete strength.

If vEd < vRd,max (ie vRd,cot θ = 2.5), then the shear reinforcement may be calculated as:
Asw/s ≥ vEd/(0.87 × fyk × z × cot 2.5)

If vEd > vRd,max (ie vRd,cot θ = 2.5), then checks against vRd,cot θ = 1.0 and determination of θ are required.
If vEd > vRd,cot θ = 1.0 then a larger section or greater concrete strength is required.

Where applied shear stresses are higher, one has to check against the maximum allowable shear stress at the maximum strut angle of θ = 45º (e.g. 5.28 MPa for a C30/37 concrete when cot θ = 1.0) and where necessary determine the actual intermediate strut angle, θ.

Solved Example for Shear Design

For the beam loaded as shown below and disregarding load factors, we are going to obtain the shear reinforcement required for section A. The shear force at the centreline of support has been adopted for this design, and the area of tension steel provided at this section As1 = 4825 mm2.

DOUBLY%2BREINFORCED%2BBEAM%2B%2528QUESTION%2529
DOUBLY%2BREINFORCED%2BBEAM%2B%2528BMD%2529


Design Data
:
Concrete Strength = 35 N/mm2
Grade of steel = 460 N/mm2
Width of beam = 400mm
Depth of beam = 600mm
Effective depth = 543mm
Area of tension steel provided at section As1 = 4825 mm2

Shear Design to EC2

Support A; VEd = 500.46 kN

VRd,c = [CRd,c.k.(100ρ1 fck)(1/3) + k1cp]bw.d ≥ (Vmin + k1cp) bw.d

CRd,c = 0.18/γc = 0.18/1.5 = 0.12
k = 1 + √(200/d) = 1 + √(200/543) = 1.606 > 2.0, therefore, k = 1.606
Vmin = 0.035k(3/2) fck0.5
Vmin = 0.035 × (1.606)1.5 × 350.5 = 0.421 N/mm2
ρ1 = As/bd = 4825/(400 × 543) = 0.022 > 0.02; Therefore take 0.02

σcp = NEd/Ac < 0.2fcd (Where NEd is the axial force at the section, Ac = cross-sectional area of the concrete), fcd = design compressive strength of the concrete.) Take NEd = 0

VRd,c = [0.12 × 1.606 (100 × 0.02 × 35 )(1/3)] 400 × 543 = 172511.992 N = 172.511 kN

Since VRd,c (172.511 kN) < VEd (500.46 kN), shear reinforcement is required.
The compression capacity of the compression strut (VRd,max) assuming θ = 21.8° (cot θ = 2.5)

VRd,max = (bw.z.v1.fcd) / (cot⁡θ + tanθ)
V1 = 0.6(1 – fck/250) = 0.6(1 – 35/250) = 0.516
fcd = (αcc fck) / γc = (0.85 × 35) / 1.5 = 19.833 N/mm2
Let z = 0.9d

VRd,max = [(400 × 0.9 × 543 × 0.516 × 19.833) / (2.5 + 0.4)] × 10-3 = 689.83 kN

Since VRd,c < VEd < VRd,max

Hence Asw / S = VEd / (0.87.Fyk.z.cot θ) = 500460 / (0.87 × 460 × 0.9 × 543 × 2.5 ) = 1.0235

Minimum shear reinforcement;
Asw / S = ρw,min × bw × sinα (α = 90° for vertical links)
ρw,min = (0.08 × √(Fck)) / Fyk = (0.08 × √35) / 460 = 0.001028
Asw/Smin = 0.001028 × 400 × 1 = 0.411
Maximum spacing of shear links = 0.75d = 0.75 × 543 = 407.25

Provide X10mm @ 150mm c/c as shear links (Asw/S = 1.0467) Ok!!!!

Shear Design to BS 8110-1:1997

Design of support A
Ultimate shear force at the centerline of support
V = 500.46 kN

Using the shear force at the centreline of support;
Shear stress = V/(bd ) = (500.46 × 10³) / (400 × 543) = 2.304 N/mm2

v(2.304 N/mm2 ) < 0.8√fcu (4.732 N/mm2 ). Hence, the dimensions of the cross-section are adequate for shear.

Concrete resistance shear stress
vc = 0.632 × (100As/bd)1/3 (400/d)1/4
(100As/bd) = (100 × 4825) / (400 × 543) = 2.221 < 3 (See Table 3.8 BS 8110-1;1997)
(400/d)1/4 = (400/543)1/4 = 0.926; But for members with shear reinforcement, this value should not be less than 1. Therefore take the value as 1.0

vc = 0.632 × (2.221)1/3 × 1.0 = 0.8245 N/mm2
For fcu = 35 N/mm2, vc = 0.8245 × (35/25)1/3 = 0.922 N/mm2

Let us check;
(Vc + 0.4)1.322 N/mm2 < v(2.304 N/mm2) < 0.8√fcu (4.732 N/mm2)

Therefore, provide shear reinforcement links.
Let us try 2 legs of Y10mm bars (Area of steel provided = 157 mm2

Asv/Sv = (0.95 × Fyv) / (bv (v – vc)) = [400 × (2.304 – 0.922)] / (0.95 × 460) = 1.264

Maximum spacing = 0.75d = 0.75 × 543 = 407.25 mm
Provide Y10mm @ 100 mm c/c links as shear reinforcement (Asv/Sv = 1.57)

We can therefore see that disregarding load factor and flexural design requirements, EC2 is more economical than BS 8110 in shear design, and in this case study by about 19%.