8.7 C
New York
Thursday, June 19, 2025
Home Blog Page 50

Formulas for Calculating Different Properties of Concrete

The most basic test done on concrete is the compressive strength test. Sometimes, other properties of concrete such as tensile strength, modulus of elasticity, shrinkage values, etc are needed for design purposes.

Researchers and standards have come up with different relationships between the compressive strength of concrete and other properties. In this article, we are going to show the formulas which relate the compressive strength of concrete with other properties as applicable to the Eurocodes.

Characteristic strength of concrete (fck)

The characteristic strength is that strength below which 5% of results may be expected to fall during compressive strength test. Individual results below fck may be obtained but, in general, only need to be investigated if they fall more than 4 MPa below fck (BS EN 206-1, cl 8.2, table 14).

Design strength (fcd)

The compressive design strength of concrete is given by;

fcd = αcc fckc   ——–  (1)

where;
fck = characteristic cylinder compressive strength of concrete at 28 days
γc = partial (safety) factor for concrete (taken as 1.5 for UK National Annex)
αcc = a coefficient taking account of long-term effects on the compressive strength (which is reduced under sustained load) and unfavourable effects resulting from the way the load is applied (conservatively taken as 0.85).

Target mean strength (fcm)

The target mean strength, fcm, is also the value used to establish the mix design and is intended to take account of the normal variability that will occur in concrete production. This margin of 8MPa for cylinders is consistent with a normal distribution with a standard deviation (SD) of about 5MPa:

fck = fcm – 1.64SD ——- (2)

Where 1.64SD = 8
Therefore SD = 8/1.64 ≈ 5MPa

N/B: For cubes, the margin is 10 MPa which gives a standard deviation of about of 6 MPa.

Development of compressive strength with time

While design is usually based on the 28-day strength, BS EN 1992-1-1, sub-clause 3.1.2(6) gives an expression for the development of the mean compressive strength of concrete with time at 20°C as follows:

fcm(t) = [βcc(t)]fcm  ——— (3)

where;
fcm(t) is the mean compressive strength at age t days.
βcc(t) = exp{s[1 – (28/t)0.5]} ——— (3a)

where;
s is a coefficient which depends on cement type
= 0.20 for cement of strength classes CEM 42.5R, CEM 52.5N and CEM 52.5R (Class R)
= 0.25 for cement of strength classes CEM 32.5R, CEM 42.5N (Class N)
= 0.38 for cement of strength classes CEM 32.5N (Class S)
(where Class R = high early strength; Class N = normal early strength; Class S = slow early strength).

Tensile strength

Tensile strength is commonly defined in one of three ways: direct tensile strength, tensile splitting strength, or flexural strength. For normal structural uses, the mean tensile strength, fctm, is related to the cylinder strength by the expressions:

Strength classes ≤ C50/60      
fctm = 0.30 fck(2/3) MPa  ——— (4)

Strength classes > C50/60         
fctm = 2.12loge [1 + (fcm)/10] MPa ——— (5)

Flexural tensile strength

Flexural tensile strength can also be calculated from the mean tensile strength by the following expressions.

The flexural strength is the higher of:

fctm,fl = (1.6 – h/1000)fctm ——— (6)
or,
fctm,fl = fctm

where;
h is the total member depth in mm

Strength development of tensile strength

BS EN 1992-1-1 provides expressions for calculating tensile strength at different maturities:

fctm(t) = [βcc(t)]α fctm ——— (7)

where:
βcc(t) is as defined in Equation (3a)
α = 1 for t < 28 days
α = 2/3 for t ≥ 28 day

Modulus of elasticity

In design, the secant modulus, Ecm (in GPa), is derived from the mean compressive strength, fcm (in MPa), from the expression:

Ecm = 22 [fcm /10]0.3 GPa ——— (8)

Variation of Modulus of Elasticity with age

The variation of modulus of elasticity with time is estimated using the expression:
Ecm(t) = [fcm(t)/fcm]0.3 Ecm ——— (9)

This formulas and relationships in this post are culled from:
Bamforth P., Chisholm D., Gibbs J., Harrison T. (2008): Properties of concrete for use in Eurocode 2. The Concrete Centre, UK

Structural Design of Composite Columns

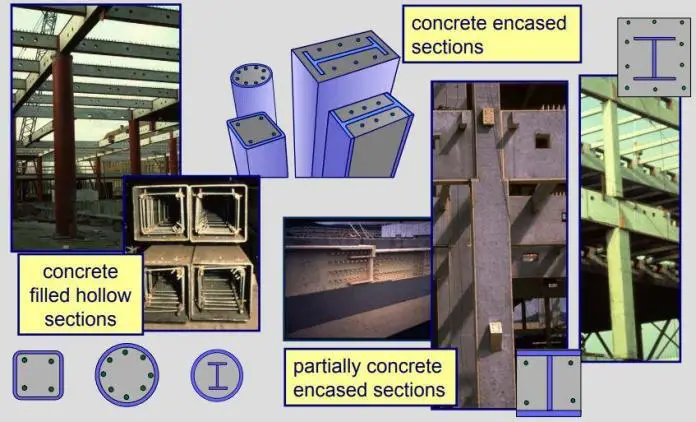
Composite sections of concrete and steel have a lot of advantages, especially in the structural performance and fire resistance of a building. For columns and other compression members, they usually appear as steel-reinforced concrete columns (SRC) or as concrete-filled steel tubes. In this article, we are going to consider the structural design of concrete encased H-section subjected to concentric axial load using Eurocode 4 and BS 5950.

According to BS 5950, the steps to design composite steel columns are as follows;

  1. Determine ultimate axial load Fc.
  2. Select trial section and check if it is non-slender.
  3. Determine rx, ry and Ag from steel tables.
  4. Determine effective lengths, LEX and LEY
  5. Calculate slenderness ratios, λEX (= LEX/rx) and λEY (= LEX/ry).
  6. Select suitable strut curves from Table 
  7. Determine compressive strength, pc 
  8. Calculate compression resistance of member, Pc = Agpc.
  9. Check Fc Pc . If unsatisfactory return to 2.

According to Eurocode 4, the simplified steps to design encased steel columns subjected to axial load are as follows;

  1. Determine the ultimate axial load on the column NEd
  2. Select a trial section and determine its properties
  3. Obtain the buckling length of the column L
  4. Obtain the effective flexural stiffness (EI)eff of the composite section
  5. Calculate the plastic resistance to compression of the composite section Npl,Rk
  6. Calculate the relative slenderness of the section (λ) using Euler’s critical load
  7. Choose the appropriate buckling curve and calculate the corresponding reduction factor χ
  8. Multiply the plastic resistance to compression with the reduction factor to obtain the buckling resistance of the section Nb,Rd
  9. Check if NEd < Nb,Rd else return to step 2.

Solved Example
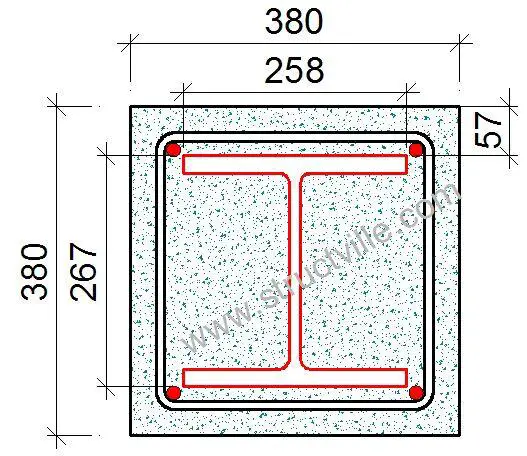
Verify the capacity of UC 254 x 254 x 107 in grade S275 steel encased in a concrete section of 380 x 380 mm to resist a characteristic permanent axial force of 1900 kN and variable axial force of 800 kN using concrete grade C25/30. Column is 3m long and considered pinned at both ends (Area of reinforcement provided = 4H16 (804 mm2 , fyk = 500 N/ mm2).

design of composite column


Solution by BS 5950
The ultimate axial load on the column is given by;
Fc = 1.4Gk + 1.6Qk = 1.4(1900) + 1.6(800) = 3940 kN

Properties of the UC section from Blue Book
Area of UC section (Ag) = 13600 mm2
Radius of gyration (rx) = 113 mm
Radius of gyration (ry) = 65.9 mm
Design strength (py) = 265 N/mm2 (since thickness of flange T = 20.5 mm)
Effective length (LE) = 3.0 m

Effective length
Check that the effective length of column (L = 3000 mm) does not exceed the least of:
(i) 40bc = 40 × 380 = 15200 mm
(ii) 100bc2/dc = (100 × 3802)/380 = 38000 mm
(iii) 250ry = 250 × 65.9 = 16475 mm OK
Radii of gyration for the cased section
For the cased section rx is the same as for UC section = 113 mm
For the cased section ry = 0.2bc = 0.2 × 380 = 76 mm but not greater than 0.2(B + 150) = 0.2(258.8 + 150) = 81.76 mm and not less than that for the uncased section (= 65.9 mm)
Hence ry = 76 mm and rx = 113 mm

Slenderness ratio
λEX = LEX/rx = (3000/113) = 26.548
λEY = LEY/ry = (3000/76) = 39.47

Compressive strength
The relevant compressive strength values for buckling about the x–x axis are obtained from Table 24(b)
of BS 5950 and from Table 24(c) of BS 5950 for bending about the y–y axis.

For λEX = 26.548 and py = 265 N/mm2, pc = 256.45 N/mm2
For λEY = 39.47 and py = 265 N/mm2, pc = 230.848 N/mm2

The compression resistance of the column is therefore given by;

Pc = (Ag + 0.45fcuAc/py)pc

Where:
Ag = 13600 mm2
fcu = 30 N/mm2
Ac = bcdc = 380 x 380 = 144400 mm2
pc = 265 N/mm2
pc = 230.848 N/mm2

Pc = [13600 + (0.45 x 30 x 144400)/265] x 230.848 x 10-3 = 4837.703 kN

Check that Pc is not greater than the short strut capacity, Pcs , given by;
Pcs = (Ag + 0.25fcuAc /py)py = [13600 + (0.25 x 30 x 144400)/265] x 265 x 10-3 = 4687 kN (this is less than Pc , therefore, take Pcs)

Fc /Pc = 3940 /4687 = 0.840 < 1.0 Okay

Design by Eurocode 4
At ultimate limit state;
NEd = 1.35Gk + 1.5Qk = 1.35(1900) + 1.5(800) = 3765 kN

Effective length of the column L = 3000 mm
Area of UC section (Aa) = 13600 mm2
Radius of gyration (iy) = 113 mm
Radius of gyration (iz) = 65.9 mm
Design strength (fy) = 265 N/mm2 (since thickness of flange T = 20.5 mm)
Iy = 17500 cm4
Iz = 5930 cm4
E = 210000 N/mm2

The plastic resistance to compression Npl,Rk = Aa.fy + 0.85Acfck + Asfyk
Aa = 13600 mm2
fy = 265 N/mm2
Ac = 380 x 380= 144400 mm2
fck = 25 N/mm2
As = 804 mm2
fyk = 500 N/mm2

Npl,Rk = [(13600 x 265) + (0.85 x 144400 x 25) + (804 x 500)] x 10-3 = 7074.5 kN
The relative slenderness λi = ( Npl,Rk / Ncr )0.5
Ncr,i = π2(EI)eff,i /L2

(EI)eff,i = EaIa + 0.6EcmIc + EsIs

Ea = Es = Elastic modulus of the structural steel and reinforcement respectively = 210000 N/mm2
Ia = Moment of inertia of structural steel in the relevant axis
Ecm =  Modulus of elasticity of concrete = 22(fck/10)0.3 (GPa) = 28960 N/mm2 (see Table 3.1 of Eurocode 2)
Ic = moment of inertia of the uncracked concrete section = bd3/12 = (380 x 3803)/12 = 17376.133 x 105 mm4
Is = moment of inertia of the reinforcement = πD4/64 = (π x 164)/64 = 3216.99 mm4 (for four bars = 4 x 3216.99) = 12867.96 mm4

Hence;
(EI)eff,y = (210000 x 17500 x 104) + (0.6 x 28960 x 17376.133 x 105) + (210000 x 12876.96) = 6.69455 x 10¹³ N.mm2
(EI)eff,z = (210000 x 5930 x 104) + (0.6 x 28960 x 17376.133 x 105) + (210000 x 12876.96) = 4.26485 x 10¹³ N.mm2

Ncr,y = [(π2 x 6.69455 x 1013) /30002] x 10-3 = 73413.955 kN
Ncr,z = [(π2 x 4.26485 x 1013)/30002] x 10-3 = 46769.313 kN

λy = (Npl,Rk / Ncr,y)0.5 = (7074.5/73413.955)0.5 = 0.310
λz = (Npl,Rk / Ncr,z)0.5 = (7074.5/46769.313)0.5 = 0.389

Check h/b ratio = 266.7/258.8 = 1.0305 < 1.2, and tf < 100 mm (Table 6.2 EN 1993-1-1:2005)

Therefore buckling curve b is appropriate for y-y axis, and buckling curve c for z-z axis. The imperfection factor for buckling curve b α = 0.34 and curve c = 0.49 (Table 6.1)

Φ = 0.5 [1 + α(λ – 0.2) + λ2]

Φy = 0.5 [1 + 0.34 (0.310 – 0.2) + 0.3102] = 0.567
Φz = 0.5 [1 + 0.49 (0.389 – 0.2) + 0.3892 ] = 0.622

X = 1/[Φ  + √(Φ2 – λ2)]
Xy = 1/[0.567 + √(0.5672 – 0.3102)] = 0.959
Xz = 1/( 0.622 + √(0.6222 – 0.3892)) = 0.903 

Therefore Nb,Rd = (Xz Npl,Rk)= (0.903 x 7074.5) = 6388.685 kN

NEd /Nb,Rd =  3765/6388.685 = 0.589 < 1.0 kN Okay

Difference between Autogenous and Drying Shrinkage of Concrete

Shrinkage in concrete refers to the volume reduction or contraction that occurs in concrete as it dries and ages. It is a natural and inevitable process caused by several factors, including the loss of water from the concrete matrix and the chemical reactions that take place during hydration.

The magnitude of shrinkage in concrete depends on various factors, including the water-to-cement ratio, cement type, aggregate properties, temperature, relative humidity, and curing conditions. Higher water-to-cement ratios generally lead to increased shrinkage, as there is more water available for evaporation and drying. Additionally, certain types of cement, such as high-early-strength (R) or low-alkali cement, can exhibit higher shrinkage characteristics.

For instance, grade 42.5R cement is expected to exhibit higher shrinkage characteristics than grade 42.5N cement.

Typical early shrinkage in concrete

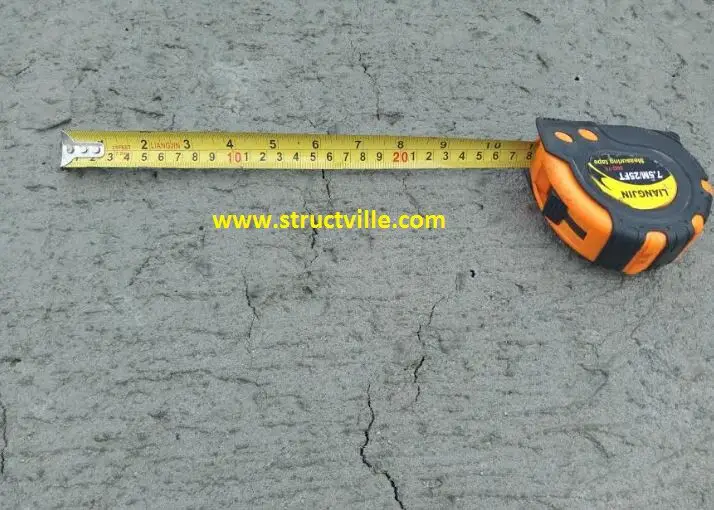
Shrinkage in concrete can have several consequences and implications for construction. It can cause cracking, which not only affects the aesthetic appearance of the concrete but also compromises its structural integrity and durability. Cracks can provide pathways for the ingress of harmful substances, such as water, chlorides, and other aggressive chemicals, leading to the corrosion of reinforcing steel and the deterioration of the concrete.

There are different types of shrinkage in concrete such as drying shrinkage, plastic shrinkage, carbonation shrinkage, and autogenous shrinkage. However, shrinkage in concrete is usually the sum of autogenous shrinkage and drying shrinkage.  In this article, we will be reviewing the difference between autogenous and drying shrinkage in concrete.

Autogenous shrinkage is caused by self-desiccation in young concrete as water is consumed during the hydration reaction. This occurs majorly within the early days of casting the concrete. However, drying shrinkage is the reduction in volume caused mainly by the loss of water during the drying process and this continues perhaps for years after the concrete is placed. This means that drying shrinkage commences after curing.

Autogenous Shrinkage

Autogenous shrinkage is a phenomenon that occurs in concrete without any external drying or thermal effects. It refers to the volume reduction or contraction of concrete due to the self-desiccation process, which is caused by the chemical reactions between cement and water during hydration.

When cement reacts with water, it forms a gel-like substance called C-S-H (calcium silicate hydrate), which gives concrete its strength. As the hydration process continues, this gel continues to absorb water, leading to a decrease in the water content within the concrete matrix. As a result, the volume of the gel decreases, causing autogenous shrinkage.

Autogenous shrinkage can be influenced by various factors, including the water-to-cement ratio, cement composition, temperature, relative humidity, and the presence of supplementary cementitious materials. Higher water-to-cement ratios generally lead to greater autogenous shrinkage because more water is available for hydration. Additionally, higher temperatures and lower relative humidity can accelerate the rate of shrinkage.

Autogenous shrinkage can have several consequences for concrete structures. First, it can lead to cracking if the concrete is restrained from freely contracting. These cracks can impair the durability and structural integrity of the concrete. Furthermore, shrinkage-induced cracks can provide pathways for the ingress of harmful substances such as water, chloride ions, and other aggressive agents, which can result in deterioration over time.

Mechanism of Autogenous Shrinkage
(1) During the hardening process of concrete, water from the mix accumulates into the pores, voids, and capillaries of the mixture.
(2) Water binds itself into the grains of the binder, as well as moving into the surroundings whose relative humidity is usually less than that of the concrete.
(3) In order to move water from the tiny voids, considerable forces are required to overcome the surface tension, as well as the forces of adhesion which binds the water to the voids.
(4) These forces act on the load-bearing structure of the concrete which at that time has low stiffness, can cause deformations in the concrete which can lead to cracking. 

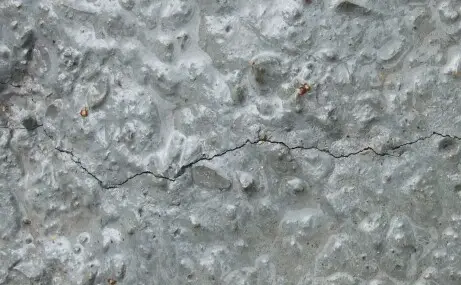
Autogenous-Shrinkage-Cracks-in-Concrete


Autogenous shrinkage cracks can be largely avoided by keeping the surface of the concrete continuously wet; conventional curing by sealing the surface to prevent evaporation is not enough and water curing is essential. With wet curing, water is drawn into the capillaries and the shrinkage does not occur. 

Practically, autogenous shrinkage happens in the interior of a concrete mass. According to BS EN 1992-1-1, autogenous shrinkage occurs in all concretes and has a linear relationship to the concrete strength.

According to EN 1992-1-1, autogenous shrinkage is given by Equation (1)


εca(t) = βas(t)εca(∞) ————————— (1)

Where;
εca(∞) = 2.5(fck – 10) x 10-6
βas(t) = 1 – e(√0.2t)
fck = characteristic strength of concrete (MPa)
Where t is given in days.

Drying Shrinkage

As concrete matures, moisture is gradually lost from the concrete mass to the atmosphere. This moisture loss is accompanied by volume change which is referred to as drying shrinkage.

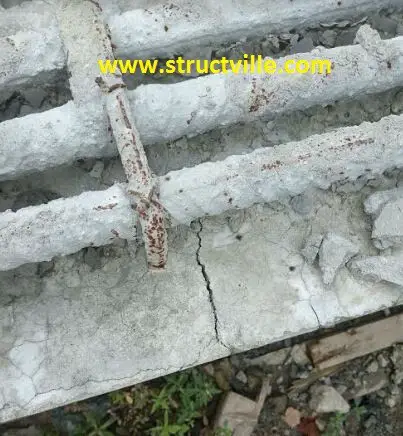
Drying shrinkage, therefore, depends on the relative humidity (for instance, indoor concrete will shrink more readily when compared with external concrete), the quantity and class of cement (rich concrete mixes will shrink more than leaner mixes), and the member size (thinner sections will shrink more quickly than thicker sections). According to EN 1992-1-1, drying shrinkage strain develops slowly, since it is a function of the migration of the water through the hardened concrete.

Drying Shrinkage
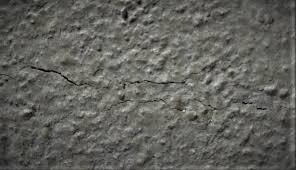
Fig 2: Drying shrinkage crack in concrete

Expression 3.9 in EN 1992-1-1 gives the development of drying shrinkage strain with time as given in Equation (2);

εcd(t) = βds(t, ts).khcd,0 ———————- (2)

Where kh is a coefficient depending on the notional size h0 (see Table 1).

Table 1: Variation of ho with kh

βds(t, ts) = (t – ts)/[(t – ts) + 0.04√(h03)]

Where;
t is the age of the concrete at the moment considered (in days)
ts is the age of the concrete (in days) at the beginning of drying shrinkage (normally this is at the end of curing)
h0 is the notional size (in mm) of the cross-section = 2Ac/u

Where;
Ac is the concrete cross sectional area (for slabs, Ac = thickness x 1000 mm)
U is the perimeter of that part of the cross-section exposed to drying (for slabs, take u = 2000 mm)

εcd,0 is the basic drying shrinkage strain. This is given in Annex B of EN 1992-1-1 as Equation (3);

εcd,0 = 0.85[(220 + 110.αds1).e(-αds2.0.1fcm)] x 10-6 x βRH ——— (3)
βRH = 1.55[1- (RH/RH0)3] ————- (4)

Where;
fcm is the mean compressive strength (Mpa)
αds1 is a coefficient which depends on the type of cement
= 3 for cement class S
= 4 for cement class N
= 6 for cement class R

αds2 is a coefficient which depends on the type of cement
= 0.13 for cement class S
= 0.12 for cement class N
= 0.11 for cement class R

RH is the ambient relative humidity (%)
RH0 = 100%

Specification of Concrete for Water Retaining Structures

Water retaining structures, from dams to swimming pools and water tanks, demand concrete that adheres to strict performance criteria. Beyond structural integrity, the concrete must exhibit exceptional durability in an aqueous environment, resisting water penetration (leakage), chemical attack, and freeze-thaw cycles. Specifying appropriate concrete for these applications requires balancing multiple factors, ensuring both long-term functionality and cost-effectiveness.

In the year 2018, we made a successful publication on the Analysis and Design of Swimming Pools and Underground Water Tanks. In this article, we will briefly review some construction aspects of water retaining structures with emphasis on the specification of concrete to be used for the construction of water retaining structures. To download the textbook on the design of swimming pools, with Staad Pro video tutorials and an Excel spreadsheet for the calculation of crack widths, click HERE.  

After carrying out the structural analysis and design of a water retaining structure, the next step is to ensure that the construction is properly executed such that the water tightness and strength of the element will not be compromised. A good design and a bad construction are as good as a failed project. The recommendations given in the following sections can be followed to ensure good results in the construction of water retaining structures.

water retaining structure
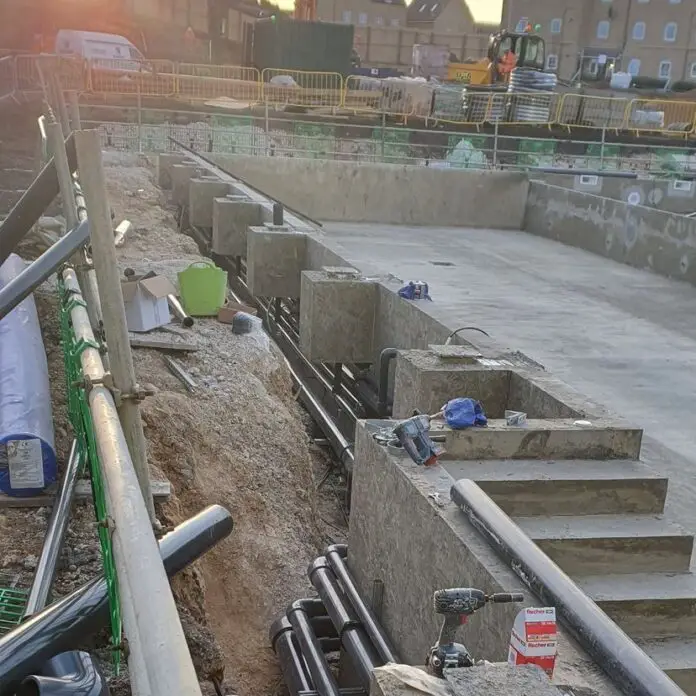
Figure 1: Construction of Water Retaining Structure

Key Considerations in Concrete for Water Retaining Structures

Strength and Durability

Strength class: Minimum compressive strength is typically in the range of 30-50 MPa, depending on structure type and design loads. Consider future expansions or hydrostatic pressure when selecting a strength class. However, the characteristic compressive strength of concrete for water-retaining structures should not be less than 30 MPa (C30/37) after 28 days of curing.

Permeability: Low permeability minimizes water ingress, reducing the potential for leaching and reinforcement corrosion. Specify a maximum water-to-cement ratio (typically 0.50) and use dense, well-graded aggregates.

Air content: Adequate air content (4-7%) improves freeze-thaw resistance and reduces internal stresses.

Cracking: Minimize by proper joint design, reinforcement detailing, and shrinkage-reducing admixtures.

Material Selection

For the construction of water retaining/excluding structures, class N (normal hardening) cement is recommended and should be used ahead of Class R (rapid hardening) due to shrinkage issues. In general, the concrete should be specified according to BS EN 206 and BS 8500 Parts 1 and 2. For water tanks, all materials in contact with potable water will need to comply with specific regulations and should be non-toxic. This is why all admixtures that will be used must be approved.

  • Cement: Portland cement types N (normal) or NA (normal air-entrained) are common choices. For severe environments, consider sulfate-resistant cement or supplementary cementitious materials (SCMs) like fly ash or slag.
  • Aggregates: Dense, well-graded, and clean aggregates minimize voids and permeability. Specify maximum size based on wall thickness and reinforcement spacing.
  • Admixtures: Utilize admixtures judiciously. Air-entraining admixtures enhance freeze-thaw resistance, while water reducers improve workability without compromising strength. Ensure compatibility with other ingredients and potable water regulations if applicable.

Construction Practices

  • Mixing and placing: Employ proper mixing procedures and equipment to achieve uniform consistency. Place concrete promptly and avoid segregation.
  • Curing: Implement effective curing practices, such as water spraying or curing compounds, to ensure proper hydration and minimize shrinkage cracking.
  • Joints: Design and construct joints to accommodate movement and prevent water leakage. Utilize waterstops (water bars) where necessary.

Additional Considerations

  • Chemical exposure: For structures exposed to aggressive chemicals, specify cement and additives with appropriate resistance.
  • Water quality: If the structure holds potable water, ensure all materials comply with relevant regulations for safety and non-toxicity.
  • Sustainability: Explore options like SCMs or recycled materials to reduce environmental impact while maintaining performance.

Standards and Codes

Refer to relevant national or international standards like ACI 318 (Building Code Requirements for Structural Concrete) or BS EN 206 (Concrete – Specification, performance, production and conformity) for detailed guidance and specific requirements.

Olympic swimming pool
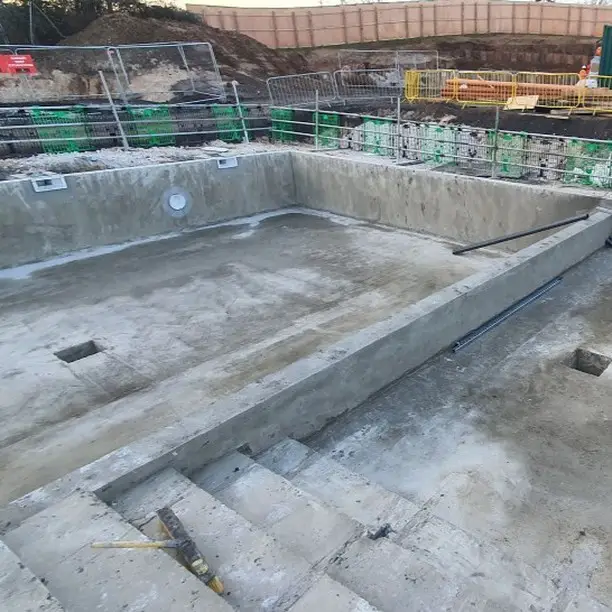
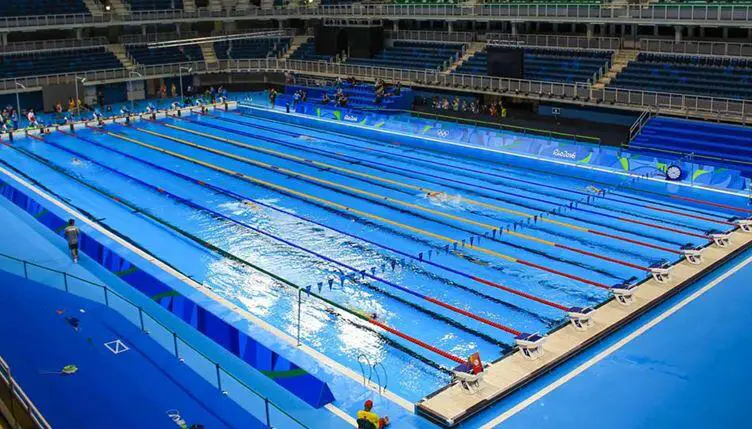
Figure 2: Olympic standard swimming pool

Permeability Considerations

Concrete for water-retaining structures must have low permeability. Water tightness refers to the ability of concrete to hold back or retain water without visible leakage (Kosmatka et al., 2003). It is common knowledge that the permeability of concrete is related to the water/cement ratio because the mix design factor is directly related to the permeability of the hardened cement paste. After the hydration reaction is completed, the remaining water leaves the concrete slowly, thereby leaving pores which reduce the strength of the concrete and the durability.

It is widely believed that a water/cement ratio of 0.2 (about 10 litres of water to 50 kg bag of cement) is needed to complete the hydration reaction, while the rest is to improve the workability of the concrete. However according to Mather et al. (2006), for a given volume of cement to hydrate completely, the quantity of original mixing water required is 1.2 times the solid volume of the cement.

The reason for this is that water should be available to fill up the 30% pore space that must be present after the hydration reaction. Ultimately, the authors opined that not all the cement will hydrate if the water/cement ratio is less than 0.4, even though only half of the water will go into a chemical combination. Research carried out by Kim et al. (2014) showed that porosity in concrete increased by 150% when the water/cement ratio was increased from 0.45 to 0.6.

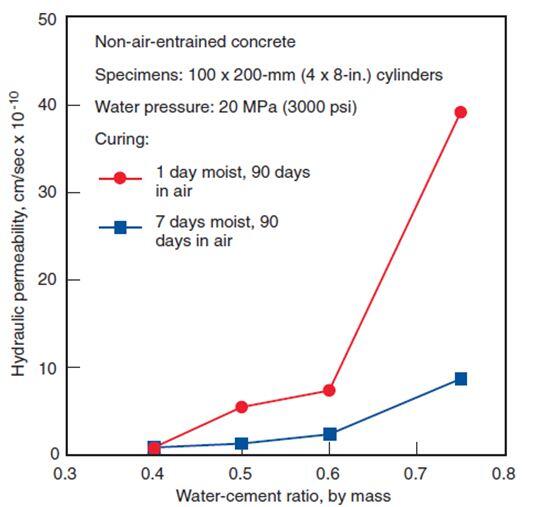
Relationship Between Hydraulic Permeability and Water/Cement Ratio Under Different Curing Conditions
Fig 2: Experimental Relationship Between Hydraulic Permeability and Water/Cement Ratio Under Different Curing Conditions (Whiting 1989, cited by Kosmatka et al, 2003)

According to Powers et al., (1954) cited by Kosmatka et al. (2003), the permeability of mature hardened cement paste kept continuously moist ranges from 0.1 x 10⁻¹² to 120 x 10-12 cm/sec for water-cement ratios ranging from 0.3 to 0.7 (see Figure 2). Also, in a leakage test conducted by Portland Cement Association on cement mortar disks of 25 mm thickness subjected to a water pressure of 140 kN/m2; the disks made with a water/cement ratio of 0.5 or less showed no sign of leakage after being moist cured for seven days.

However, the disks made with a water/cement ratio of 0.8 showed leakage after being cured for the same period of time. Research has also shown that concrete cured in water is less permeable than concrete that hardened in air, therefore it is recommended that immediately after removing the formwork of tank walls, the tank should be flooded with water. This also helps in autogenous healing of cracks.

Furthermore, the permeability and gradation of the aggregates, the quality of the aggregate/cement paste interface, and the ratio between cement paste and aggregates affect the overall permeability of concrete. Workability is usually an issue when we try to keep the water/cement ratio low. The best way out is to use water-reducing admixtures to make the concrete workable.

This is a better option than using waterproofing admixtures and a high water/cement ratio. Waterproofing admixtures reduce absorption and water permeability by acting on the capillary structure of the cement paste. They will not significantly reduce water penetrating through cracks or through poorly compacted concrete which are two of the more common reasons for water leakage in concrete structures.

Summary

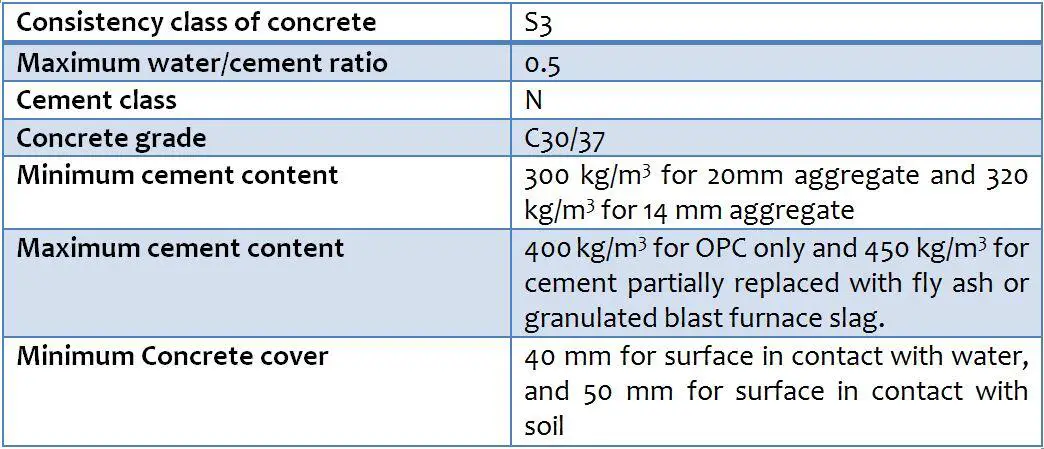
Table 1 gives the recommended concrete material requirements for water-retaining structures. A concrete specified and prepared as given in Table 1 should not give problems for water retaining structures provided it is well placed and compacted.

Table 1: Recommendation for concrete to be used water retaining structure

Recommended Concrete Specification for Water Retaining Structures

In effect, cracking can only be controlled by structural design based on the structural arrangement adopted: introducing movement joints, or by reinforcing the structure properly to limit the crack widths. Otherwise, Type A water protection should be specified. For water-retaining structures, the recommended minimum thickness for water tightness is 250 mm, unless the hydrostatic pressure in the tank walls is very low. 

Specifying concrete for water retaining structures requires a comprehensive understanding of performance demands, material properties, and construction practices. By carefully considering strength, durability, material selection, and construction techniques, engineers can ensure long-lasting, leak-free structures that fulfil their intended purpose for decades to come.

References
Kim Yun-Yong , Kwang-Myung Lee, Jin-Wook Bang, and Seung-Jun Kwon (2014): Effect of W/C Ratio on Durability and Porosity in Cement Mortar with Constant Cement Amount. Advances in Materials Science and Engineering Volume 2014, Article ID 273460, 11 pages http://dx.doi.org/10.1155/2014/273460

Kosmatka, S. H., Kerkhoff B., and Panarese, W. C. (2003): Design and Control of Concrete Mixtures, EB001, 14th edition, Portland Cement Association, Skokie, Illinois, USA

Mather, B. and Hime, W. G. (2002): Amount of Water Required For Complete Hydration of Portland Cement. American Concrete Institute (ACI) Volume: 2 Issue Number: 6 ISSN: 0162-4075 pp 56 -58 http://worldcat.org/oclc/4163061

Powers, T. C.; Copeland, L. E.; Hayes, J. C.; and Mann, H. M (1954): Permeability of Portland Cement Pastes, Research Department Bulletin RX053, Portland Cement Association, http://www.portcement.org/pdf_files/RX053.pdf

Whiting, D. (1989): “Permeability of Selected Concretes,” Permeability of Concrete, SP108, American Concrete Institute, Farmington Hills, Michigan, pp 195 -222.

What is Site Instruction?

A site instruction is a formal written order given by the heads of a project to contractors or sub-contractors on specific projects issues such as delay in progress, defective work or materials, guidance on how to carry out a specific item of work, permission to proceed with an item of work, instruction on procurement and logistics, amendments to procedure, or instruction on general project challenges. Site instructions are formal documents that can be presented during disputes, claims, variations, and arbitration. As a result, they should be issued and treated with utmost care and caution by both parties.

Due to its formal nature, a site instruction must be specific, direct, and understandable. A good site instruction must contain the following information;

(1) The name of the firm and the individual issuing the instruction.
(2) The name of the firm and the individual receiving the instruction.
(3) The place, date, and time that the instruction was issued.
(4) The team that issued the instruction and the head of the team (if applicable).
(5) The current observation on site for the item of work for which instruction is being issued
(6) The instruction on what is to be done (with sketches if applicable).
(7) The signature of the person issuing instruction and the signature of the person receiving the instruction

It should be issued in a minimum of 3 duplicates where one copy is kept on site with the site manager, the consultant takes one copy, and another copy is filed in the project’s file at the company’s office. 

Read Also:
Propriety of bending schedules for construction purposes
Seven basic principles of floor and wall tiling

Who issues site instruction?
Site instruction can be issued by the project manager to the consultants or contractors. The consultants can issue instruction to the contractors, and contractors can issue instruction to the sub-contractors. Building regulatory agencies from the government can also issue site instruction to the contractors or consultants of a project. 

For example, if a client decides to make HVAC changes, which will lead to need for new ductworks (say for chiller pipes), the project manager (usually the architects) will have to instruct the HVAC consultants to modify their design, and perhaps instruct the structural engineers to make provision for passage of pipes through the beams. Note that this should be a technically coordinated decision. In as much as the project has started already, such alterations cannot be instructed verbally, hence the need for written site instruction to that effect. The structural engineers may deem the changes not too critical, and may opt to issue site instruction (with sketches) to the main contractors (usually civil works) on how to make adjustments for the pipes to pass through. 

Also, during site inspection, regulatory agencies can issue site instruction to contractors to increase set-backs if found contrary to the approved drawing. They can also order demolition of defective works, or rearrangement of wrongly placed bars etc.

When do you issue/request for site instruction?
(1) A project head should issue site instruction when proposing a change to what is in the approved construction drawing.

(2) If an error or challenge is discovered in the working drawing, the consultant must either issue a new drawing or give a site instruction on how to proceed.

(3) A project head should issue site instruction when proposing a solution to an unforeseen problem or challenge on site which can impact on time, procedure, and cost.

(4) A project head can issue notice of delay in form of a site instruction.

(5) A site manager/contractor should request for an instruction from consultants/regulatory agencies to proceed after an item of work has been satisfactorily completed. For instance, after checking arrangement and placements of reinforcements and formwork, the consultant/regulatory agency should issue an instruction to the contractor to proceed with concreting.

(6) A site manager/contractor should request for a written site instruction when asked to do something he is not comfortable or very familiar with.

(7) A site manager/contractor should request for site instruction to proceed and use a material or procedure he has not tried before.

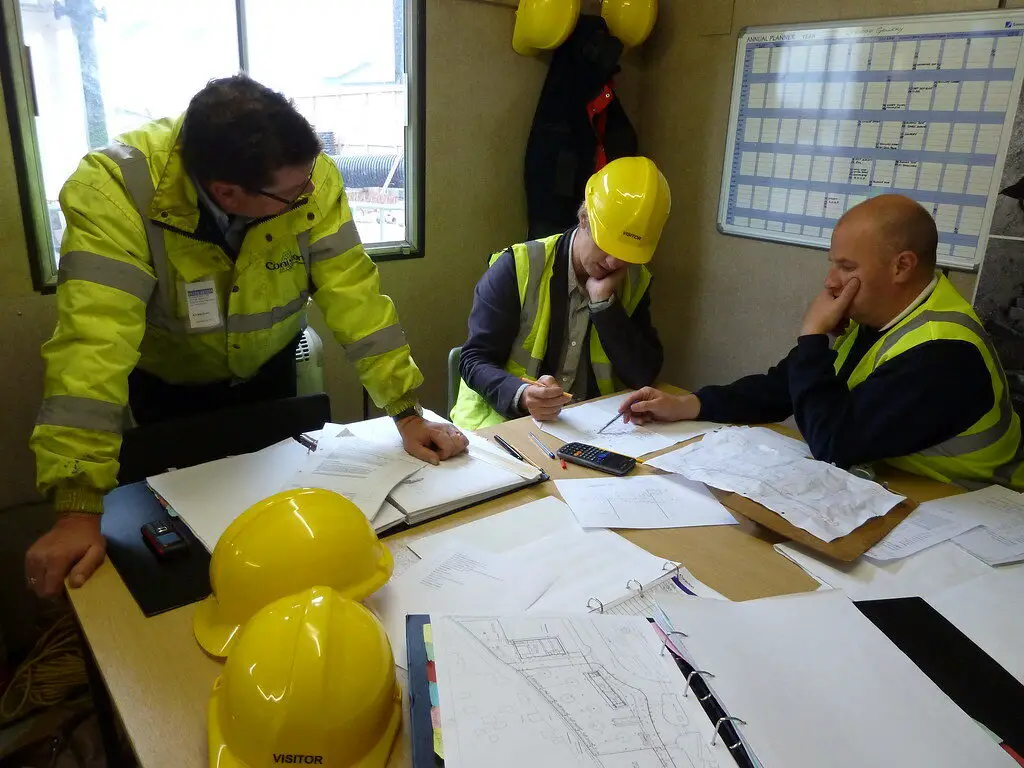
Site meeting

What do you do after receiving site instruction?
Since site instructions are formal documents, the site manager should therefore take the following steps after receiving instruction:

(1) Contact the company’s head office using the approved means of communication and forward a duplicate copy of the instruction received for filing (an e-mail attachment or posting it to an online workplace platform can suffice).

(2) Discuss and analyse the impact of the instruction on delivery time, procedure, and cost of the project with the project team.

(3) The contractor should send a formal response to the instructor on the impact of the instruction if necessary. It is worthwhile to note that some instructions are very normal in construction and do not need deliberation for an experienced site manager. For instance, a site instruction from a consultant that formwork should not be removed until after 21 days should be seen as normal. However, if this will affect the project delivery time, the contractor can request for an instruction to remove the formwork at say 14 days. The project team can look at the situation technically and a new instruction can be issued to proceed or there can be an outright rebuttal by the consultant. However, it is now on record that there might be 7 days delay depending on the initially agreed programme of work.

Instructions to demolish, remove, or make good a major defective work must be approved from the general office with the input of the quantity surveyor of the project. Such decisions do not require a site manager’s unilateral action. 

(4) A good site manager should work hard and implement all approved corrections according to the instruction.

(5) After all the corrections have been effected, the consultant or agency should be invited to check that the instruction has been carried out properly, after which they will issue a new instruction to proceed with the next item of work.

Do you need good project managers, drawings, and construction advice for your construction works?Send an e-mail to structville@gmail.com or info@structville.com. Alternatively, send a Whatsapp message to +2347053638996

Structural Analysis of Portal Frames Subjected to Gravity Load

Gravity actions are normally used for the verification of portal frames for member resistances, lateral buckling, and torsional stability. Elastic design of portal frames is permitted by Eurocode 3, and the most significant load case (from experience) is the situation where the frame is subjected to gravity load from permanent actions and variable actions, taking into account the second-order effects and imperfection.

The load combination used for this is usually of the form shown in Equation (1);

p = 1.35gk + 1.5qk (1)


In the past, we have solved the problem of two hinged portal frames which are statically determinate due to the presence of internal hinge at the apex. However, it is not a very practical scenario as portal frames are required to be rigidly connected in order to achieve in-plane stability.

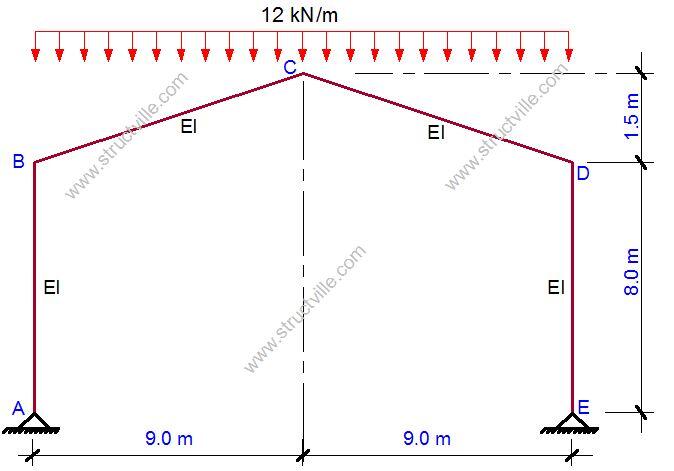
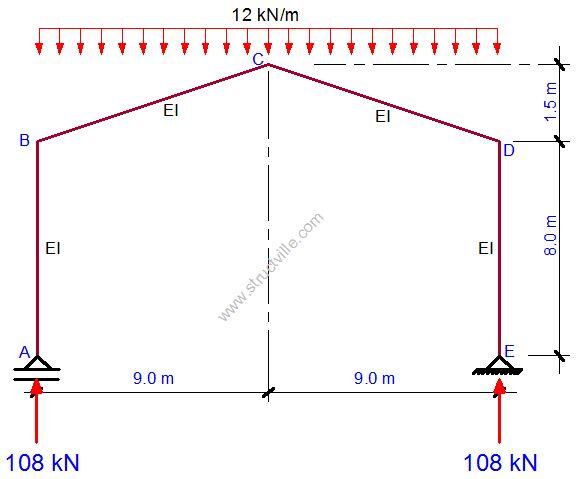
In this article, we are going to show how you can obtain the effects of actions (bending moment, shear force, and axial force) for a rigid portal frame subjected to an ultimate limit state load of 12 kN/m as shown in Figure 1. We will assume that the same universal beam section will be used for the column and the rafters (EI = Constant).

Portal Frame
Fig 1: Portal frame

A little consideration will show that the frame shown in Figure 1 is statically indeterminate to the first order. Therefore, using the force method of analysis, we will need to reduce the structure to a basic system.

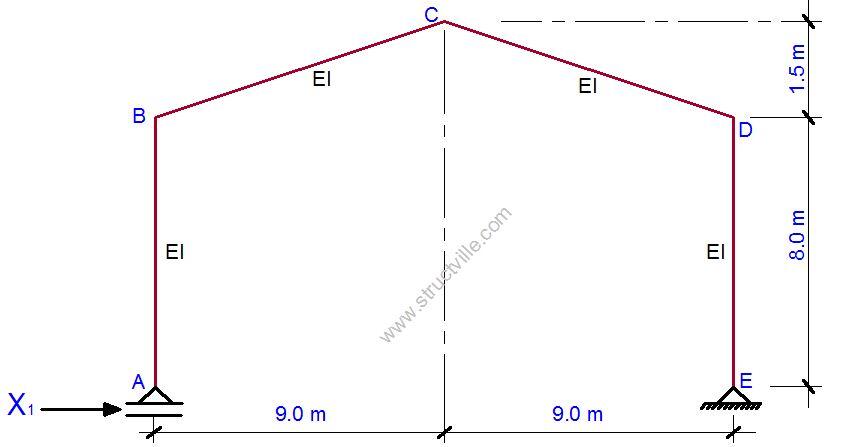
This is a process by which we remove the redundants (excess reactive forces) in the structure, to make it statically determinate. The basic system adopted must also be stable. This is shown in Figure 2.

Basic System 1
Fig 2: Reduction of the frame to basic system

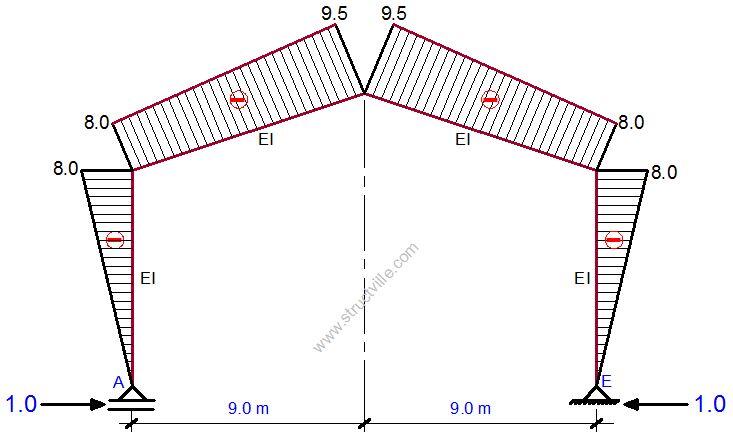
To proceed, we will now assign a unit force to the removed redundant horizontal reaction, and plot the bending moment diagram due to the unit force on the basic system as shown in Figure 3.

Bending Moment Diagram
Fig 3: Bending moment diagram due to horizontal unit force at point A

Since there is no other redundant support, we can apply the external load on the basic system. Due to the symmetry of the structure and the loading, we can verify that the vertical support reactions at A and E are given as shown in Figure 4;

Ay = Ey = (12 x 18)/2 = 108 kN

LOAD ON BASIC SYSTEM
Fig 4: External load and support reaction on the basic system

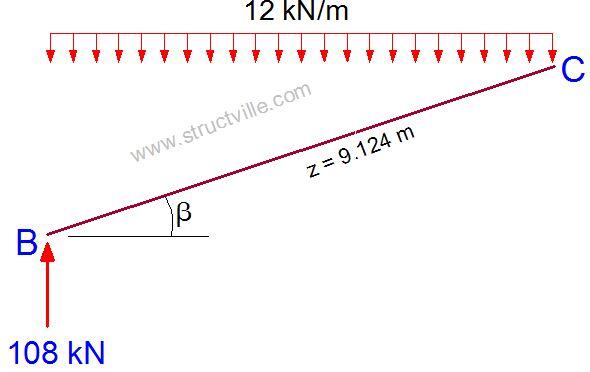
On observing Figure 4, we can see that there will be no bending moment in sections A-B and D-E, rather they will be subjected to compressive axial force of 108 kN. For member B-C, the bending moment will induced due to the reactive force and the externally applied uniformly distributed load. The free-body diagram of member B-C is shown in Figure 5.

We can verify that the geometrical properties of B-C are as follows;
The angle of inclination β = tan-1(1.5/9) = 9.462º
The length of the member z = √(1.52 + 92) = 9.124 m

section bc
Fig 5: Free body diagram of member of B-C

The equation for the bending moment of the section can be given by;
Mz = [108 x cos(β) x z] – [12 x cos(β) x z2]/2
Mz = 106.53z – 5.918z2

At z = 9.124 m
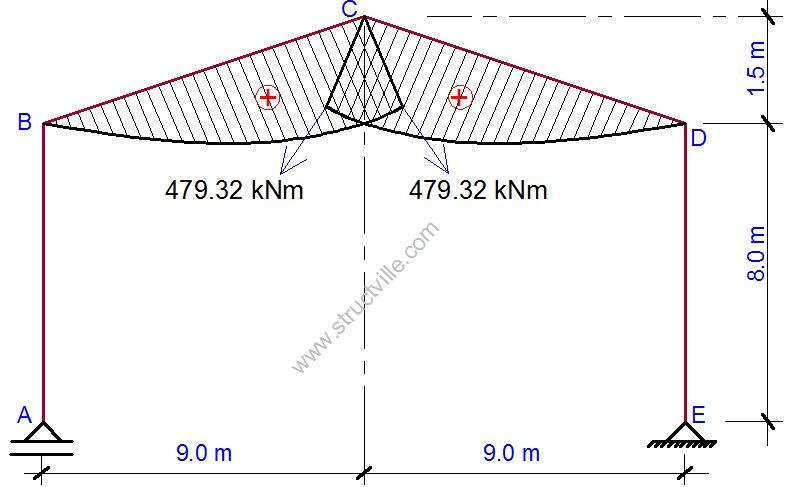
MCL = 106.53(9.124) – 5.918(9.124)2 = 479.32 kNm

The same thing is also happening at section C-D, and the bending moment diagram of the structure is shown in Figure 6.

BMD
Figure 6: Bending moment diagram of external load on basic system

The canonical equation for the structure is given by Equation (2);

δ11X1 + Δ1P = 0 ——– (2)

Where;
δ11 = Deflection at point 1 due to unit force at point 1
X1 = The actual external reaction at point 1 in the direction of the deflection due to externally applied load
Δ1P = Deflection at point 1 due to externally applied load

We are going to evaluate δ11 and Δ1P according to Vereshchagin’s rule which involves combining of the bending moment diagrams. For another example of how to apply Vereshchagin’s rule, click here.

Evaluation of δ11
In this case, the bending moment diagram of the unit force will combine with itself.

Combiner 1
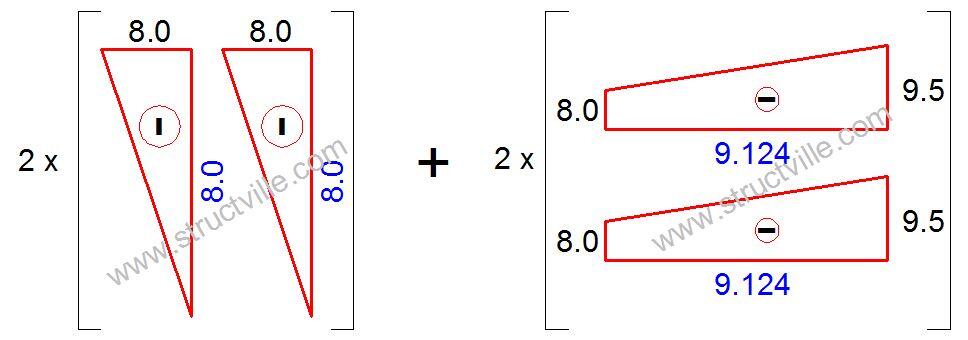
Fig 7: Load Case combining with itself

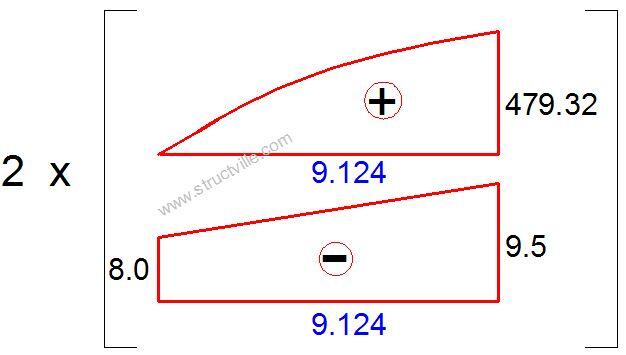
δ11 = 2 x [1/3 x 8 x 8 x 8] + 2 x 1/3 x [(8 x 8) + (9.5 x 8) + (9.5 x 9.5)] x 9.124 = 1741.867/EI

Evaluation of Δ1P
Here, the bending moment diagram due to the unit force will combine with the bending moment diagram due to the externally applied load as shown in Figure 8.

Combiner 2
Fig 8: Load case 1 combined with externally applied load

Δ1P = 2 x (1/12) x 479.32 x [(5 x 9.5) + (3 x 8)] x 9.124 = 52115.345

Substituting back into the canonical equation;
X1 = 52115.345/1741.867 = 29.919 kN (This obviously represents the horizontal reactions Ax and Ex)

The final bending moment diagram can be obtained therefore as follows;
Mdef = M1X1 + M0
MA = ME = 0
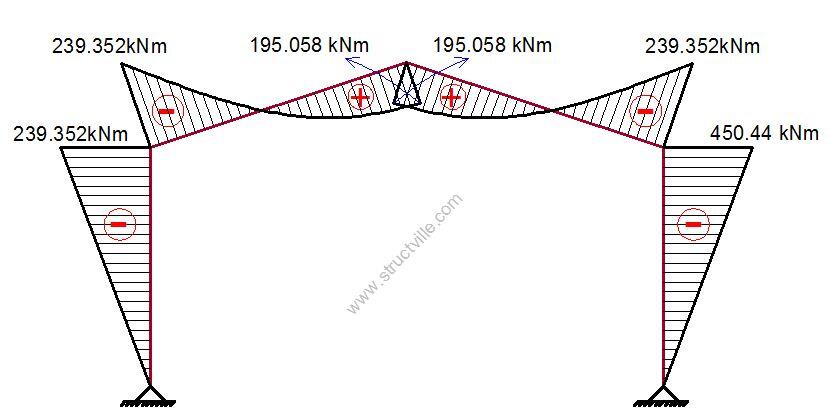
MB = MD = (29.919 x -8) + 0 = -239.352 kNm
MC = (29.919 x -9.5) + 479.32 = 195.089 kNm

The bending moment diagram is shown in Figure 9, and the shear and axial forces can also be obtained accordingly.

Bending moment diagram of portal frame
Fig 9: Final bending moment diagram

Thank you for visiting Structville today… Please check back for more updates.

On the Consolidation Settlement of Pile Groups

When a group of piles are embedded in saturated clays, the pile group undergoes time-dependent consolidation settlement. This can be calculated using the consolidation settlement equations and generally involves evaluating the increase in stress when the soil beneath a pile group is subjected to pressure due to load from the superstructure/column Qg.

The consolidation settlement of pile groups can be estimated by assuming an approximate distribution method that is commonly referred to as the 2:1 method.

The calculation procedure involves the following steps as described in Das (2008);

1. Obtain the total length of embedment of the pile L, and the total load (service load) transmitted from the column to the pile cap (Qg).
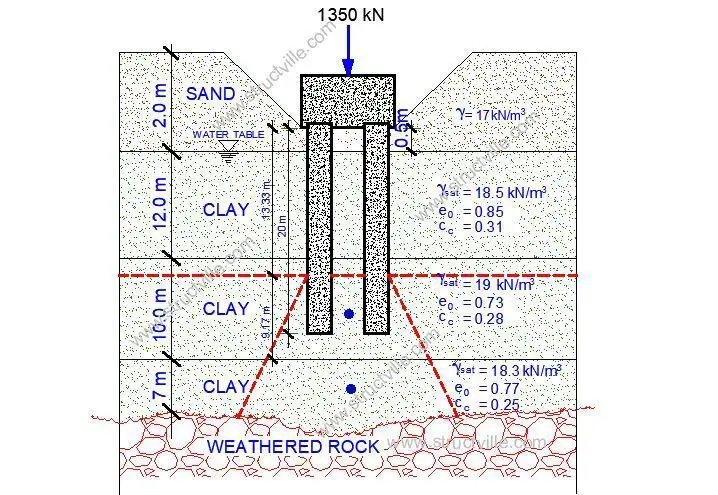
2. The load Qg is assumed to act on a fictitious footing depth of 2L/3 from the top of the pile. The load Qg spreads out along 2 vertical:1 horizontal lines from this depth.
3. Calculate the effective stress increase caused at the middle of each soil layer by the load Qg:

∆σi‘ = Qg/[(Bg + zi) (Lg + zi)]

Where;
∆σi‘ = effective stress increase at the middle of layer i
Bg, Lg = Width and length of the plan of pile group, respectively
zi = distance from z = 0 to the middle of the clay layer, i

4. Calculate the settlement of each layer caused by the increased stress:

∆Sc(i) = [∆e/ (1 + e0(i)] × Hi

where;
∆Sc(i) = consolidation settlement of layer i
∆ei = change of void ratio caused by the stress increase in layer i
e0(i) = initial void ratio of layer i (before construction)
Hi = Thickness of layer i

5. Calculate the total consolidation settlement of the pile group by;
∆Sc(g) = ∑∆Sc(i)

Solved Example

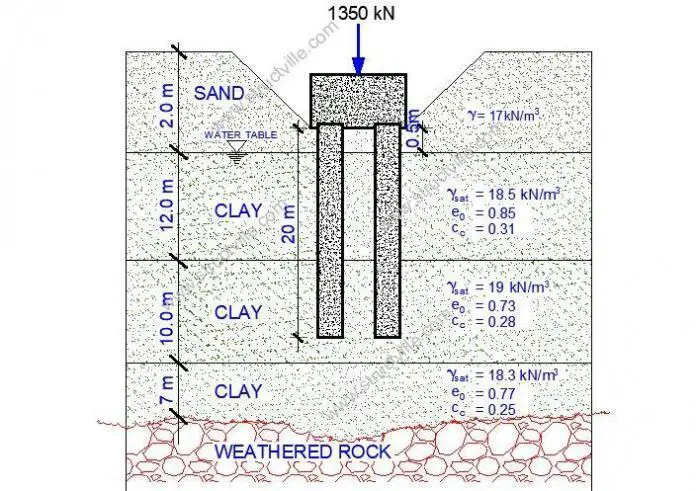
Calculate the consolidation settlement of a group of 4 piles founded on layers of clay as shown below. The piles are 600mm in diameter and form a square plan of 1800mm x 1800mm. The service load from the column on the pile is 1350 kN.

consolidation settlement of pile group

Solution
Depth of fictitious footing = 2L/3 = 2(20)/3 = 13.33 m
By implication, it can be seen that the influence depth went beyond the first layer of clay. Therefore, consolidation settlement calculation commences from the second clay layer of the soil profile. Let us therefore call this first layer of influence, layer 1.

Layer 1
∆σ1‘ = Qg/[(Bg + z1) (Lg + z1)] = 1350 / [(1.8 + 4.585) × (1.8 + 4.585)] = 33.114 kPa

σ0(1)‘ = (2 × 17) + 12(18.5 – 9.81) + 5.415(19 – 9.81) = 188.04 kPa

∆Sc(1) = [(Cc(1)H1)/(1 + e0)] × log[(σ0(i)‘ + ∆σi‘ )/σ0(i)‘]
∆Sc(1) = [(0.28 × 9.17)/(1 + 0.73)] × log[(188.04 + 33.114)/188.04] = 0.1045m = 104.473 mm

Layer 2
∆σ2‘ = Qg/[(Bg + z2) (Lg + z2)] = 1350 / [(1.8 + 12.67) × (1.8 + 12.67)] = 6.4475 kPa

σ0(2)‘ = (2 × 17) + 12(18.5 – 9.81) + 10(19 – 9.81) + 3.5(18.3 – 9.81) = 259.895 kPa

∆Sc(2) = [(Cc(2)H2)/(1 + e0)] × log[(σ0(2)‘ + ∆σ2‘ )/σ0(2)‘]
∆Sc(2) = [(0.25 × 7)/(1 + 0.77)] × log[(259.895 + 6.4475)/259.895] = 0.0104m = 10.48 mm

Therefore total settlement ∆Sc(g) = ∆Sc(1) + ∆Sc(2) = 104.473 + 10.48 = 114.953 mm

Thank you so much for visiting Structville today, and God bless you.

References
Das B.M. (2008): Fundamentals of Geotechnical Engineering (3rd Edition). Cengage Learning, USA

Analysis of Beams on Elastic Foundation

When a beam lies on an elastic foundation under the action of externally applied loads, the reaction forces of the foundation are proportional at every point to the deflection of the beam. This assumption was introduced first by Winkler in 1867. There are cases in which beams are supported on foundations which develop essentially continuous reactions that are proportional at each position along the beam to the deflection of the beam at that position.

This is the reason for the name ‘elastic foundation’. There are many geotechnical engineering problems that can be idealized as beams on elastic foundations. This kind of modelling helps to understand the soil-structure interaction phenomenon and predict the contact pressure distribution and deformation within the medium (e.g. soil). The most common theory for a beam on elastic foundation modelling is the Winkler approach.

image 5
Figure 1: Schematic representation of beam on elastic foundation


For instance, the beam shown in Fig. 1 will deflect due to the externally applied load, and produce continuously distributed reaction forces in the supporting medium. The intensity of these reaction forces at any point is proportional to the deflection of the beam y(x) at that point via the constant ks:

R(x) = ks.y(x)  — Eq. (1)

Where kis the soil’s modulus of subgrade reaction which is the pressure per unit settlement of the soil (unit in kN/m2/m). The reactions R(x) act vertically and oppose the deflection of the beam. Hence, where the deflection is acting downward there will be a compression in the supporting medium. Where the deflection happens to be upward in the supporting medium tension will be produced which is not possible (for soils).

If we assume that the beam under consideration has a constant cross-section with constant width b which is supported by the foundation. A unit deflection of this beam will cause a reaction equal to ks.b in the foundation, therefore the intensity of distributed reaction (per unit length of the beam) will be:

R(x) = b.ks.y(x) = k.y(x) —-Eq. (2)

where k = k0.b is the constant of the foundation, known as Winkler’s constant, which includes the effect of the width of the beam, and has unit of kN/m/m.

The general 4th order differential equation for beam on elastic foundation is given by equation (3);

EI(d4y)/dx4 + k.y = q  —- Eq. (3)

The homogenous equation is given by;

EI(d4y)/dx4 + k.y = 0

(d4y)/dx4 + 4β4y = 0

Where β = ∜(k/4EI) = (k/EI)(1/4)

The general solution for the equation is available, which is given by;
y = eβx (C1sinβx + C2cosβx) + e-βx(C3sinβx + C4cosβx)

Warren and Richard (2002) published tables containing equations for analysing beams on elastic foundation subjected to different loads. The method described in the book has been employed in this article to analyse a beam on an elastic foundation and the results compared with the results from Staad Pro software.

Solved Example
A 600mm x 400mm rectangular beam is resting on a homogenous soil of modulus of subgrade reaction ks = 10000 kN/m2/m. The beam is 10m long and carries a concentrated load of W = 300 kN at 3m from the left-hand side. Neglecting the self-weight of the beam, and assuming freely supported ends, obtain the bending moment at the point of the concentrated load. Take the modulus of elasticity of concrete Ec = 21.7 x 10⁶ kN/m2.

BEAM 2BON 2BELASTIC 2BFOUNDATION
Example of beam resting on an elastic foundation
beam 2Bsection

Solution 
Second moment of area of concrete beam IB = (bh3)/12 = (0.4 × 0.63)/12 = 7.2 x 10⁻³ m4
Flexural rigidity of the beam EcIB = 21.7 × 106 × 7.2 × 10-3 = 156240 kN.m2
β = (bks/4EI)(1/4) = [(0.4 × 10000)/(4 × 156240)](1/4) = 0.2828
βl = 0.2828 × 10 = 2.828 m; β(l – a) = 0.282(10 – 3) = 1.979

Where a is the distance of the concentrated load from the left end of the beam.
Since βl < 6.0, we can use Table 8.5 of Roark’s Table for Stress and Strain (Warren and Richard, 2002).

For a beam with both ends free;
RA = 0; MA = 0

The equations for bending moment and shear force along the beam is as given below;

Mx = MAF1 + RA/2βF2 – yA2EIβ2F3 – θAEIβF4 – W/2βFa2
Vx = RAF1 – yA2EIβ3F2 – θAEIβ2F3 – MAβF4WFa1

Where;
θA (rotation at point A) = [W/(2EIβ2)] × [(C2Ca2 – 2C3Ca1)/C11]
yA (vertical deflection at point A) = [W/(2EIβ3)] × [(C4Ca1 – C3Ca2)/C11]

We can therefore compute the constants as follows;
C2 = coshβl.sinβl + sinhβl.cosβl = [cosh(2.828) × sin(2.828)] + [sinh(2.828) × cos(2.828)] = (8.485 × 0.3084) + (8.426 × –0.9512 ) = –5.398

C3 = sinhβl.sinβl = (8.426 × 0.3084) = 2.5985

C4 = coshβl.sinβl – sinhβl.cosβl = [cosh(2.828) × sin(2.828)] + [sinh(2.828) × cos(2.828)] = (8.485 × 0.3084) – (8.426 × –0.9512) = 10.631

Ca1 = coshβ(l – a).cosβ(l – a) = cosh(1.974) × cos(1.974) = 3.669 × -0.392 = -1.438

Ca2 = coshβ(l – a).sinβ(l – a) + sinhβ(l – a).cosβ(l – a) = [cosh(1.974) × sin(1.974)] + [sinh(1.974) × cos(1.974)] = (3.669 × 0.9198) + (3.530 × -0.392) = 1.9909

Ca3 = sinhβ(l – a).sinβ(l – a) = (3.530 × 0.9198) = 3.247

C11 = sinh2βl – sin2βl = 8.4262 – 0.30842 = 70.902

θA = W/(2EIβ2) × [(C2Ca2 – 2C3Ca1)/C11]
θA = [300/(2 × 156240 × 0.28282 ) × [(–5.398 × 1.9909) – (2 × 2.5985 × –1.438)/70.902] = (0.012 × –0.0462) = -0.0005544 radians

yA (vertical deformation at point A) = [W/(2EIβ3)] × [(C4Ca1 – C3Ca2)/C11]
y = [300/(2 × 156240 × 0.28283)] × [(10.631 × –1.438) –2.5985 × 1.9909)/70.902] = (0.0424 × –0.2885) = –0.01223 m = -12.23 mm

Bending moment at point C
Substituting the values of deflection and slope into the equation for bending moment (note that the first and second terms of the equation goes to zero since RA = MA = 0);

Mx = – yAEIβ2F3  – θAEIβF4 – W/2βFa2
Mx = – (–0.01223 × 2 × 156240 × 0.28282)F3 – (– 0.0005544 × 156240 × 0.2828)F4 – 300/(2 × 0.2828)Fa2

Mx = 305.638F3 + 24.495F4 – 530.410Fa2

Substituting F3, F4, and Fa2 (see Table 8.5, Warren and Richard, 2002) into the equation;

Mx = 305.638(sinhβx.sinβx) + 24.495(coshβx.sinβx – sinhβx.cosβx) – 530.410[coshβ(x –a).sin β(x –a) + sinh β(x –a).cos β(x –a)]

The bending moment under the concentrated load (point C);
x = 3m; (x – a) = 3 – 3 = 0

βx = 0.8484
Mx = 305.638[sinh(0.8484) × sin(0.8484)] + 24.495[cosh(0.8484) × sin(0.8484) – sinh(0.8484) × cos(0.8484)]

Mc = 305.638 (0.953 × 0.750) + 24.495(1.382 × 0.750 – 0.9539 × 0.6611) = 218.45 + 9.942 = 228.392 kN.m


Verification
This manual calculation has been verified using Staad Pro software. The steps adopted were as follows:

(1) Modelling
The 10m beam was modelled as a one-dimensional line element connected by nodes at 1m length interval. This was to represent/attach soil springs at 1m interval.

node 2Bconnection

(2) Section Properties

The beam was modelled using concrete of modulus of elasticity = 21.7 x 10⁶ kN/m2, with dimensions of 600mm x 400mm.

(3) Support 

Using the elastic mat foundation option will not work since the support will not form a closed loop (analysing this way will give a ‘colinear support error’). Therefore, the soil spring was modelled using the ‘FIXED BUT’ support option. The support must be released for moment since this is the ideal scenario for the structure we are trying to model.

The soil modulus of the subgrade reaction was multiplied by the width of the beam thus;

kb = 10000 kN/m2/m x 0.4m = 4000 kN/m2

Now, given that the nodes are spaced at 1m interval, the vertical spring constant was taken as 4000 kN/m. The general form of the foundation is given below;

soil 2Bspring 2Bmodel
Modelling of beam on elastic foundation

(4) Analysis and Results

When analysed using the static check option, the following results were obtained;

(a) Soil deformation

settlement

The vertical deflection at point A (node 1) was observed to be 12.195mm, against 12.23mm obtained using manual analysis.

(b) Bending Moment

Bending 2Bmoment
Staad Pro result for beam on elastic foundation

The bending moment obtained at point C was 228.146 kNm which is comparable with 228.392 kNm obtained using manual calculations. Therefore, it can be seen that both methods give approximately the same result.

References
Warren C.Y., Richard B. Y. (2002): Roark’s Formula for Stress and Strain (7th edition). McGraw Hill, USA


Analysis and Design of Cantilever Retaining Walls on Staad Pro

In this post, we are going to show how cantilever retaining walls can be analysed and designed on Staad Pro software, and also compare the answer obtained with classical solutions. We should know that retaining walls must satisfy geotechnical, equilibrium, structural, upheaval, seismic considerations, etc. As a result, the designer must ensure that by appropriate knowledge of materials, site conditions, etc, he/she will provide suitable dimensions of the retaining wall that will ensure resistance of the structure to overturning, sliding, bearing capacity failure, uplift, etc. After appropriate sizing of the retaining wall, the structural analysis and design will commence to determine the action effects (bending moments, shear forces, axial forces, deflection etc), and provision of proper reinforcements to resist the action effects.


In the past, Structville has published a 17 page document on geotechnical design of cantilever retaining walls subjected to earth load, pavement surcharge load, traffic load, etc. This loading situation can be found when retaining wall is used to support embankment carrying traffic road way.  It was interesting to see how Design Approach 1 (DA1) of Eurocode 7 was used to ensure the geotechnical stability of the wall. Just in case you missed it, kindly download the PDF from the link below;

Geotechnical Design of Cantilever Retaining Walls to Eurocode 7

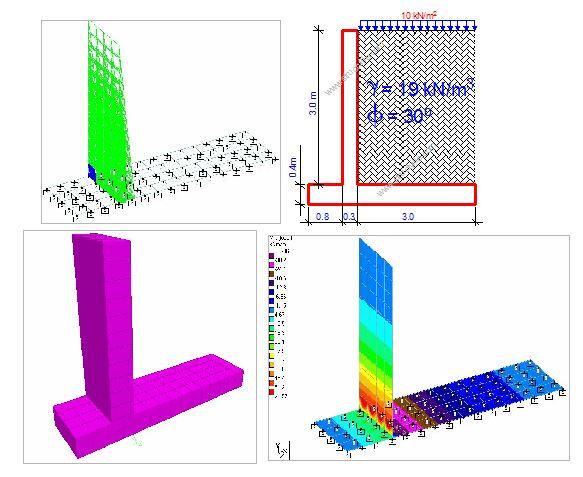
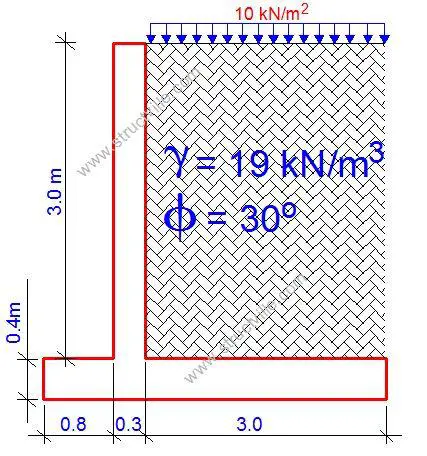
In this post, let us consider the retaining wall sized and loaded as shown in Figure 2. This structure has been modelled on Staad Pro in order to determine the action effects due to the applied load.

Cantilever 2Bretaining 2Bwall
Fig 2: Cantilever retaining wall

The retaining wall is subjected to a 3m thick earthfill, and a variable surcharge pressure of 10 kPa. Given that the retained earth has an angle of internal friction of 30°, we can obtain the Rankine active earth pressure as follows;

ka = (1 – sin 30)/(1 + sin 30) = 0.333

front
[Get this publication on Design of Swimming Pools and Underground Water Tanks into your mailbox by clicking HERE or by clicking on the book cover]

Therefore the actions on the retaining wall that will be input into Staad Pro as are as follows;

Vertical actions
(1) Self weight (to be calculated automatically by Staad)
(2) Weight of earthfill (19 kN/m3 × 3m) = 57 kN/m2
(3) Surcharge load = 10 kN/m2

Horizontal Actions
(4) Triangular earth pressure = (0.333 × 19 × 3) = 18.98 kN/m2
(5) Uniform surcharge pressure = (0.333 × 10) = 3.333 kN/m2

The wall has been modelled per metre run on Staad, and plate mat foundation was utilised with coefficient of subgrade modulus of 100000 kN/m2/m.

Steps to adopt
(1) Model the retaining wall utilising plate element meshing, assign thickness of 0.4m to the base, and 0.3m to the wall. Also assign plate mat foundation of subgrade modulus 100000 kN/m2/m to the base in the y-direction.

RET 2B1
Fig 3: Modelling and meshing of the retaining wall

(2) Assign the following loads to the structure

Load Case 1 (LC1)
(a) Self weight to the whole structure
(b) Weight of earth fill to the heel of the retaining wall (57 kN/m2)
(c) Assume that the base is buried 1m into the ground, hence apply vertical pressure load of (19 kN/m2) to the toe but neglect all passive pressures.

a1
Fig 4: Permanent vertical actions on the retaining wall base
final 2Bfront 2Bcover
[Get this publication on Design of Residential Buildings Using Staad, Orion, and Manual Calculations into your mailbox by clicking HERE or by clicking on the book cover]

Load Case 2 (LC2)
(d) Triangular earth pressure to the wall (18.98 kN/m2)

a2
Fig 5: Horizontal active earth pressure on the wall

Load Case 3 (LC3)
(e) Uniform horizontal surcharge pressure to the walls (3.333 kN/m2)
(f) Uniform vertical surcharge pressure to the heel (10 kN/m2)

a3
Fig 6: Surcharge loads on the wall and on the base


Combination (Ultimate limit state)
pEd = 1.35LC1 + 1.35LC2 + 1.5LC3

A little consideration will show that the load cases 1 and 2 are treated as permanent actions, while load case 3 is treated as a variable action.

(3) Analyse the structure for the load cases
(N/B): You may need to increase the iteration limits for the load cases containing horizontal actions to converge

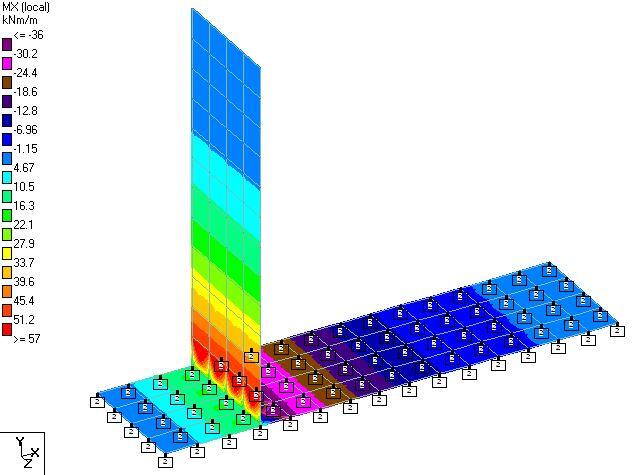
MX1
Fig 7: Main bending moment on the retaining wall
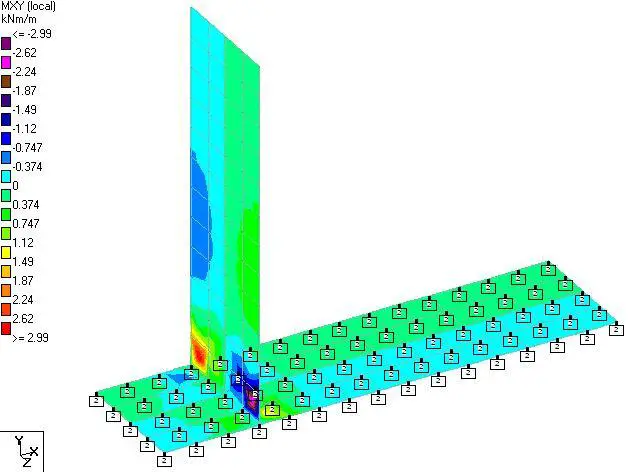
MXY
Fig 8: Twisting moment on the retaining wall
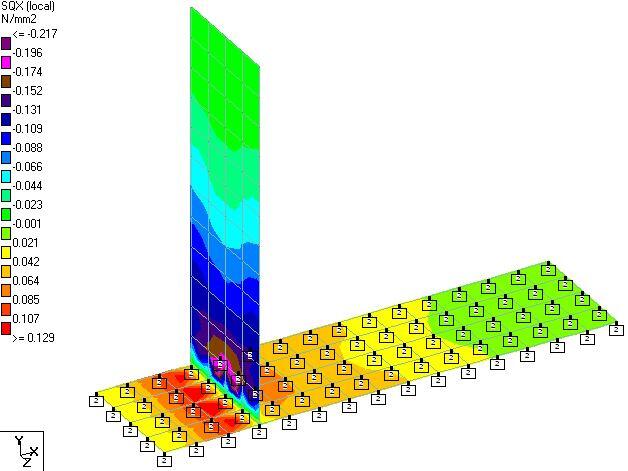
SQX
Fig 9: Shear stress on the retaining wall

On considering the bending moment diagram Mx (Figure 7), we can see that the maximum moment close to the base of the wall is 57 kNm/m. If we add the effect of torsion (Figure 8), the design moment can be taken as 57 + 2.99 = 59.99 kNm/m.

To carry out manual analysis, we will have to follow the steps given below to obtain the maximum moment at the base of the wall. The actions causing bending on the wall are the horizontal earth pressure and the horizontal surcharge pressure.

Moment from surcharge pressure = [(3.333 × 32)/2] = 14.998 kNm/m
Moment from horizontal earth pressure = [(18.98 × 3)/2] × (3/3) = 28.47 kNm/m

At ultimate limit state, MEd = 1.35(28.47) + 1.5(14.998) = 60.931 kNm/m

A little consideration will show that Staad Pro and Manual calculations gave almost the same value for wall bending moment. However, I expect the value of base moment from Staad Pro to be lower than the one from manual analysis. Kindly verify this at your private time.


Thank you for visiting Structville today and God bless you.

An Investigation on the Analysis of Beam and Raft Slab Using Staad Pro

Modern codes of practice are increasingly recognising the computational power of structural analysis  softwares. Staad Pro is a renowned structural analysis and design software that is used all over the world, and this post is aimed at investigating the analysis of beam and raft foundation using Staad Pro V8i. Winkler’s model has been used as a basis for the analysis. This post will help engineers who use Staad Pro to make decisions on whether raft slab can be confidently analysed on Staad Pro V8i environment, or there will be need to move to Staad Foundation, or any other foundation analysis software.

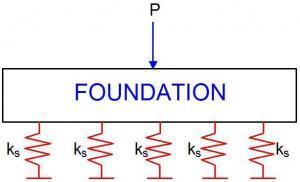
Winklers 2BModel
Fig 1: Winkler’s Model

Winkler’s model assumes that soil possesses stiffness which is considered to be the ratio of the contact pressure of the soil, and the vertical deformation associated with it. This relationship is assumed to be linear, and can be given by what is called the coefficient of subgrade reaction (ks).

ks = q/S ——————- (1)

where;
q is the contact pressure at a point in the footing, and
S is the settlement at the same point.

Equation (1) assumes that for granular soils, the value of ks is independent of the magnitude of pressure, and is the same at all points on the surface of the footing. These two assumptions are however not very accurate for obvious reasons, especially for flexible foundations. There are lots of literature available on the topic of ‘coefficient of subgrade reaction’, and you are advised to read them up on Google. However, it is accepted that the method gives realistic contact pressures especially when considering very low order of settlement. Coefficient of subgrade reaction is obtained in the field using in-situ plate load test. Plate load tests are usually carried out using (300 x 300) mm plate, and there is usually need to correct the obtained value for the actual width of the foundation (for a quick check of procedure, see page 696 of Murthy, 2012). I will not actually dabble into the accuracy of application of coefficient of subgrade reaction for foundation design in this post, but the reader is advised to consult wide range of literature since opinion on this seems to vary.

front
[Get this publication on Design of Swimming Pools and Underground Water Tanks into your mailbox by clicking HERE or by clicking on the book cover]

In Staad Pro software, the use of Winkler’s Model can easily be done by applying ‘foundation’ support option to the structure in question. Under this option, you can use ‘elastic mat’ or ‘plate mat’. Elastic mat is suitable for beam and plate combination (e.g beam and raft slab in a building) while plate mat is good when you have plate elements only forming the base (e.g base of an underground water tank). For training on how to use Staad Pro efficiently, contact the author on ubani@structville.com


In many parts of Nigeria, beam and raft slab is employed for low-medium rise buildings when the soil has low bearing capacity (usually between 100 kPa and 50kPa) or where providing separate bases will pose so many challenges. For manual analysis of such foundations, the rigid approach is usually used, which yields higher value of internal stresses, while on the other hand, finite element based foundation design softwares can be used, which usually yields lower internal stresses but higher settlement (flexible approach).

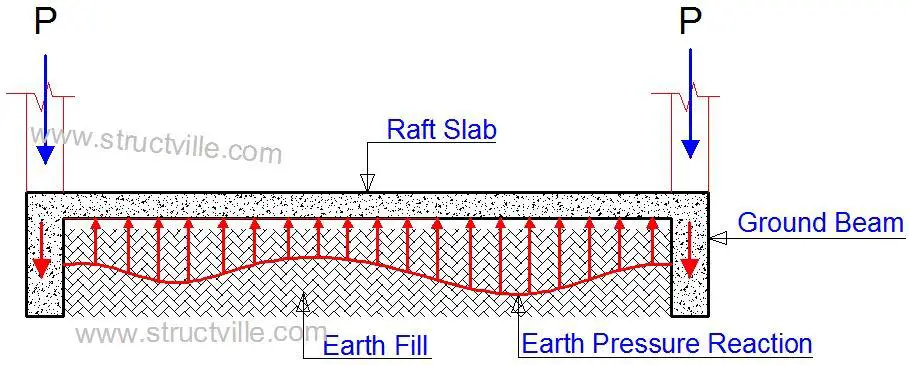
In the design of beam and raft slab foundation, it is usually assumed that the column load gets transferred/distributed to the ground beams, and tries to push them down into the soil. This action is resisted by the earth pressure intensity, which is mainly transferred to the ground floor slab. The schematic diagram of this action is shown below.

Schematic 2BDiagram 2Bof 2BBeam 2Band 2BRaft 2BFoundation
Fig 2: Load Path of Beam and Raft Foundation

Design Example
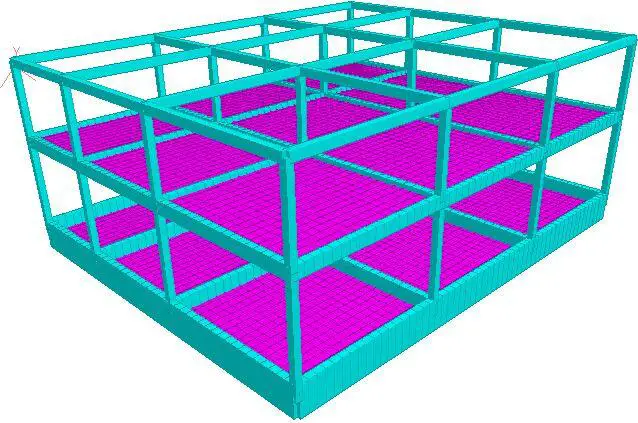
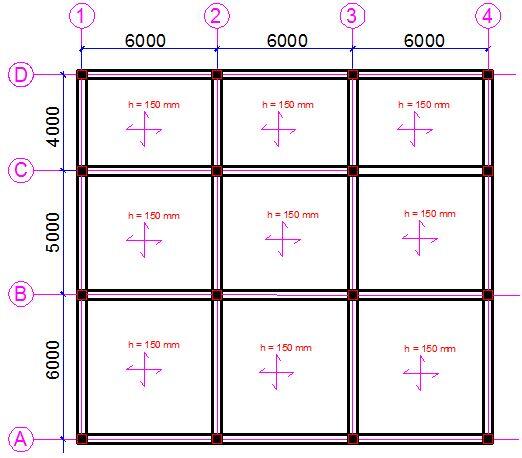
As an example, let us consider a two storey building with the foundation layout shown below.

GA
Fig 3: Typical Foundation Layout of Structure

For the beam and raft layout shown in Fig. 3, the necessary data are as follows;

Ground beam dimensions = 1200 x 250 mm
Thickness of ground floor slab = 150 mm
Dimension of all columns = 230 x 230 mm
First floor slab = 150 mm
First floor beams = 450 x 230 mm
Roof beams = 300 x 230 mm
Additional dead load on floors (finishes and partition allowance) = 2 kN/m2
Imposed load on building (variable action) = 2 kN/m2
Load at ultimate limit state = 1.35gk + 1.5qk
Coefficient of subgrade reaction ks =  of 20000 kN/m2/m (assumed for very soft clay, reference taken from CSC Orion Software)

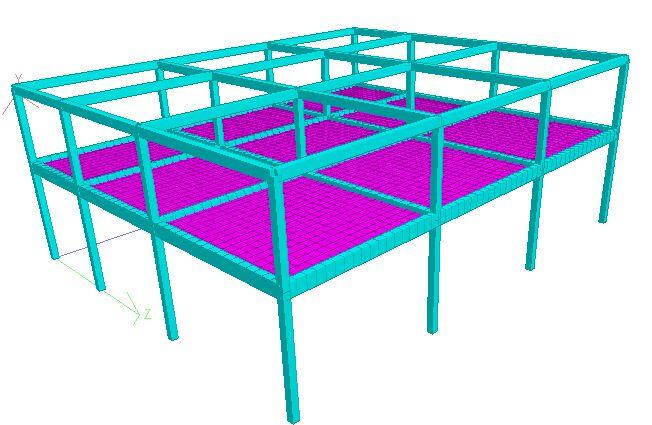
The 3D view of the frame is shown in Figure 4 below;

3D 2BFRAME 2BOF 2BBUILDING
Fig 4: 3D Model of the Building

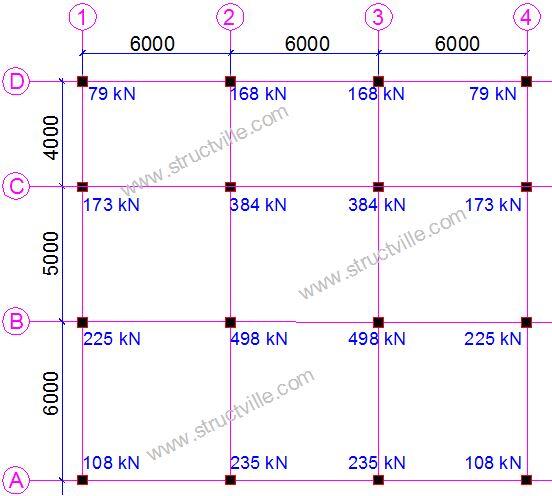
After analysis of the superstructure on Staad, the following ultimate column axial loads which are transferred to the foundation are shown below;

COLUMN 2BLOAD 2BON 2BRAFT 2BSLAB
Fig 5: Column Loads on the Foundation

From figure 5 above, I believe you can easily model the foundation in another software, or carry out manual analysis for checks of the procedure adopted here.

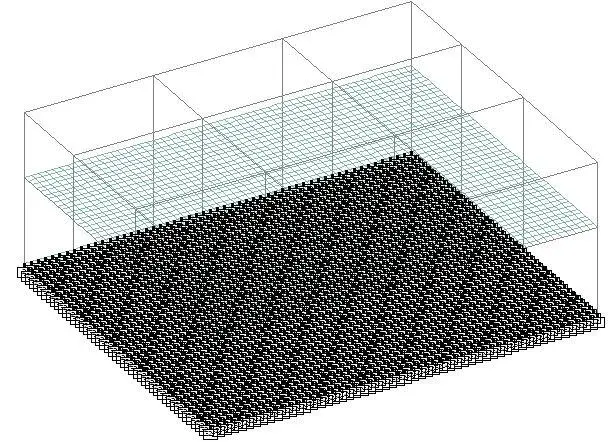
When the ground beams and elastic mat foundations are applied on Staad Pro, the results are as follows;

SUPPORTS 2BON 2BRAFT
Fig. 6: Typical View of the Structure with Elastic Mat Foundation


(1) Base Pressure

BASE 2BPRESSURE
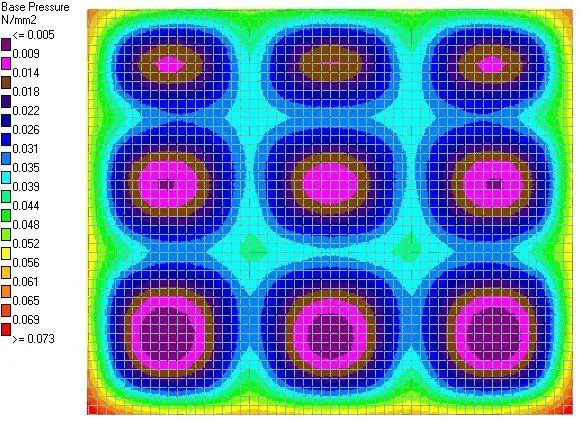
Fig. 7: Base Pressure

A little consideration will show that we are obtaining a maximum base pressure of 73 kPa at the edges, which might be higher than the bearing capacity of the soil. The engineer is advised to review this properly. However, along grid lines 2 and 3, we have base pressure of 39 kPa which increases towards the edges. The minimum base pressure occurred at the mid-spans.

(2) Moment in the raft slab (x-direction)

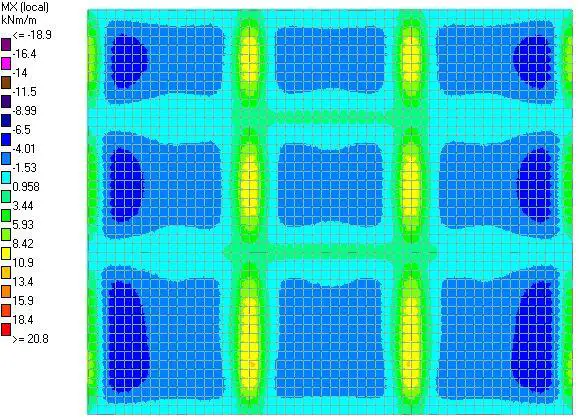
MX
Fig 8: Mx Moment

The bending moment on the raft slab was discovered to be low when compared with the value that could be gotten using the rigid approach (the maximum moment can be seen to be within 10.9 and 13.4 kNm/m)

final 2Bfront 2Bcover
[Get this publication on Design of Residential Buildings Using Staad, Orion, and Manual Calculations into your mailbox by clicking HERE or by clicking on the book cover]

(3) Bending moment in the Y-direction

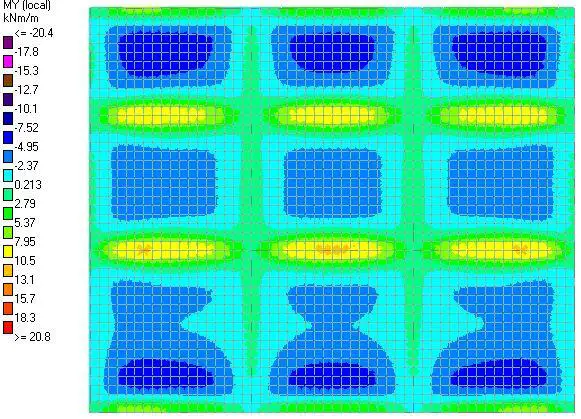
MY
Fig 9: My Moment


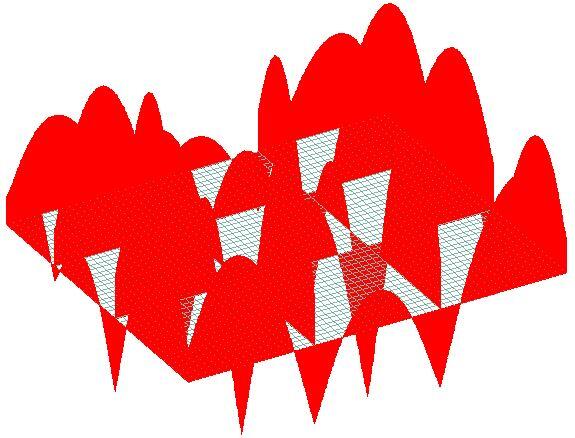
(4) Twisting Moment

MXY
Fig 10: Mxy Moment

(5) Bending Moment in the ground beams

BENDING 2BMOMENT 2BIN 2BGROUND 2BBEAMS
Fig 11: Bending Moment Diagram of the Ground Beams

For simplicity, the maximum design forces have been presented in the table below;

Maximum 2BMoments

The bending moment on ground beam of grid line (2) is given below;

BM2
Fig 12: Bending Moment for Ground Beam Grid line 2

What are your thoughts on the values obtained? At your convenience, you can model the raft slab on the software you normally use, and compare the results obtained. You can present your observations in the comment section for review.

Thank you for visiting Structville, and God bless you.

Citation
Murthy V.N.S (2012): Textbook of Soil Mechanics and Foundation Engineering (Geotechnical Engineering Series) 1st Edition. CBS Publishers and Distributors Pvt Ltd, India ISBN: 81-239-162-1