8.7 C
New York
Monday, October 28, 2024
Home Blog Page 28

How to Determine the Depth of Foundation

Foundations are substructure elements that transmit the superstructure load of a structure to the final bearing soil layer/stratum. The depth of a foundation is an important parameter that influences the performance of the structure. There are no strict rules or direct formulas for determining the depth of a foundation, but there are important factors that must be considered before the final depth of a foundation is selected.

The first consideration in the selection of the depth of a foundation is that the foundation should be taken down to a depth where the bearing capacity of the soil is adequate to support the foundation loading without excessive settlement or shear failure. The bearing capacity of the foundation and the depth is determined from soil investigation using in-situ and/or laboratory tests.

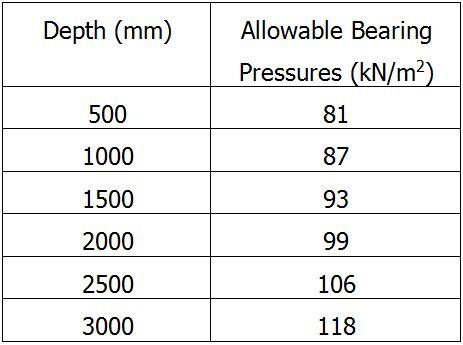
Soil investigation report produced by a geotechnical engineer usually contains the bearing capacity of soil in a site at different depths. The selected depth and bearing capacity used for the foundation design should give an idea of the minimum depth of the foundation. A typical example is shown in the table below;

typical foundation depth from soil test report

From the table above, if a bearing capacity of 87 kPa has been used for the foundation design, the minimum depth of the foundation should be 1000 mm.

Aside from bearing capacity considerations, it is very important to take the depth of foundations beyond the loose or disturbed topsoil, or soil liable to erosion by wind or flood. When a foundation is founded very close to the ground surface, erosion can lead to loss of bearing capacity no matter how strong the strata is in shear resistance.

When the conditions above are met, the major objective should then be to avoid too great a depth to the foundation level. Depending on the nature of the soil, when the excavation of the trench exceeds 1500 mm, supports may be required to keep the sides from caving in. This can cause a lot of disruption to the foundation construction and subsequently add to the cost of the foundation.

Where possible or applicable, the base of a shallow foundation should be kept above the groundwater level in order to avoid the costs of groundwater control and possible instability of the soil due to the seepage of water into the bottom of the excavation. According to Tomlinson et al (1989), it is usually more economical to adopt wide foundations at a comparatively low bearing pressure, or even to adopt the alternative of piled foundations, than to excavate below groundwater level in a water-bearing gravel, sand or silt.

Apart from the considerations of allowable bearing capacity, it is important to extend shallow foundations in clays beyond the soil stratum that is subject to the influences of ground movement caused by swelling and shrinkage, vegetation, frost action, and other effects. Consideration should be given to the stability of shallow foundations on stepped or sloping ground.

The anticipated loading on a foundation can also influence the depth of the foundation. Foundations subjected to high lateral loads and overturning moment should be founded at greater depths where the depth of the foundation and surcharge can improve the factor of safety against overturning and sliding.

Rankine’s formula can be used to estimate the depth of a shallow foundation. However, the answer gotten from the formula is rarely used because of its lack of practical significance. Rankine’s formula for the depth of a shallow foundation is given by;

Df = (qa/Ƴ) × [(1 – sinØ)/(1 + sinØ)]2

Where;
qa = allowable bearing capacity
Ƴ = unit weight of soil
Ø = angle of repose or shearing resistance of soil

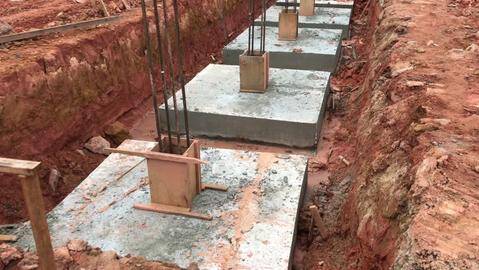
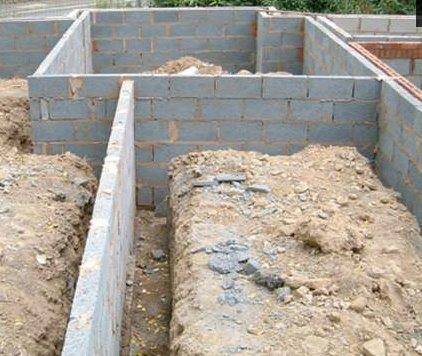
depth of foundation strip
Typical depth of strip foundation

For pad and strip foundations, it is usual to provide a minimum depth of 500 mm as a safeguard against minor soil erosion, the burrowing of insects or animals, heave, and minor local excavations and soil cultivation. It is important to note that this minimum depth is inadequate for foundations on shrinkable clays where swelling and shrinkage of the soil due to seasonal moisture changes may cause appreciable movements of foundations.

A depth of 900 mm to 1000 m is regarded as a minimum at which some seasonal movement will occur but is unlikely to be of a magnitude sufficient to cause damage to the superstructure or ordinary building finishes.

For most duplexes constructed in Nigeria where the bearing capacity of the soil is greater than 100 kN/m2 at shallow depths, a depth of 900 mm to 1200 mm is usually adequate for separate column bases.

References
Tomlinson M. J. (1989): “Foundations Design” in Civil Engineer’s Reference (L. S. Blake eds). Butterworth-Heinemann 1989


Bentley Systems Launches Bentley Education Program

Bentley Systems has announced the launch of Bentley Education program that will provide full access to learning licenses of more than 40 of Bentley’s most popular applications used by infrastructure professionals worldwide. The program offers full access to learning licenses of over 40 of Bentley’s most popular applications used by infrastructure professionals around the globe, including ContextCapture, MicroStation, OpenRoads Designer, STAAD.Pro, and SYNCHRO. The portal can be accessed here.

The Bentley Education program uses a role-based learning approach, allowing future infrastructure professionals to focus on specific capabilities needed for specific professions. Students can go beyond mere product proficiency and develop a comprehensive understanding of the skill sets required to excel in various roles in infrastructure engineering.

Currently, the Bentley Education program is only available in the United Kingdom, Australia, Singapore, Ireland, and Lithuania, with plans to expand to the United States, Canada, Mexico, Latin America, and India by mid-summer. The students/educators or institutes from other countries can navigate to STUDENTserver to use their unique school code provided by their faculty/institute lab administrator for a complimentary software download.

Bentley education program

The Bentley Education portal aims to bridge the gaps in classroom teaching, innovative technology, and best practices learned from real-world projects. Bentley is also asking students from all over the world to come forward with their ideas that improve quality of life and submit those for Future Infrastructure Star Challenge 2021. With infrastructure going digital, the program will help students sharpen their digital design skills and enhance their chances to grab opportunities as AEC professionals.

“With many nations and institutions committing to infrastructure and digital education initiatives as top priorities for a post-pandemic world, we are excited to launch this much-requested and responsive program now,” said Katriona Lord-Levins, Chief Success Officer, Bentley Systems. “We want to inspire and encourage students to learn about infrastructure engineering as a possible career path, and to introduce these young minds to the vast opportunities that lie ahead, with infrastructure going digital.”

Vinayak Trivedi, vice president of Bentley Education, said, “We want to make the Bentley Education portal the place where students can go to learn about and become inspired to make infrastructure engineering their career choice. The goal of the program is to help students who are passionate about infrastructure to get a jump-start on a fulfilling career. The Future Infrastructure Star Challenge 2021 provides an opportunity for them to be creative and innovative in project designs for improving the quality of life and positively changing the world.”

Structville Webinar on the Design of Raft and Pile Foundation

Structville Integrated Services Limited is pleased to announce the second edition of the webinar on the ‘Design of Raft and Pile Foundation’. The details are as follows;

Topic: Structural Analysis and Design of Raft and Pile Foundation
Date: Saturday, 5th of June, 2020
Time: 07:00 pm – 09:00 pm (WAT)
Facilitator: Engr. Ubani Obinna (MNSE, R.Engr)

To register for the event click HERE

webinar foundation design

Features:
(1) Theories and philosophies in the design of shallow and deep foundations
(2) Practical design of pile foundations and pile caps using real-life data
(3) Rigid and flexible approach to the design of raft foundation
(4) Structural design of raft foundation
(5) Full design material (mini textbook) with detailed drawings covering the above topics

To register for the event, click HERE

Use of Lightweight Concrete in RC Design

According to EN 1992-1-1:2004, lightweight concrete is concrete having a closed structure and a density of not more than 2200 kg/m3 consisting of or containing a proportion of artificial or natural lightweight aggregates having a particle density of less than 2000 kg/m3. By having a closed structure, the implication is that the concrete must not be aerated either autoclaved or cured for the requirements stated to apply.

The requirements for normal-weight concrete are generally applicable to lightweight concrete unless specifically varied as described in Chapter 11 of EN 1992-1-1:2004. In general, where strength values originating from Table 3.1 of EC2 are used in Expressions, those values have to be replaced by the corresponding values for lightweight concrete, given in Table 11.3.1 OF EC 2.

Lightweight concrete offers the advantage of considerably reducing the dead load of a structure. According to ASTM 331-05, structural lightweight concrete should not have 28 days compressive strength of less than 17 MPa. Structural lightweight concrete can be applied in;

  • Floors in steel frame buildings (lightweight concrete on fire-rated steel deck assemblies)
  • Concrete frame buildings & parking structures (all types, including post-tensioned floor systems)
  • Bridge decks, piers & AASHTO girders
  • Specified density concrete, etc

To manufacture lightweight concrete, natural or artificial lightweight aggregates could be used (to form a closed structure). Alternatively, the concrete could be aerated or produced with no fines (open structure).

The main natural lightweight aggregates used for production of concrete are;

1. Diatomite
2. Pumice
3. Scoria
4. Volcanic cinders
5. Tuff

Artificial lightweight aggregates can be manufactured by heating raw materials such as shales, clay, and pellets in a kiln at a temperature of about 1200 ℃. Alternatively, molten blast furnace slag or clinker aggregates can be used.

The following symbols are used specially for lightweight concrete:

LC the strength classes of lightweight aggregate concrete are preceded by the symbol LC
ηE is a conversion factor for calculating the modulus of elasticity
η1 is a coefficient for determining tensile strength
η2 is a coefficient for determining creep coefficient
η3 is a coefficient for determining drying shrinkage
ρ is the oven-dry density of lightweight aggregate concrete in kg/m3
For the mechanical properties an additional subscript l (lightweight) is used.

Density Classes

Six density classes are identified for lightweight concrete in EN 206-1. This is reproduced in the table below. The table gives corresponding densities for plain and reinforced concrete with normal percentages of reinforcement which may be used for design purposes in calculating self-weight or imposed permanent loading. Alternatively, the density may be specified as a target value during mix design.

Density class1.01.21.41.61.82.0
Range of density801 – 10001001 – 12001201 – 14001401 – 16001601 – 1800180- 2000
Nominal design density (kg/m3): Plain concrete105012501450165018502050
Nominal design density (kg/m3): Reinforced concrete115013501550175019502150

Many properties of lightweight concrete are related to its density ρ. The coefficient;

η1 = 0.4 + 0.6ρ/2200

is used to modify the relevant property of normal-weight concrete. In this expression, ρ refers to the upper limit of the density for the relevant density class in accordance with the table above.

An estimate of the mean values of the secant modulus Elcm for lightweight concrete may be obtained by multiplying the values in Table 3.1 of EC2, for normal density concrete, by the following coefficient:

ηE = (ρ/2200)2

The strength classes and properties associated with lightweight concrete are shown in the Table below;

Strength class of lightweight concrete

Design compressive strength

The value of the design compressive strength is;
flcd = αlccflckc

The recommended value in the code for αlcc is 0.85. The UK National Annex proposes to adopt the same value.

Similarly, the value of the design tensile strength is
flctd = αlctflctkc
with αlct = 0.85.

Lateral Buckling of Slender RC Beams

Just like columns, beams can undergo lateral buckling instability when it is slender. Slenderness in beams occurs when the width of the beam is too narrow compared to its span or depth. However, this is usually a rare occurence in construction, therefore, simple checks are usually sufficient to check that lateral buckling problem will not occur in beams.

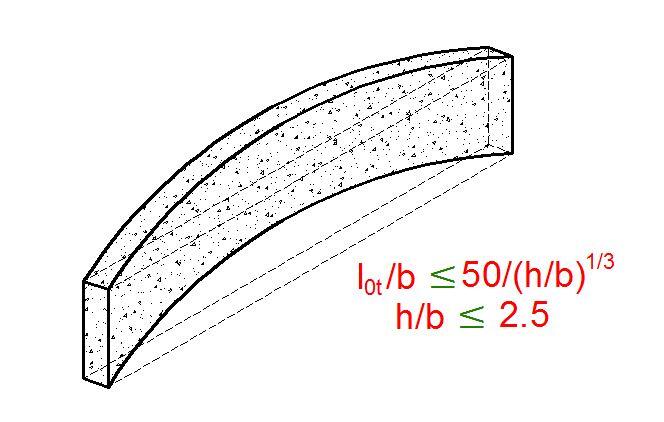
According to clause 5.9 of EN 1992-1-1:2004, a beam will be safe against lateral buckling provided that;

For persistent situations: l0t/b ≤ 50/(h/b)1/3 and h/b ≤ 2.5
For transient situations: l0t/b ≤ 70/(h/b)1/3 and h/b ≤ 3.5

where:
l0t is the distance between torsional restraints
h is the total depth of beam in central part of l0t
b is the width of compression flange

According to EC2, where buckling instability is to be considered in beams, a lateral deflection of l/300 should be assumed as a geometric imperfection in the verification of beams in unbraced conditions, with l = total length of the beam. In finished structures, bracing from connected members may be taken into account. Furthermore, torsion associated with lateral instability should be taken into account in the design of supporting structures.

No indication is given in EN 1992-1-1 as to how a further check should be formulated, should this be necessary. However, a more detailed analysis is given clause 6.7.3.3.4 of the CEB-FIP 1990 Model Code. The method given in the publication has similarities with the nominal curvature method (for analysis of slender columns) in that it postulates an ultimate deflected shape and then ensures that the critical section can withstand the resulting internal actions.

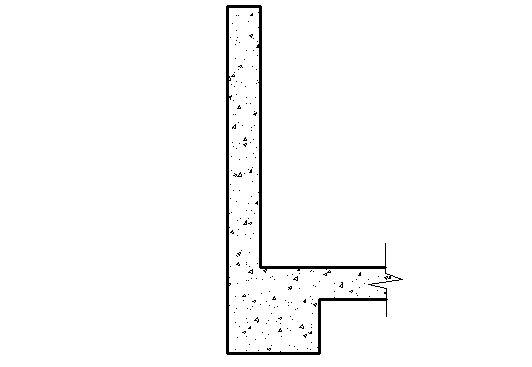
edge beam with parapet
Fig 1: Cross-section of edge beam with parapet

According to Beeby and Narayanan (2009), a problem which occasionally occurs in practice with slender beams is where, for example, an edge beam is designed with a thin parapet cast monolithically as sketched in Fig. 1. Such a beam would normally be designed ignoring the effect of the upstand parapet; however, rigorous interpretation of rules such as those in EN 1992-1-1 would imply that such a member cannot be used because of the slenderness of the parapet. It must, in such circumstances be satisfactory to state that if the beam is adequately safe without the parapet, then the addition of the parapet cannot make it less safe.

References
Beeby A. W. and R. S. Narayanan R. S. (2009): Designers’ Guide to Eurocode 2: Design of Concrete Structures. Thomas Telford Publishing, London

How to Write NSE Technical Report

The Nigerian Society of Engineers (NSE) was founded in the year 1958 to serve as an umbrella body for professional engineers in Nigeria. As a professional body, the NSE is dedicated to the professional development and enhancement of its members, and amongst other things, to upholding high ethics and standards in the practice of engineering profession in Nigeria.

Engineering graduates from COREN recognised universities who have practiced for a minimum of four years are qualified to apply to become corporate members of the NSE. During application, candidates are expected to provide documents such as 1st-degree certificate, NYSC certificate, statement of experience forms, acknowledgment form (from the branch), and must be endorsed by two financially up-to-date Registered Engineers who will act as the proposers. There are other different categories of membership in the NSE and the requirements for each cadre of membership are well specified on the NSE website.

Candidates following the B1/B2 route (described above) to corporate membership are required among other things to satisfy some minimum requirements which are assessed through technical reports, interviews, and examination. Candidates who successfully pass through this process can directly apply to COREN to be recognised as Registered Engineers without further exams or interviews.

One of the major hurdles of the NSE application process is to successfully write a detailed technical report containing your relevant work experience. The interesting aspect of this is that the report will be read and assessed by experienced registered engineers in the field of the candidate, who will eventually interview the candidate.

If the candidate is successful after this stage, he can proceed to write a computer-based test before the council takes a decision. Therefore, the aim of this article is to show you how to successfully write and defend your NSE technical report.

The NSE technical report is separated into Volume 1 and Volume 2. Volume 1 of the report contains the generalised post-graduate experience of the candidate, while Volume 2 is a technical report that contains specific engineering designs and/or construction that the candidate has executed under the supervision of a Registered Engineer.

In order to be successful, a candidate should be very sure that he is qualified to be admitted as a corporate member of the NSE. This is done by checking that he has met all the prescribed requirements, including a minimum of 4 years of professional work experience.

Engineering graduates who have met the four years postgraduate requirement but are not practicing engineering should not apply, since this will undermine the vision of upholding high professional standards in engineering in Nigeria. Only those who are practicing engineering should apply.

Therefore honesty, integrity, and confidence is very paramount in this case. Furthermore, it is very easy for experienced engineers to recognise someone who is not in active practise.

Guidelines for Writing Volume 1 – ‘Post-Graduate Experience’

The format or guideline for writing Volume 1 of the NSE technical report can be downloaded from the NSE website. This aspect of the technical report should contain the academic and work history of the candidate. The procedure for writing the academic history can be seen in the NSE guideline. However, I will elaborate on the work experience aspect.

The way the professional work experience of the candidate should be arranged as shown in the snippet below;

NSE technical report guideline

A candidate is expected to report on at least 5 projects he has been involved in since his graduation from the university. The projects can be in the form of design (consultancy) and/or construction. Candidates in academia can submit details of their research output (publications) that are relevant to the development of the engineering profession. The aim of the Volume 1 report is to show the depth of professional experience acquired by the candidate.

Post Graduate Training – Titled Experience

According to NSE guidelines, a candidate is expected to start by stating the title of the experience gained for each project. This will enable the examiners to know the direction that the candidate is going, and also know the minimum experience they are expecting the candidate to acquire from the project.

A civil engineering graduate who has been on a construction site as a site engineer should state ‘site supervision/management‘ as the experience gained. Someone who has been in the design office as a consultant can state the experience gained as ‘structural design‘. To be more specific, the candidate should add the actual nature of the design done since each project in the report is expected to be unique. Experience in the design of steel structures should be differentiated from experience in the design of reinforced concrete.

Therefore, the titled experience for each of the projects can be in the following forms (note: this is mixed up across different fields of engineering);

WORK EXPERIENCE 1: DESIGN OF SOLAR INVERTERS
WORK EXPERIENCE 2: DESIGN OF TIMBER BRIDGE
WORK EXPERIENCE 3: CONSTRUCTION SUPERVISION OF RIGID PAVEMENT
WORK EXPERIENCE 4: DESIGN OF EARTH DAMS
WORK EXPERIENCE 5: INSTRUMENTATION OF LPG GAS PLANT

For example, if you look at the titles above, the examiners will expect the candidate who stated the ‘Work Experience 2’ to have acquired a minimum basic experience in the design of timber bridges (not reinforced concrete or steel). With that, they are already looking out for some important details that will show that the experience gained is sufficient. All grey areas can be cleared during the interviews as the examiners will likely request to get more information from you.

Project Title

The title of the project where the experience was gained should be explicitly stated. The project title should be as written in the contract documents of the project. The following are examples of project titles;

(1) EXPANSION AND REHABILITATION OF ENUGU-ONITSHA EXPRESSWAY
(2) INSTALLATION OF 33 kVA TRANSFORMER FOR SILVA ESTATE, AKURE
(3) STRUCTURAL DESIGN OF RESIDENTIAL DEVELOPMENT FOR MR. AND MRS. GARBA BELLO
(4) DESIGN AND INSTALLATION OF HVAC FOR ORIENTAL HOTELS AND TOWERS

Organisation Name

The NSE technical report guidelines requires that you state the organisation/department where the experience was gained. For example;

FEDERAL MINISTRY OF WATER RESOURCES, NIGERIA (Dams and Reservoir Operations Department)
STRUCTVILLE INTEGRATED SERVICES, LIMITED
OVE ARUP AND PARTNERS (Project Management Department)
LAMBERT ELECTROMEC

Statement of Project Objective

No project starts in vain. As an engineer, it is expected that you should know the objective of the project that you are embarking on. The objective of a project should also determine whether you should agree to be part of the project or not. It is against NSE engineering ethics to be involved in projects whose aims are inimical to humanity and general development. For instance, projects linked to acts of terrorism should be rejected by professional engineers. Do not be like Tom Lehrer who made this quote;

Once the rockets go up, who cares where they come down? That is not my department.

The specific objectives of an engineering project could be;

(1) Construction of water treatment plant for raw water from Ogbese Reservoir for household distribution.
(2) Assessment of the sub-soil conditions of Lekki Peninsula with a view of obtaining the most appropriate foundation system for a medium-rise commercial development.

The objectives of the project from which you obtained your relevant experience can give the examiners an idea of the quality of experience and/or exposure that you must have gained.

Project Duration and Position Held

It is important to state the number of years or months you spent on each project. Remember as I said earlier, the aim of the examiners is to evaluate the depth of experience you have acquired in the profession. Nobody expects you to know it all, but in the areas where you have worked, you are expected to be good at it in order to be called an engineer.

Furthermore, the job title or position you held during your engagement should be stated. Job titles are usually provided in your employment letter and should be very professional titles that reflect the nature of your responsibility. When the actual job title is generic, you can add the specific role or responsibility in parenthesis. Some examples of valid job titles are;

(1) GRADUATE RESEARCH ASSISTANT (Department of Mechanical Engineering)
(2) PUPIL ENGINEER (Structural Design)
(3) ASSISTANT SITE SUPERVISOR
(4) GRADUATE INTERN (Facility Management), etc

It is awkward for you to handle a project from start to finish immediately after graduation without the supervision of a Registered Engineer. Therefore, you should be properly guided when writing about your experience.

Description of Experience

This is an important aspect of the NSE ‘Volume 1’ technical report. In this section, you are expected to describe the project, your level of participation in the project, your responsibility, the summary of your daily routine/job description, challenges encountered during the project, solutions proferred, and lessons learned from the project.

It is very important for you to write on projects that you truly worked on. Avoid giving false reports or giving your technical report to someone else to write for you. You should own your report completely. By so doing, you will be able to defend all the processes and operations of the project from start to finish. This should include the design, construction methodology, and construction management. Lies and discrepancies can be easily detected since you are going to be examined by engineers who do exactly the same thing.

Furthermore, even if you worked on construction aspects only, you should have an idea about how the design is done. This is what makes you a complete engineer.

In order to make this section clear, you should break it down into sub-sections as recommended in the NSE technical report guideline. The ‘description of experience report’ should be written in first person singular or plural.

If you have truly participated in an engineering project, you should have no challenge in telling the story of what you did during the project. The only difference is that you will have to tell the story in a technical way. Having said that, you should use technical terms in your description of daily work activities.

For civil engineers on site, it is very common to use expressions that are easily understood by the artisans. For instance, terms like ‘shoot-out‘ (for cantilevers), ‘iron 16‘ (for Y16 mm rebars), ‘pillars‘ (for columns), etc should be avoided in your report. Also, the proper description of each item of work such as ‘preparation and installation of formwork‘, ‘pouring/casting of concrete‘, ‘creation of diversion‘, ‘establishment of construction levels‘, etc should be used.

Every project is unique and has its own challenges. A good engineer will always reflect on the challenges encountered during a previous project and how it was resolved. This is because experience is what makes a complete engineer. You can as well think of how to improve on the solutions you adopted in the past. Some examples of challenges that can be encountered on site are;

(1) Groundwater control problems
(2) Human resources management problems
(3) Discrepancies between design specifications and actual site conditions
(4) Construction cost management, etc

In order to assess your level of exposure in the engineering profession, the examiners will like to know the challenges you encountered and how you solved them. Remember that your storytelling should be technical, and the solutions you proffered should make engineering sense (technical and management wise).

Even if you had made wrong decisions, there is no problem since you are expected to state the lessons you learned from each project. We all make mistakes, but the lessons you learn from them are more important.

Pictures

Ultimately, you are expected to back up each project with pictures to add more weight to your claims. So always take pictures of your construction projects. It is very important.

Guidelines for Writing Volume 2 – ‘NSE Technical Report on Two Selected Projects’

In Volume 2 of the NSE technical report, you are expected to select two of your best projects from the five listed in Volume 1 and write a detailed report on them. Preferably, the two projects selected should not be related and should offer a completely different experience to the candidate.

For instance, if the first project report is on the design of a reinforced concrete residential building, the second should be preferably come from say, design and construction of an industrial steel building, shoreline protection, retaining walls and culverts, bridges, construction of jetties/wharves, tank farms, and reservoirs, etc.

Candidates with experience in different fields can report on highway construction, water treatment and supply, etc.

According to NSE technical report guidelines, Volume 2 should be divided into three chapters. The first and second chapters should contain reports on the first and second projects respectively, while the third chapter should contain the recommendation and conclusion.

The arrangement of chapters 1 and 2 should be as follows;

1.0 INTRODUCTION
1.1 JUSTIFICATION OR NEED FOR PROJECT
1.2 PRELIMINARY STUDIES/INVESTIGATIONS
1.3 DESIGN CONSIDERATIONS/CRITERIA
1.4 STANDARDS AND SPECIFICATIONS
1.5 METHODOLOGY AND DESIGN CALCULATIONS
1.6 DRAWINGS
1.7 PREPARATION OF BEME (INCLUDING TAKE–OFF SHEETS)
1.8 CONSTRUCTION/INSTALLATION/ANALYSIS/TEST & CALCULATIONS
1.9 ANALYSIS OF TEST RESULTS AND COMMISSIONING
1.10 PROJECT OUTCOME

Introduction

In this section, the project should be properly introduced. The introduction should include the title of the project, the client, the consultants, and the contractors. Furthermore, the location of the project should also be included. For buildings, the features of the building should be included such as the materials to be used for the construction (reinforced concrete, structural steel, timber, etc), the number of floors, the floor area, etc. Other specific features such as suspended swimming pools, helipad, tanks, etc should also be included.

Every feature that can give an idea of the magnitude of the selected project and the expected level of construction difficulty should be stated.

Justification of the Project

The exact need of the project should be stated. This could be stated in form of;

  • Construction of a two-lane flyover bridge at Eleme Junction to ease traffic congestion
  • Construction of public swimming pool for residents of Springhill Estate for recreation and relaxation purposes
  • Construction of Okoja motor park to provide parking facility for commuters, and to avoid on-street parking

Preliminary Studies/Investigations

All the preliminary studies carried out before the commencement of the project should be stated. These can include the Environmental Impact Assessment (EIA), site surveys, geotechnical site investigation, wind funnel tests, etc. The findings of these investigations and how they affect the project in terms of planning, design, and execution should also be stated.


Design Considerations/Criteria

The candidate is expected to state the design considerations for the project. These can include the decisions taken from the preliminary studies or site investigation. The exposure conditions of the proposed structure, the basic wind speed, potentials for differential settlement or temperature difference should be stated.

Furthermore, the anticipated direct actions on the structure should be stated such as ‘highway bridge to be subjected to abnormal traffic‘, ‘building to be used as a place of worship‘, ‘building founded on a water logged area‘ etc. All considerations that will affect the design of the building should be stated.

Standards and Specifications

The code of practice or standard adopted in the design should be clearly stated.

Methodology/Design Calculations

For reports on construction, the construction methodology should be stated. For design works, the design calculation should be shown in full. Remember that the design calculation sheet for NSE technical report should be presented in the standard format of ‘ReferenceCalculationOutput‘.

Drawings

All design drawings (structural detailing) should be included. Drawings should be presented using the generally accepted format and scales. A lot of people have been disqualified from NSE exams for presenting shoddy drawings. All drawings should be clean, legible, and properly formatted. Remember to show plan and sections (for slabs), and elevation and sections (for beams and columns).

Preparation of BEME

The Bill of Engineering Measurement and Evaluation (BEME) for each project should be included. This should also include the quantity take-off sheet. As far as what we know is concerned, BEME is concerned with the calculation of quantities and cost of items of work in an engineering project that requires engineering judgement in the process. Otherwise, it something that should be left to quantity surveyors in my opinion.

Therefore for civil engineering projects, I will recommend limiting your BEME to just concrete and reinforcements works (or structural steel and the accessories). Calculation of quantities such as plaster, blocks/bricks, doors, windows, tiles, etc is not necessary in my opinion.
Earth Dams: Types, Construction, and Modes of Failure

Dams are structures that are constructed to impound a water body such as a stream or a river. The upstream (reservoir) of a dam is crucial for water storage which can be used for irrigation, municipal water supply, hydropower generation, flood control, fishing, and recreation. There are different types of dams such as earth dams, gravity dams, arch dams, etc.
Earth dams are dams that are constructed using natural materials such as natural soils, rocks, clays, and gravel. It is the most ancient type of embankment and can be constructed using familiar processes and primitive equipment. Unlike gravity and arch dams which require a sound foundation and more complex construction materials and methods, earth dams can be founded on natural soils. However, they are more susceptible to failure when compared with other types of dams.

Types of Earth Dams

There are three popular types of earth dams and they are;

  1. Homogeneous Embankment type
  2. Zoned Embankment type
  3. Diaphragm type

Homogeneous Embankment Type

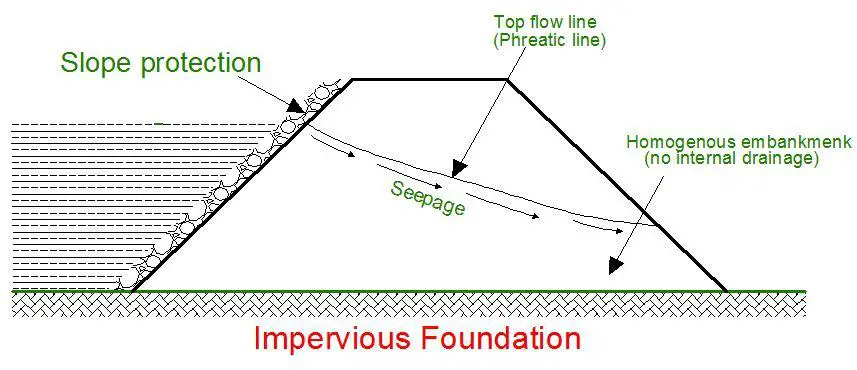
This is the simplest type of earth dam. It is constructed using a single material (same type of soil) and hence can be considered to be homogeneous throughout. To aid water tightness and stability, a blanket of relatively impervious material may be placed on the upstream face. This type of embankment is attractive when only one type of material is economically or locally available. However, this type of earth dam is more suitable for low to moderately high dams and for levees. Large dams are seldom designed as homogeneous embankments.

homogenous earth dam
Fig 1: Homogeneous type embankment earth dam

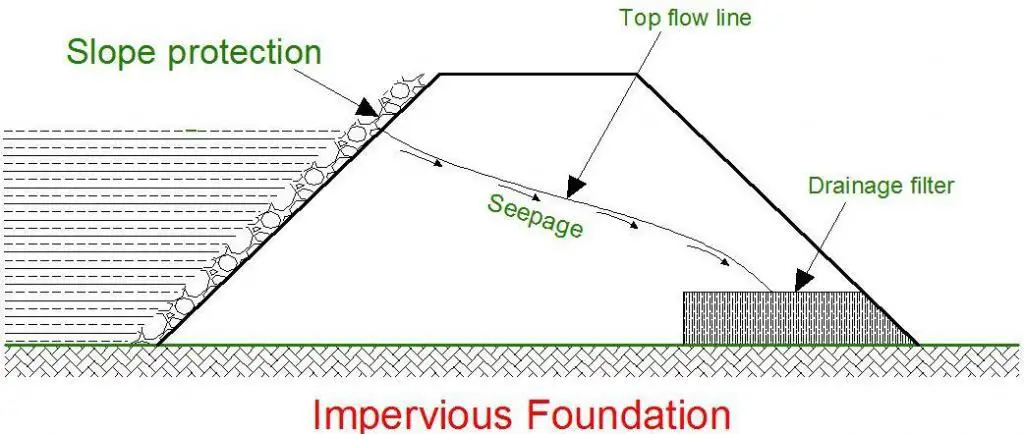
Seepage can be a major problem of purely homogenous earth dams. As a result, huge sections are usually required to make it safe against piping, stability, etc. To overcome this problem, it is usually very typical to add an internal drainage system such as a horizontal drainage filter, rock toe, etc. The internal drainage system keeps the phreatic line (i.e. top seepage line) well within the body of the dam, and steeper slopes and thus, smaller sections can be used, the internal drainage is, therefore, always provided in almost all types of embankments.

homogenous earth dam with drainage filter
Fig 2: Homogeneous type embankment earth dam with drainage filter

Zone Embankment Type

Zoned embankments are usually provided with a central impervious core, covered by a comparatively pervious transition zone, which is finally surrounded by a much more pervious outer zone. The central core checks the seepage. The transition zone prevents piping through cracks which may develop in the core. The outer zone gives stability to the central impervious fill and also distributes the load over a large area of foundations.

zoned embankment type of earth dam
Fig 3: Zoned embankment earth dam

This type of embankment is widely constructed and the materials of the zones are selected depending upon their availabilities. Compacted clay can be used for the central impervious core. The clay material should be carefully selected and should have a coefficient of permeability of less than 1 x 10⁻⁹ m/s irrespective of the compaction energy applied. Furthermore, in order to avoid desiccation-induced shrinkage cracks, the volumetric shrinkage should not exceed 4% and the unconfined compression strength (UCS) should exceed 200 kN/m2.

Freely draining materials, such as coarse sands and gravels, are used in the outer shell. Transition filters are provided between the inner zone. This type of transition filter is always provided, whenever there is an abrupt change of permeability from one zone to the other.

Diaphragm Type Embankment

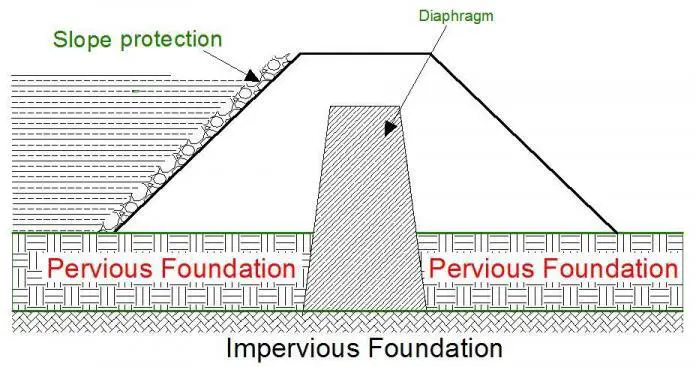
Diaphragm type embankment earth dam has a thin impervious core, which is surrounded by earth or rock fill. The impervious core, called the diaphragm, is made of impervious soils, steel, timber, concrete, or any other materials. It acts as a water barrier to prevent seepage through the dam.

The diaphragm may be placed either at the center as a central vertical core or at the upstream face as a blanket. The diaphragm must also be tied to the bedrock or to a very impervious foundation material. This is to avoid excessive under-seepage through the foundation.
DIAPHRAGM TYPE OF EARTH DAM
Fig 4: Diaphragm type embankment

The diaphragm type of embankment is differentiated from zoned embankments, depending upon the thickness of the core. If the thickness of the diaphragm at any elevation is less than 10 meters or less than the height of the embankment above the corresponding elevation, the dam embankment is considered to be of “Diaphragm Type”. But if the thickness equal or exceeds these limits, it is considered to be zoned embankment type.

Methods of Construction

There are two methods of constructing earthen dams:

  1. Hydraulic-fill Method; and
  2. Rolled-fill Method.

Hydraulic-fill Method

In this method of construction, the dam body is constructed by excavating and transporting soils by using water. Pipers called flumes, are laid along the outer edge of the embankment. The soil materials are mixed with water and pumped into these flumes. The slush discharged through the outlets in the flumes at suitable intervals along their lengths. The slush, flowing towards the centre of the bank, tends to settle down. The coarser particles get deposited soon after the discharge near the outer edge, while the fines get carried and settle at the centre, forming a zoned embankment having a relatively impervious central core.
Since the fill is saturated when placed, high pore pressures develop in the core materials, and the stability of the dam must be checked for these pressures. This type of embankment is susceptible to settlement over a long period, because of slow drainage from the core. Hydraulic-fill method is, therefore, seldom adopted these days, Rolled-fill method for constructing earthen dams is, therefore, generally and universally adopted in these modern days.

Rolled-fill Method

The embankment is constructed by placing suitable soil materials in thin layers (15 to 30 cm) and compacting them with rollers. The soil is brought to the site from burrow pits and spread by bulldozers, etc. in layers. These layers are thoroughly compacted by rollers of designed weights. Ordinary road rollers can be used for low embankments (such as for levees or bunds); while power-operated rollers are to be used for dams. The moisture content of the soil fill must be properly controlled. The best compaction can be obtained at a moisture content somewhere near the optimum moisture content.

Failure of Earth Dams   

Earth dams are less rigid and hence more susceptible to failure. Every past failure of such a dam has contributed to an increase in the knowledge of the earth dam designers. Earthen dams may fail, like other engineering structures, due to improper designs, faulty constructions, lack of maintenance, etc. the various causes leading to the failure of earth dams can be grouped into the following three classes.

  1. Hydraulic failures
  2. Seepage failures
  3. Structural failures.

These causes are describes below in details:

Hydraulic Failures

About 40% of earth dams failures have been attributed to these causes. Hydraulic failure of earth dams can occur due to over-topping of the top of the dam, erosion of the upstream face, erosion of the downstream face due to the formation of gullies, and erosion of the downstream toe.

Seepage Failures

Controlled seepage or limited uniform seepage is normal in all earth dams, and ordinarily it does not produce any harm. However, uncontrolled or concentrated seepage through the dam body or through its foundation may lead to piping or sloughing and the subsequent failure of the dam. Piping is the progressive erosion and subsequent removal of the soil grains from within the body of the dam or the foundation of the dam. Sloughing is the progressive removal of soil from the wet downstream face. More than 1/3rd of the earth dams have failed because of these reasons.

Structural Failures

About 25% of the dam failures have been attributed to structural failures. Structural failures are generally caused by shear failures, causing slides. This is majorly an issue of slope stability and foundation stability of the dam.

Detailing of Reinforced Concrete Slabs

Structural detailing is the process of interpreting design information and instructions using drawings and schedules. In reinforced concrete slabs and other structures, detailing entails using drawings and schedules to specify the dimensions and arrangement of structural members, material properties, clear cover, reinforcement sizes, spacings, and arrangement.

It is the duty of the Designer and the Detailer to ensure that the information provided in the drawing is correct since the same will be used for execution on site. The essence of this article is to provide information on the detailing standards for reinforced concrete slabs according to the requirements of the Eurocodes and UK practice.

Detailing Information

The design information that should be provided in the detailing of reinforced concrete slabs include:

  1. Layout and section drawings including details of holes and upstands, etc.
  2. Concrete grade and aggregate size (minimum standard 25/30 MPa and 20mm).
  3. Nominal cover to reinforcement and controlling design consideration, fire or durability (standard 20mm for internal conditions 40mm for external conditions).
  4. Main reinforcement bar runs and positions. This should include:
    • diameter, pitch of bars, and location (e.g. T1, T2, B1, B2, etc.)
    • type of reinforcement and bond characteristics (standard: H)
    • fixing dimensions to position bar runs and ends of bars.
  5. Details of any special moment bars connecting slab to wall or column.
  6. Details of cut-off rules, if other than standard shown in Model Details.
  7. Details of fabric required. For coffered slabs, this should include the fabric required in the topping and in the bottom of solid sections around columns. Sufficient details should be given to show that the reinforcement will fit in the depth available allowing for laps in the fabric. Guidance should be given for the additional area required for laps otherwise 22% will be assumed for 300mm laps.
  8. Details of insertions, e.g. conduit, cable ducting, cladding fixings, etc., should be given where placing of reinforcements is affected.

The Minimum Area of Reinforcement for Solid Slabs

According to Clauses 9.3.1.1, 9.3.1.2 and 9.2.1.1 of EC2;

  • Tension reinforcement:
    • As,min = 0.26btdfctm/fyk0.0013btd where:
      • bt is the mean width of the tension zone
      • d is the effective depth
      • fctm is determined from Table 3.2 of EC2
      • fyk is the characteristic yield strength
  • This also applies to nominal reinforcement.
  • Minimum bottom reinforcement in direction of span: 40% of the maximum required reinforcement.
  • Minimum top reinforcement at support (e.g. where partial fixity exists): 25% of the maximum required reinforcement in span, but not less than As,min. This may be reduced to 15% for an end support.
  • Secondary transverse reinforcement: 20% of main reinforcement except where there is no transverse bending (e.g. near continuous wall supports).
  • Preferred minimum diameter of reinforcement for solid slabs: 10mm.

The area of bottom reinforcement provided at supports with little or no end fixity assumed in design should be at least 0.25 that provided in the span.

Bar spacing

According to Clauses 8.2 and 9.3.1.1 of EC2, the recommended minimum spacing of reinforcing bars is 75 mm and 100 mm for laps.

Maximum spacing of bars for slabs
• Main bars: 3h ≤ 400mm (in areas of concentrated loads 2h ≤ 250mm)
• Secondary bars: 3.5h ≤ 450mm (in areas of concentrated loads 3h ≤ 400mm)

Where h is the thickness of the slab.

Anchorage and Lapping of Bars

For high yield and 500 Grade steel, the table below gives typical anchorage and lap lengths for ‘good’ and ‘poor’ bond conditions. For ends that are on ‘direct supports’ the anchorage length beyond the face of the support may be reduced to d but not less than the greater of 0.3 lb,rqd, 10b or 100mm.

Table 1: Typical anchorage and lap length for solid slabs

Anchorage and lap length for slabs

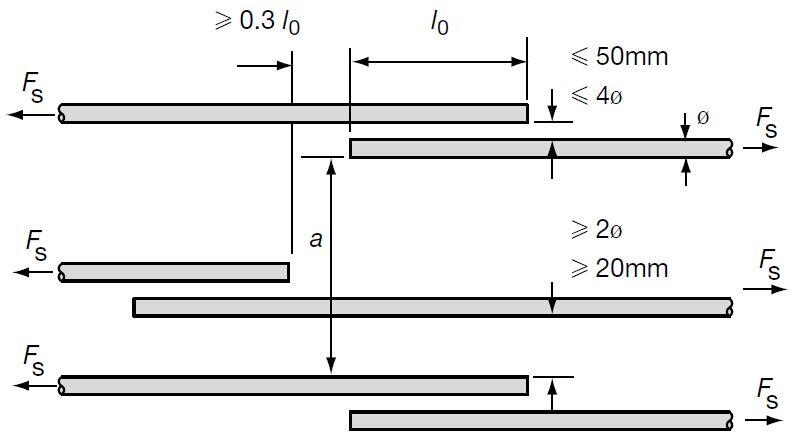
Where loading is abnormally high or where point loads are close to the support, reference should be made to EC2, Sections 8 and 9. Lap lengths provided (for nominal bars, etc.) should not be less than 15 times the bar size or 200 mm, whichever is greater. The arrangement of lapped bars should comply with Figure 1;

lapping of bars in supports
Figure 1: Guideline for lapping in solid slabs

Simplified Curtailment Rules for Reinforcement

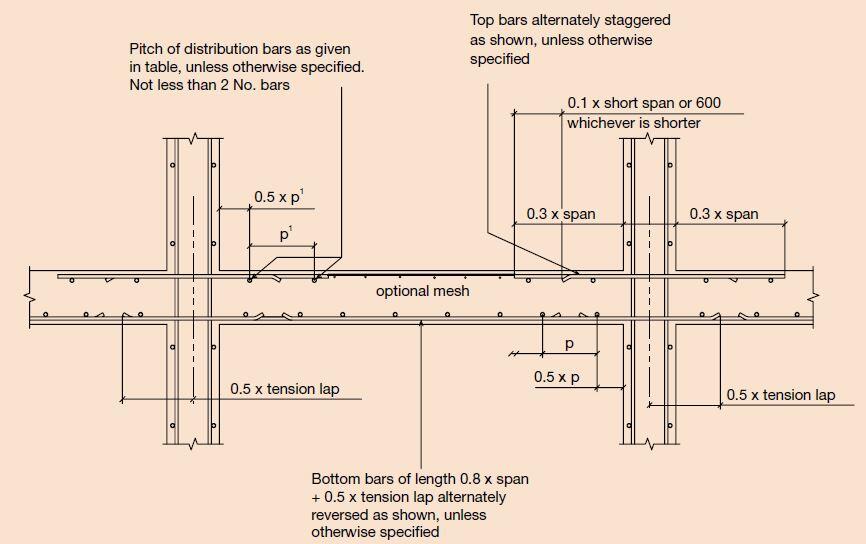
When only the minimum percentage of reinforcement is provided, there should be no curtailment when detailing reinforced concrete slabs. Simplified rules for curtailment of bars may be used without bending moment diagrams, provided adjacent spans are approximately equal (within 15%) and provided that the loading is uniformly distributed. The simplified rules for curtailment in solid slabs can be seen in Figures 2 to 5.

At internal supports in one-way and two-way slabs, the top reinforcement should extend into the span by 0.3 x times the length of the span as shown in Figure 2.

slab curtailment rules
Figure 2: Curtailment rules for top reinforcements in solid slabs

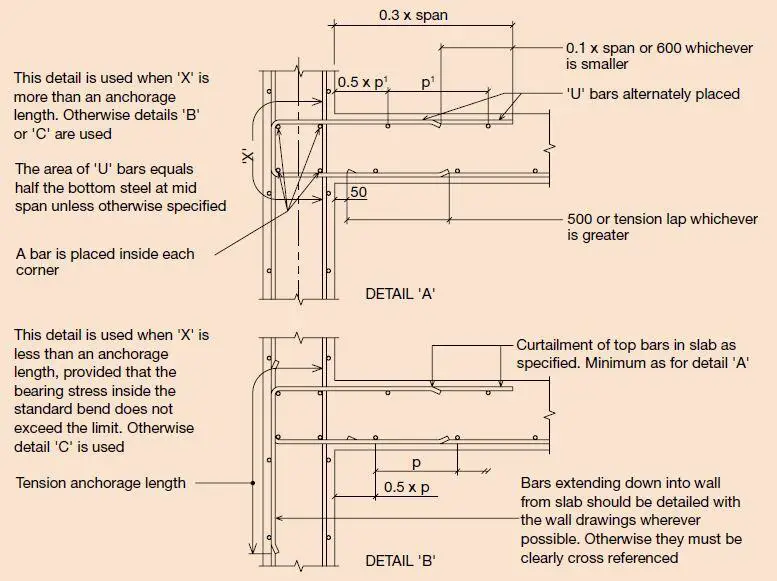
When the end support of a solid one-way or two-way slab is completely restrained (for example, when a solid slab is supported by a shear wall), the bars should be returned into the span by 0.3 x span as shown in Figure 3.

curtailment rule restrained end support 1
Figure 3: Curtailment rules for restrained end support

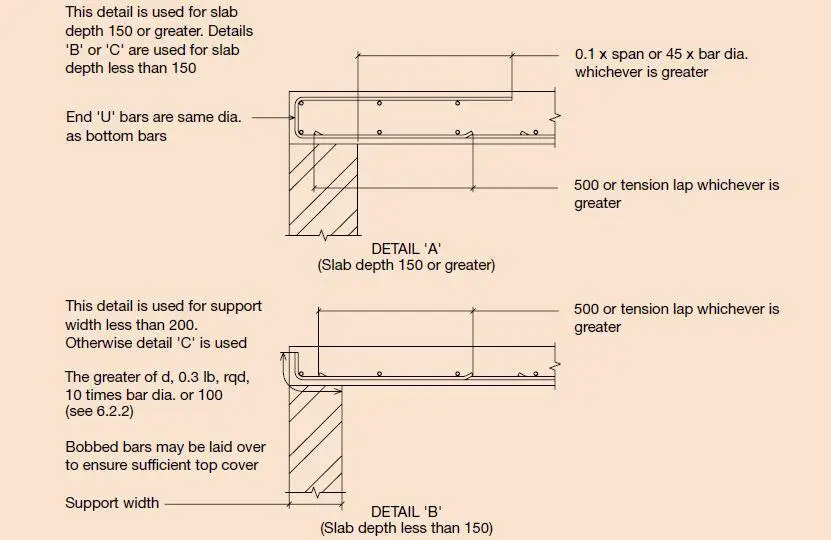
For external unrestrained support (for example, slabs supported by masonry walls), the bottom reinforcement should be returned by 0.1 x span. Where partial fixity exists (for example, end support of a slab supported by beams), the bottom reinforcement should be returned by 0.15 x span.

unrestrained end support
Figure 3: Curtailment rules for unrestrained end support of slabs

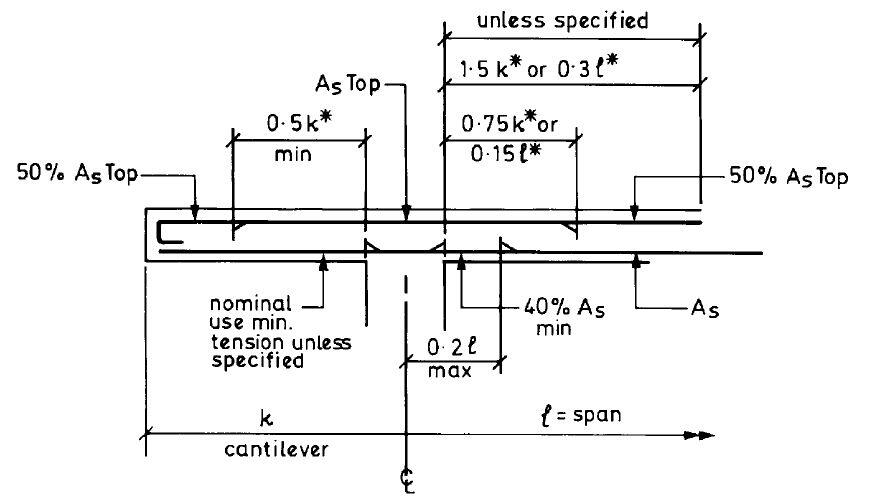
At cantilevers, the main top reinforcements should extend into the span by at least 1.5 x times the length of the cantilever or 0.3 times the length of the span whichever is greater. It is also recommended to provide at least 50% of the top reinforcement at the bottom in order to help control deflection.

detailing of cantilever slab
Figure 4: Curtailment rules for cantilevers


In other circumstances, the curtailment of the main longitudinal reinforcement should be related to the bending moment/shear force diagrams.

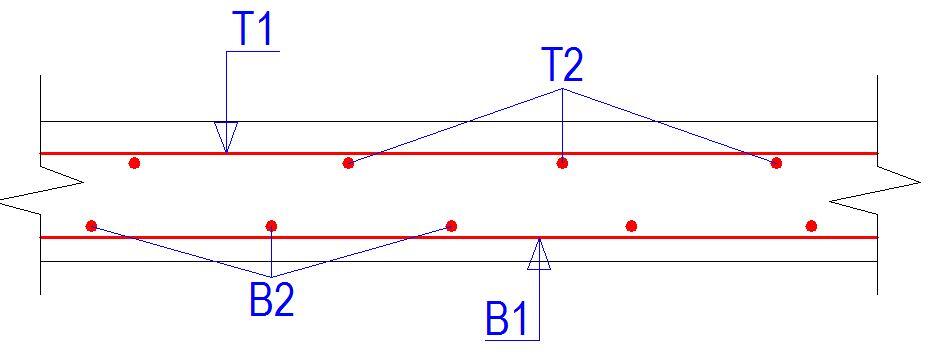
Notation for Locating Layers of Reinforcement

Reinforcement is fixed in layers starting from the bottom of the slab upwards and bar marks should preferably follow a similar sequence of numbering.

Notation is as follows:

• abbreviation for top outer layer T1 (or TT)
• abbreviation for top second layer T2 (or NT)
• abbreviation for bottom second layer B2 (or NB)
• abbreviation for bottom outer layer B1 (or BB)

bar layer notation in slabs
Figure 5: Notation for reinforcement layers

Reinforcement Bars and Indicator Lines

In slab detailing, every reinforcement bar is assigned a bar mark. Each bar mark is unique to a type of reinforcement, grade, size, dimensions, and shape. Therefore a bar mark can represent a single bar or a group of bars. Every bar mark is represented on plan by a typical bar drawn to scale, using a thick line (generally, rebar lines should be thicker than all other lines in the detailing drawing).

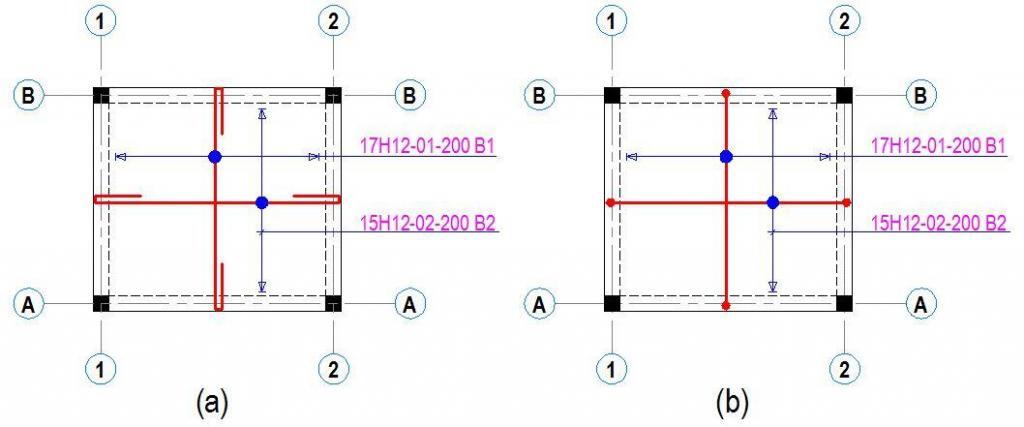
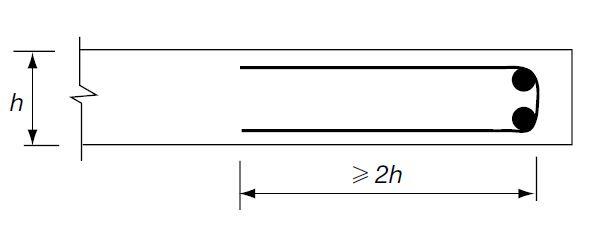
The reinforcement bar is positioned approximately midway along its indicator line (also called the call-out line), the junction of the bar and the indicator line is highlighted by a large dot. The first and last bars in a zone of several bars are represented by short thick lines, their extent indicated by arrowheads. Bends or hooks, when they occur at either end of the typical bar are represented by a medium dot or similar as shown in Figure 7(b).

Sometimes, hooks or bent bars are drawn on plan as though laid flat (see Figure 7a). This is actually the commonest method of detailing. However, confusion on site can result if some of these bars are required to be fixed flat and some upright. Sections and notes should be provided to clarify this method if used.

Example

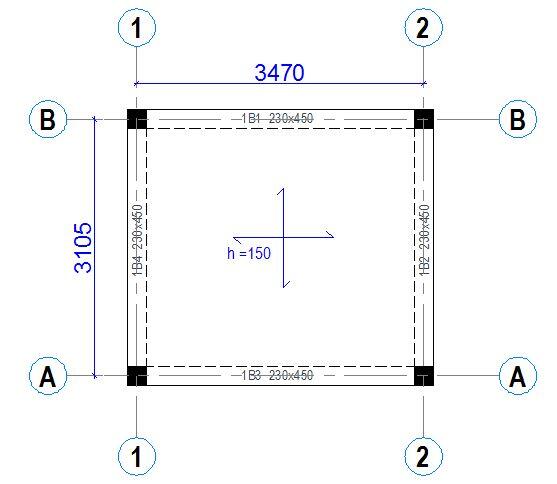
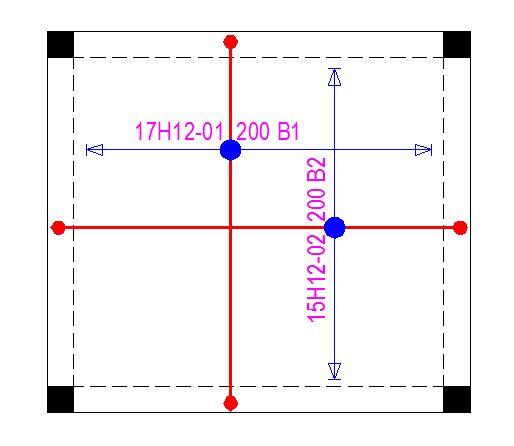
typical simply supported slab panel
Figure 6: Typical simply supported slab panel

Let us consider the slab panel shown above with simply supported assumptions. The reinforcement specified in all directions is H12 @ 200mm spacing.

To calculate the number of rebars to be provided in each direction, the following steps can be followed;

In the short span direction;
n = [(lx – bwp)/p] + 1 = [(3105 – 230 – 200)/200] + 1 = 14.375 (provide 15 Nos of H12 bars)
Note: p is the spacing of the bars and it is assumed that the laying of slab mat reinforcement starts at 0.5p from the face of the beam.

Similarly in the long span direction;
n = [(ly – bwp)/p] + 1 = [(3470 – 230 – 200)/200] + 1 = 16.2 (provide 17 Nos of H12 bars)
Note: On site, you will eventually have a spacing that is slightly less than 200 mm center to centre (about 178 mm, which is good/conservative). But if you provide 16 numbers, you will have spacing greater than 200 c/c which is not too good.

Detailing of reinforced concrete slab
Figure 7: (a) Hooks/bends drawn on plan as though laid flat (b) Hooks/bends represented by a medium dot

In figure 7(a) the bend/hook is drawn in plan as flat, while in figure 7(b) it is represented using a medium dot. Either method is acceptable in standard, but in Nigeria, the former is more popular.

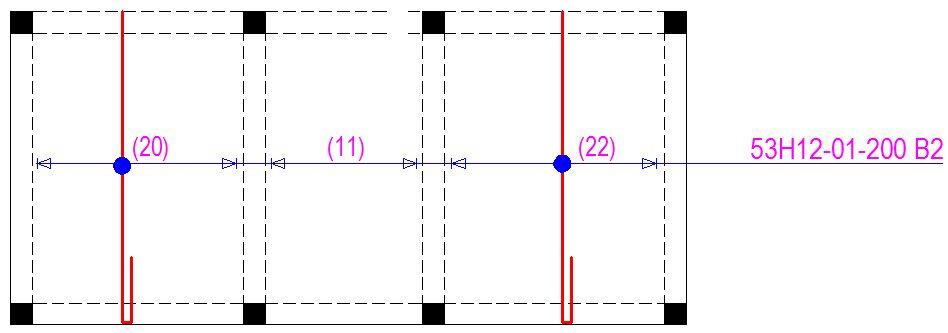
When there are multiple zones/panels with similar bar marks, the number of bars in each panel can be written and the total summed up in the call out. This saves time and paper space in the detailing of reinforced concrete slabs. An example is shown in Figure 8;

SLAB DETAIL 3
Figure 8: Detailing similar bar marks in multiple zones/panels

When there are serious space restrictions on the paper, the calling up of bars can be written along the indicator lines as shown in Figure 9. In extreme cases, it can be written along the bars.

alternative forms of detailing
Figure 9: Reinforcement call up written along the indicator lines in the slab


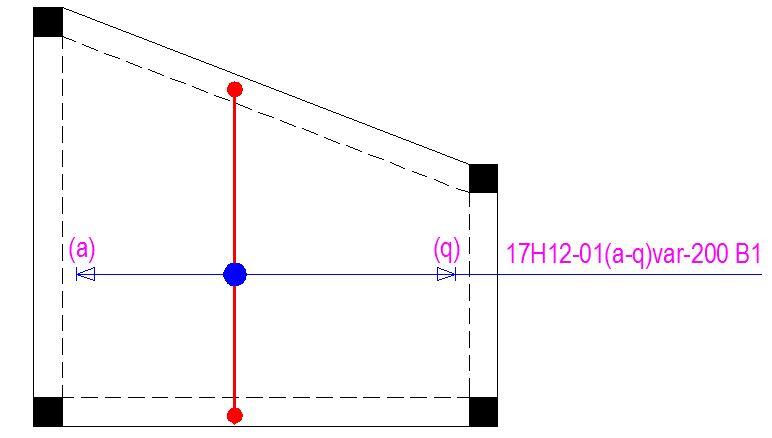
When bars are to be detailed in a panel/zone that is varying in dimension, the approach shown in Figure 10 should be used;

varying bar mark
Figure 10: Detailing of reinforcement in a zone with varying dimension

Edge reinforcement

According to Clauses 9.3.1.4 of EC2, reinforcement should be placed along free (unsupported) edges of slabs and at corners that are supported on both sides. This allows the distribution of local loads which helps to prevent unacceptable cracking. This reinforcement may be supplied in the form of U-bars as shown in Figure 11.

edge reinforcement
Figure 11: Reinforcement detailing in a free edge of a slab

Numerical Integration for Engineers

Generally, integration is the process of summing up slices or parts in order to find the whole. If dx represents a small displacement or change along the direction x, the process of integration will give a function g(x), the derivative of which △g(x) is equal to the function f(x). This is indicated by the integral sign ∫. Thus, ∫f(x)dx is the summation of the product of f(x) and dx. Numerical integration is a computational (approximate) approach of evaluating definite integrals.

A definite integral is defined by limits (say a and b) and it is given by;

\int_{a}^{b} f(x) \,dx

Numerical integration has a lot of applications in engineering such as in the computation of areas, volumes, and surfaces. It also has the advantage of being easily programmable in computer software. In civil engineering, it can be applied in the computation of earthwork volumes such as cut and fill in road construction.

Read Also…
Linear Interpolation for Engineers

For the approximation of definite integrals of the form ∫f(x)dx, the numerical quadrature is normally used. In this method, the function f(x) is normally replaced with an interpolating polynomial p(x) which on integration, obtains an approximate value of the definite integral.

To obtain the numerical solution of functions using the numerical quadrature, the first step is usually to select a distinct set of equally spaced nodes {x0, x1, …., xn} from the interval [a,b]. The smaller the spacing of the nodes or intervals, the more accurate the solution.

Let us assume that Pn is the lagrange interpolating polynomial then we can write;

\\P_n(x) =  \sum_{i=0}^{n} f(x_i)L_i(x)


If we integrate Pn excluding its truncation error term over [a ,b], we obtain;

\int_{a}^{b} f(x) \,dx\  =\int_{a}^{b} \sum_{i=0}^{n} f(x_i)L_i(x),dx\\= \sum_{i=0}^{n} a_if(x)

Where ai = ∫Li(x)dx for i = 0, 1, 2, 3, … n

There are many methods of approximating the numerical quadrature for numerical integration but we are going to consider the most popular ones which are;

  1. Trapezoidal Rule, and
  2. Simpson’s rule

The Trapezoidal Rule for Numerical Integration

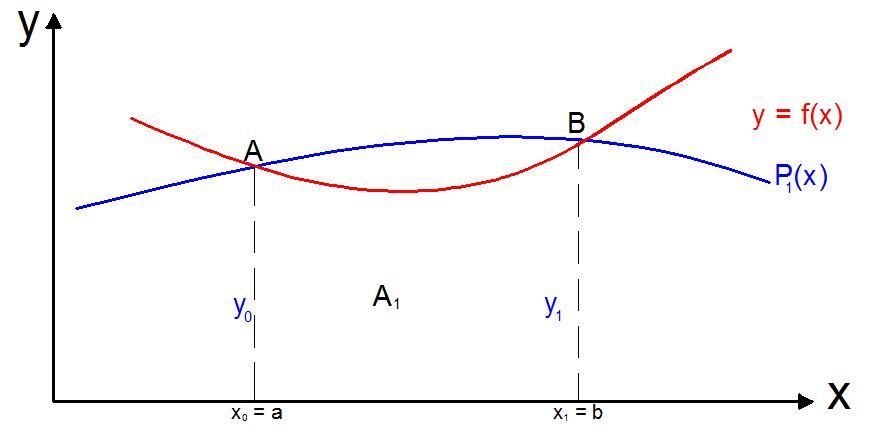
The Trapezoidal rule for numerical integration is obtained from considering the integration formula produced by using first Lagrange polynomials with equally spaced intervals. To evaluate ∫f(x)dx within the limits [a, b], let x0 = a and x1 = b. Then h = b – a = x1 – x0

trapezoidal rule

Using the linear Lagrange polynomial;

P1(x)= [(x – x1)/(x0 – x1)]f(x0) + [(x – x0)/(x1 – x0)]f(x1)

Therefore;

\int_{a}^{b} f(x) \,dx\  =\int_{a}^{b}[((x - x_1)/(x_0-x_1))f(x_0) + ((x - x_0)/(x_1-x_0))f(x_1)]dx

The equation above eventually yields;

f(x)dx = (x1 – x0)/2[f(x1) + f(x0)}

But (x1 – x0)/2 = h
Hence,

\int_{a}^{b} f(x) \,dx\  = h/2[f(x_1) + f(x_0)] ---- (2.3)


Equation (2.3) is known as the Trapezoidal rule.

It gives good approximation to the value of ∫f(x)dx when the curve of y = f(x) when the interval [a, b] is small, and deviates slightly from the trapezium aABb. However, in a situation when the deviation is violent, i.e. the interval [a, b] is very large, the accuracy in the approximation to the value of ∫f(x)dx can be improved by dividing the interval [a, b] into a larger (even) number of trapezoid of smaller width. This is referred to as the Composite Trapezoidal Rule.

Composite Trapezoidal Rule

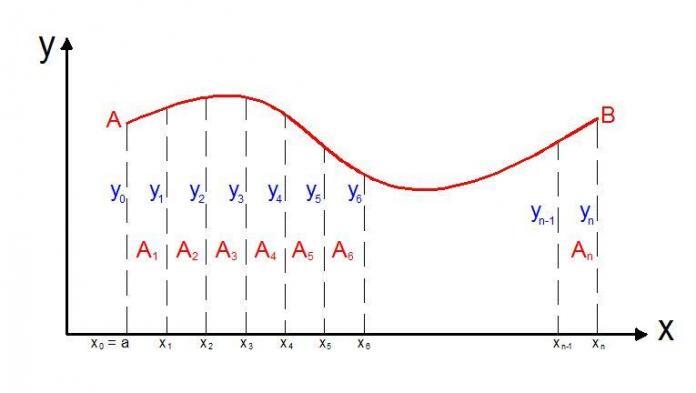
Under the condition that warrants the use of composite trapezoidal rule, we can establish the general formula using the figure below;

Trapezoidal rule of numerical integration

The area;

A1 = h/2(y0 + y1)
A2 = h/2(y1 + y2)
A3 = h/2(y2 + y4)
.
.
.
An = h/2 (yn-1 +yn)

Hence
Ai = (A1 + A2 + A3 + ⋯ + An)
= h/2 [y0 + yn+ 2(y1 + y2 + y3 + ⋯ + yn-1]

The generalised Trapezoidal Rule can therefore be expressed as;

\int_{a}^{b} f(x) \,dx\  = h/2[f(x_0) + f(x_n) + 2\sum_{i=1}^{n-1}f(x_i)]  ---- (2.4)

The Simpson’s Rule for Numerical Integration

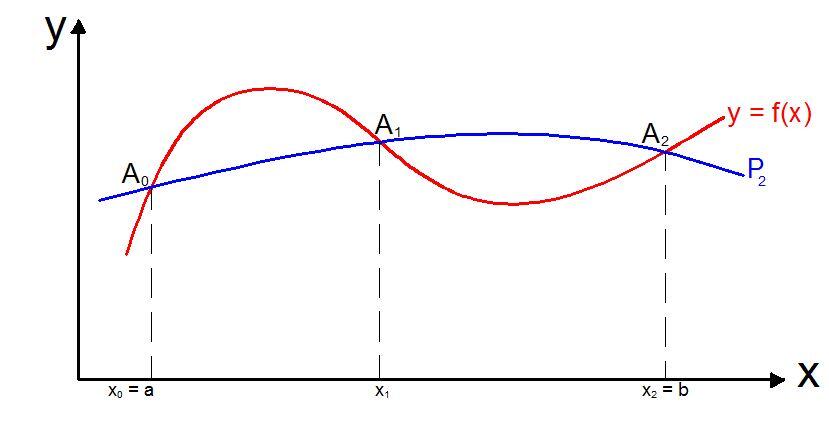
If we consider the integration formula derived by using the second Lagrange polynomials with equally spaced intervals. If the function f(x) is replaced by an arc of a parabola, and the origin temporarily shifted to a point x = x0 by putting x = X + x0 . We may therefore write the equation of the parabola A0A1A2 as y = y0 + bX + cX2.

simpsons rule

The area of the two adjacent strips under A0A1A2 is approximately;

\int_{0}^{2h} (y_o + bX + cX^2)dx\  = 2h(y_o + bh + 4/3ch^2) 

Ultimately;

\int_{0}^{2h} (y_o + bX + cX^2)dx\  = h/3(y_o + 4y_1 + y_2) 

Composite Simpson’s Rule

Similar to Trapezoidal rule, the accuracy of Simpson’s rule can be improved by dividing the interval [a, b] into a larger (even) number of strips of smaller width. Let us evoke fig 6.2, and by considering two successive strips at a time, we can write the expression of Simpson’s formula as thus:

f(x)dx = h/3[y0 + 4y1 + y2) + (y2 + 4y3 + y4) + … + (yn-2 + 4yn-1 + yn)

In a more compact form;

f(x)dx = h/3[y0 + yn + 2∑even ordinates + 4∑odd ordinates]

Worked Example

Evaluate the integral below using 10 intervals;

\int_{0}^{1} (sinx)dx\ 

Solution
At 10 intervals, h = 0.1

y0 = f(x0) = sin(0) = 0
y1 = f(x1) = sin(0.1) = 0.0998 (radians)
y2 = f(x2) = sin(0.2) = 0.1986
y3 = f(x3) = sin(0.3) = 0.2955
y4 = f(x4) = sin(0.4) = 0.3894
y5 = f(x5) = sin(0.5) = 0.4794
y6 = f(x6) = sin(0.6) = 0.5646
y7 = f(x7) = sin(0.7) = 0.6442
y8 = f(x8) = sin(0.8) = 0.7173
y9 = f(x9) = sin(0.9) = 0.7833
yn = f(x10) = sin(1.0) = 0.8414

Using the composite Trapezoidal rule;
f(x)dx = h/2[y0 + yn+ 2(y1 + y2 + y3 + ⋯ + yn-1]
sin(x)dx = 0.1/2[0 + 0.8414 + 2(0.0998 + 0.1986 + 0.2955 + 0.3894 + 0.4794 + 0.5646 + 0.6442 + 0.7173 + 0.7833] = 0.4593

Using the composite Simpson’s rule;
f(x)dx = h/3[y0 + yn + 2∑even ordinates + 4∑odd ordinates]
sin(x)dx = 0.1/3[0 + 0.84814 + 2∑(0.1986 + 0.3894 + 0.5646 + 0.7173) + 4∑(0.0998 + 0.2955 + 0.4794 + 0.6442 + 0.7833)] = 0.4596

The exact solution

\int_{0}^{1} (sinx)dx\ = 0.459697

Therefore, it can be seen that the composite Simpson’s rule approximates better than the composite Trapezoidal rule.

Free-Standing Sawtooth Staircase | Analysis, Design, and Detailing

A free-standing sawtooth staircase is a type of slabless (without waist) staircase that is freely supported at the landing. By implication, this staircase comprises of the thread and risers only, which are usually produced using reinforced concrete.

Analytical and detailing solutions exist for reinforced concrete sawtooth and free-standing staircases, but when the two systems are combined, there may be a challenge with the detailing due to the well-known structural behaviour of cantilevered type structures.

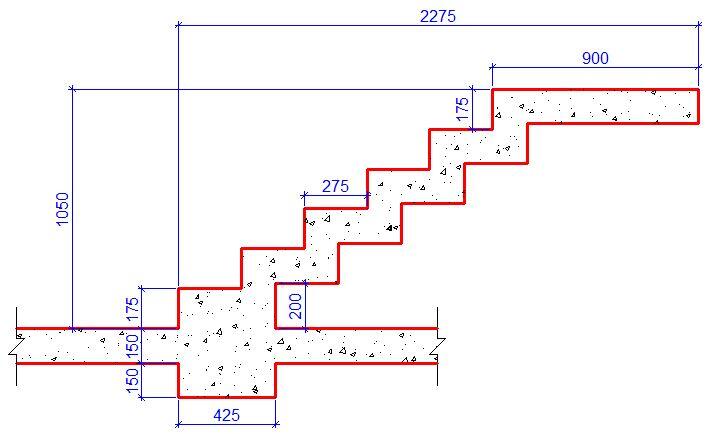
Typical section of a free-standing sawtooth staircase
Fig 1: Typical section of a free-standing sawtooth staircase

In cantilevers, the main reinforcements are provided at the top (the tension area), and furthermore, they must be properly anchored and/or extended into the back-span for good anchorage/development length, and to resist the hogging moment that exists at the back of the cantilever.

In reinforced concrete slabs, the cantilever reinforcement should extend into the back-span by at least 0.3 times the span of the back-span, or 1.5 times the length of the cantilever, whichever is greater. The same requirement of reinforcements extending cantilever reinforcements applies to reinforced concrete beams too.

It can therefore be seen that continuity of reinforcements is an important detailing requirement of cantilevered type structures. Without the introduction of haunches, this may be difficult to achieve in free-standing sawtooth staircases.

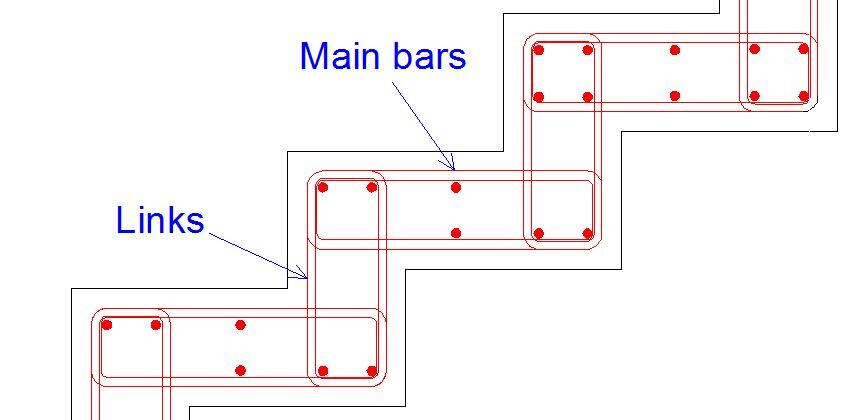
In sawtooth staircases, the main reinforcements are provided on the landing, which is connected to the risers using links. A typical detailing sketch of a sawtooth staircase is shown below;

typical detailing of sawtooth staircase
Fig 2: Typical detailing sketch of sawtooth (slabless) staircase

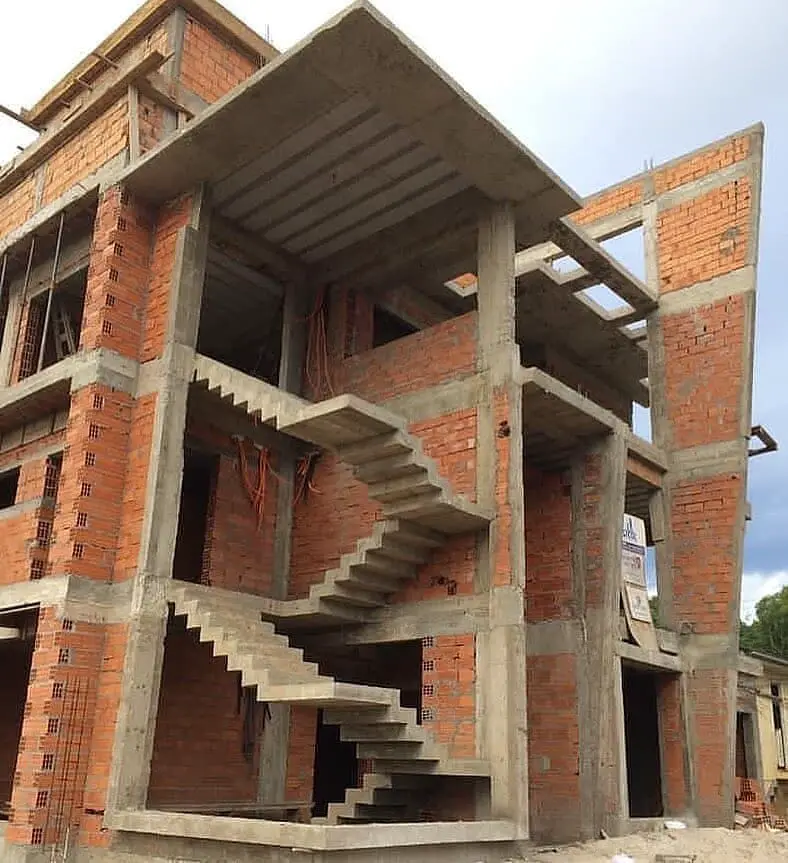
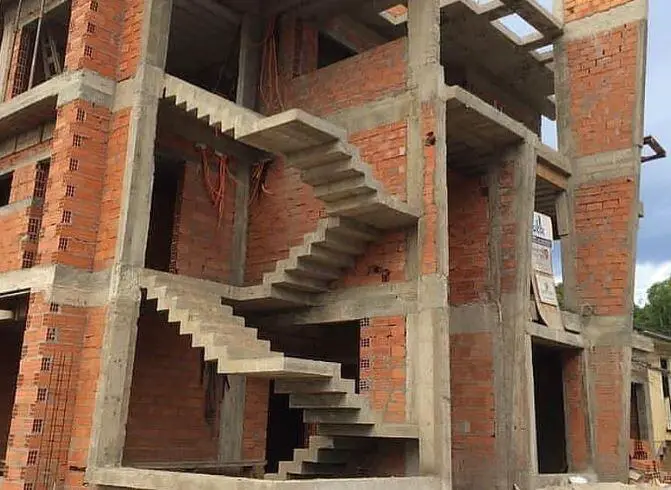
Knowing full well that this type of staircase has been successfully designed and constructed (see Fig. 3). The pertinent questions to ask are, therefore;

(1) What is the detailing procedure of a free-standing sawtooth staircase without the use of haunches?
(2) Is the continuity of reinforcements necessary at the landing-riser junction?
(3) Are the links rigid enough to provide the needed continuity?

engenharianerd CObh63DjPL
Fig 3: Well constructed free-standing sawtooth staircase

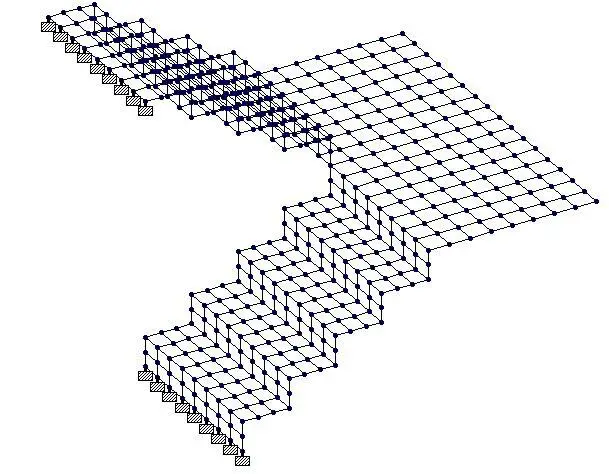
To provide an insight to the answers, let us consider a finite element model of a free-standing sawtooth staircase.

The properties of the staircase are as follows;

Width = 1000 mm
Width of landing = 1000 mm
Height of riser = 175 mm
Width of thread = 275 mm
Thickness of all elements = 150 mm

Loading
(1) Self weight
(2) Finishes of 1.2 kN/m2
(3) Imposed load of 3 kN/m2

Load Combination
ULS = 1.35gk + 1.5qk

finite element model of free standing sawtooth staircase
Fig 4: Finite element model of the free-standing sawtooth staircase

Some of the analysis results are given below;

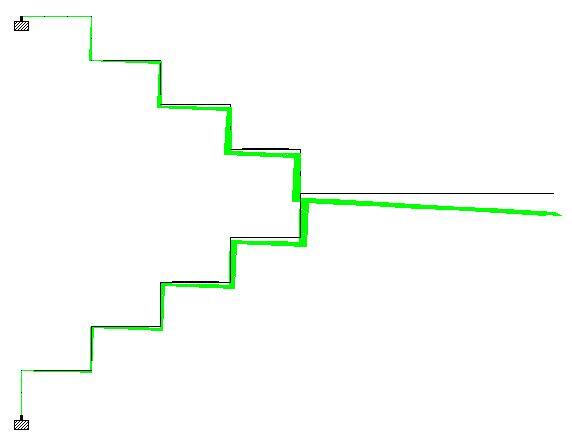
DEFLECTION PROFILE UNDER SELF WEIGHT
Fig 5: Deflection profile of the staircase under uniformly distributed load
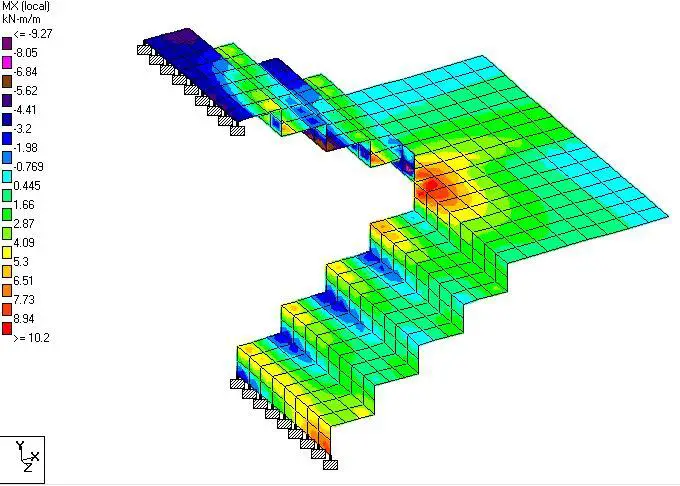
MX
Fig 6: Transverse bending moment of the staircase (ULS)
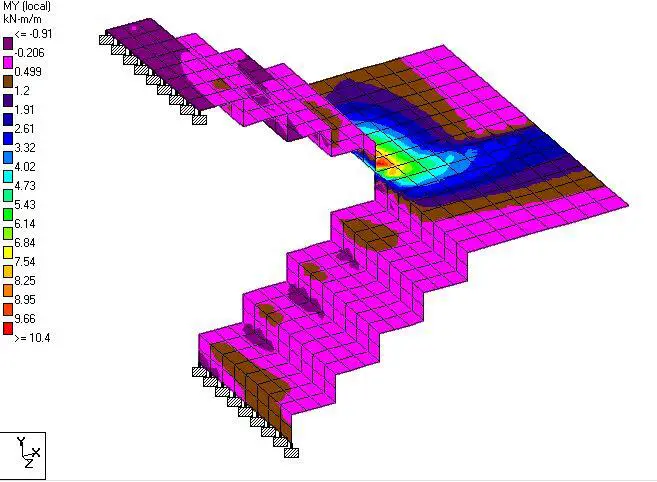
MY
Fig 7: Longitudinal bending moment of the staircase (ULS)
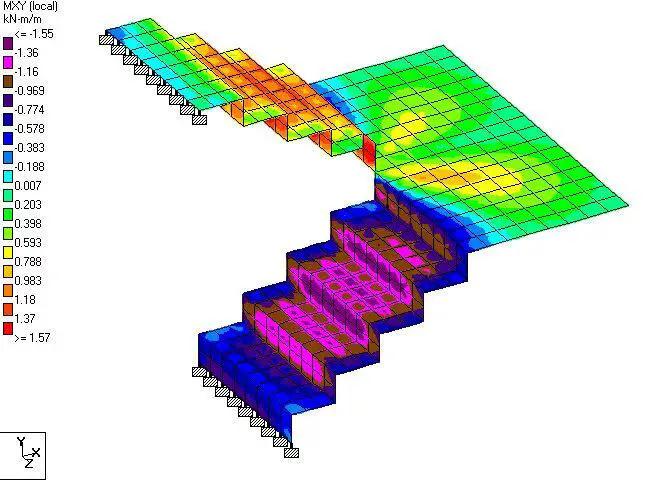
Torsion
Fig 8: Twisting moment of the staircase (ULS)

From the nature of the internal stresses distribution, is it safe to say that the true cantilever behaviour of structures is not properly represented in free-standing sawtooth staircases? From the deflection profile, this is probably not the case. Can we get sketches of typical detailing guide from you?

Thank you for visiting Structville today. God bless you.