8.7 C
New York
Monday, October 28, 2024
Home Blog Page 57

Design of Retaining Walls

In the design of civil engineering structures, retaining walls are normally used to retain soil (earth materials) and possible hydrostatic pressure, and they are usually found on embankments, highways, basements of buildings, etc. This publication presents an example of the design of cantilever retaining walls.

The fundamental requirement of retaining wall design is that the wall must be able to hold the retained material in place without causing excessive movement due to deflection, overturning, or sliding. Furthermore, the wall must be structurally sound to withstand internal stresses such as bending moment and shear due to the retained soil. This is ensured by providing adequate wall thickness and reinforcement.

Retaining wall design can be separated into three basic phases:

(1) Stability analysis – ultimate limit state (EQU and GEO)
(2) Bearing pressure analysis – ultimate limit state (GEO), and
(3) Member design and detailing – ultimate limit state (STR) and serviceability limit states.
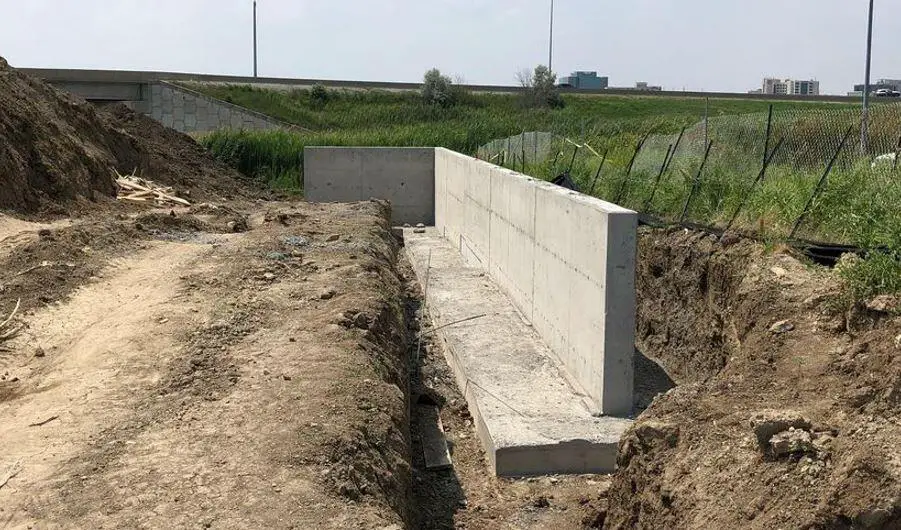
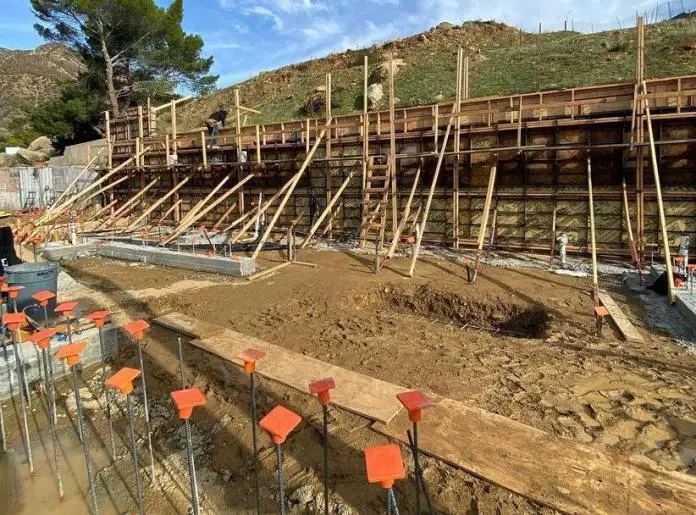
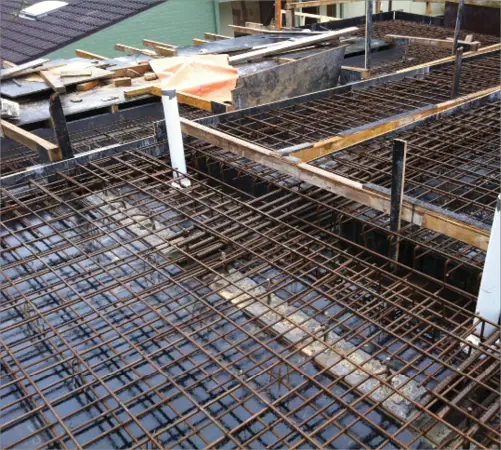
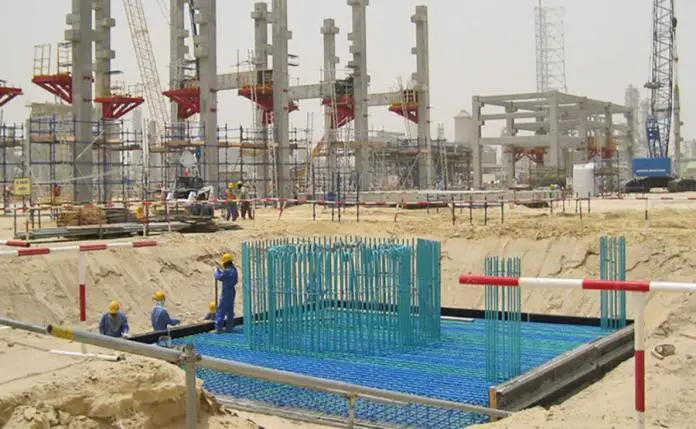
Construction of a reinforced concrete retaining wall

Stability Analysis

A retaining wall must be stable under the action of the loads corresponding to the ultimate limit state (EQU) in terms of resistance to overturning. This is exemplified by the straightforward example of a gravity wall shown below.
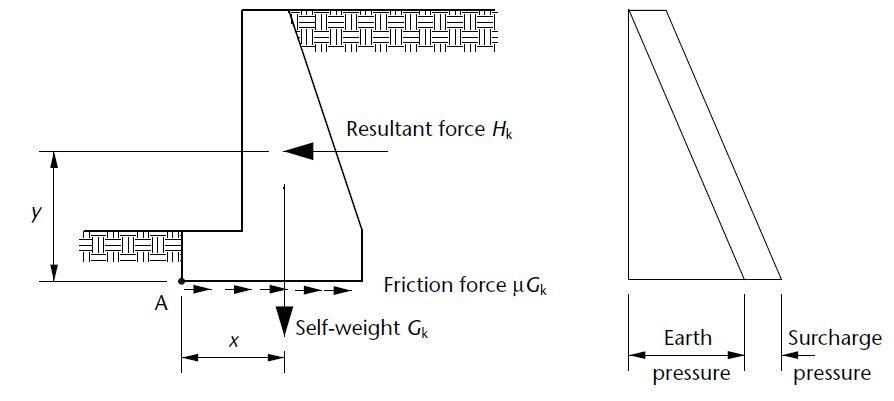
gravity retaining wall
Gravity retaining wall

When a maximal horizontal force interacts with a minimal vertical load, overturning becomes critical. It is common practice to apply conservative safety factors of safety to the pressures and weights in order to prevent failure by overturning. The partial factors of safety that are important to these calculations are listed in Table 10.1(c).
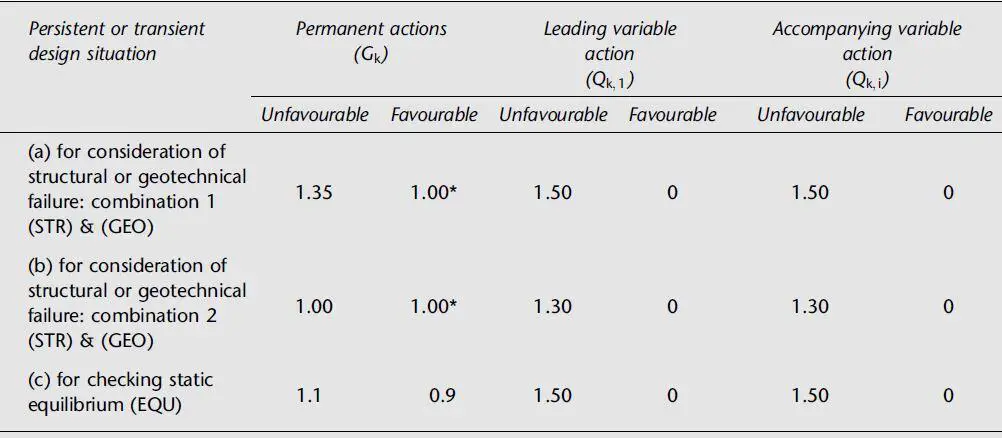
partial factors ULS

If the permanent load Gk has “favourable” effects, a partial factor of safety of γG = 0.9 is applied, and if the effects of the permanent earth pressure loading at the rear face of the wall have “unfavourable” effects, a partial factor of safety of γf = 1.1 is multiplied. The variable surcharge loading’s “unfavorable” consequences, if any, are compounded by a partial factor of safety of γf = 1.5.

The moment for overturning resistance is normally taken about the toe of the base, at point A on figure 1. Consequently, it is necessary that 0.9Gkx > γfHky.

Friction between the base’s bottom and the ground provides the resistance to sliding, which is why it is also influenced by the entire self-weight Gk. The base’s front face may experience some resistance from passive ground pressure, but as this material is frequently backfilled against the face, this resistance cannot be guaranteed and is typically disregarded.

Failure by sliding is taken into account while analyzing the loads that correspond to the GEO’s final limit condition. The variables that apply to these calculations are listed in the table above. Typically, it is observed that sliding resistance is usually more critical than overturning. If the sliding requirement is not satisfied, a heel beam may be employed, and the force from passive earth pressure across the heel’s face area may be added to the force resisting sliding.

Bearing Pressure Analysis

When evaluating the necessary foundation size, the bearing pressures behind retaining walls are evaluated using the geotechnical ultimate limit state (GEO). The analysis is comparable to what would happen to a foundation if an eccentric vertical load and an overturning moment were to act simultaneously.
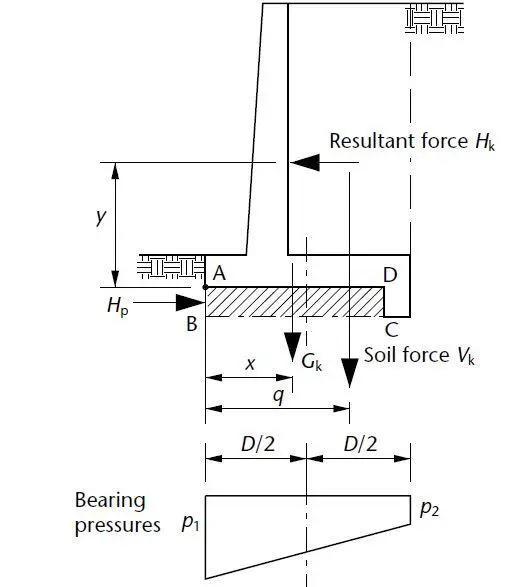
bearing pressure distribution on a retaining wall
Typical bearing pressure under a retaining wall

The distribution of bearing pressures will be as shown below, provided the effective eccentricity lies within the ‘middle third’ of the base, that is;

M/P ≤ B/6

Therefore;

pmax = P/B + 6M/B2
pmin = P/B – 6M/B2

In general, section 9 of EN 1997-1 applies to retaining structures supporting ground (i.e. soil, rock or backfill) and/or water and is sub-divided as follows:

§9.1. General
§9.2. Limit states
§9.3. Actions, geometrical data and design situations
§9.4. Design and construction considerations
§9.5. Determination of earth pressures
§9.6. Water pressures
§9.7. Ultimate limit state design
§9.8. Serviceability limit state design

According to EN 1997-1, ultimate limit states GEO and STR must be verified using one of three Design Approaches (DAs). The United Kingdom proposed to adopt Design Approach 1, and this has been used in this design.

The design of gravity walls to Eurocode 7 involves checking that the ground beneath the wall has sufficient:

  • bearing resistance to withstand inclined, eccentric actions
  • sliding resistance to withstand horizontal and inclined actions
  • stability to avoid toppling
  • stiffness to prevent unacceptable settlement or tilt

Verification of ultimate limit states (ULSs) is demonstrated by satisfying the inequalities:
Vd ≤ Rd
Hd ≤ Rd
MEd,dst ≤ MEd,stb

In the example downloadable in this post, the retaining wall shown below has been analysed for resistance against sliding, overturning, and bearing. All the calculations were carried out at ultimate limit state.

Member Design and Detailing

The design of bending and shear reinforcement, like that of foundations, is based on a consideration of the loads for the ultimate limit state (STR), along with the accompanying bearing pressures. Steel will rarely be needed in gravity walls, whereas the walls in counterfort and cantilever walls may be designed as slabs. Unless they are quite large, counterforts often have a cantilever beam-like design.
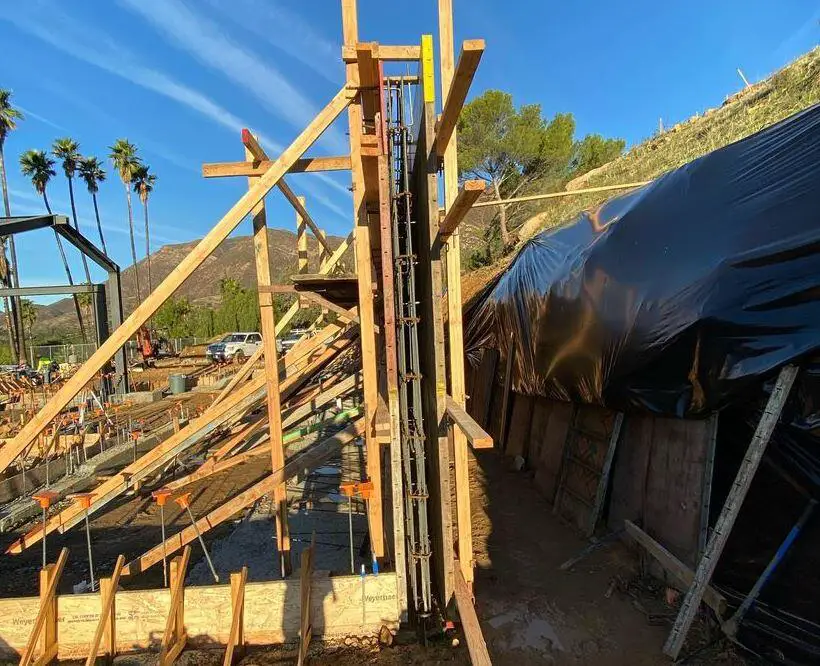
cantilever retaining wall construction
Construction of cantilever retaining wall

The stem of a retaining wall of the cantilever type is made to resist the moment brought on by the horizontal forces. The thickness of the wall can be calculated as 80mm per metre of backfill for the purposes of preliminary sizing. In most cases, the base’s thickness is the same with the stem’s. The heel and toe need to be made to resist the moments brought on by the downward weight of the base and soil and the upward earth-bearing pressures.

As necessary, reinforcement details of retaining walls must adhere to the general guidelines for slabs and beams. To prevent shrinkage and thermal cracking, special attention must be paid to the reinforcement’s detailing. Because they typically entail enormous concrete pours, gravity walls are particularly prone to damage. Minimal restrictions on thermal and shrinkage movement should be used. The need for strong soil-base friction, however, negates this in the design of bases, making it impossible to create a sliding layer. Therefore, the bases’ reinforcement needs to be sufficient to prevent cracking from being brought on by a lot of constraint.

Due to the loss of hydration heat during thermal movement, long retaining walls supported by inflexible bases are especially prone to cracking, thus detailing must make an effort to disperse the cracks to maintain appropriate widths. There must be full vertical movement joints available. Waterbars and sealants should be used, and these joints frequently include a shear key to stop differential movement of adjacent wall sections.

Groundwater hydrostatic forces are typically applied to the back sides of retaining walls. By including a drainage passage at the face of the wall, these might be decreased. A layer of earth or porous blocks with pipes to remove the water, frequently through the front of the wall, is the customary method for creating such a drain. Water is less likely to flow through the retaining wall, cause damage to the soil beneath the wall’s foundations, and cause hydrostatic pressure on the wall to decrease as a result.

Retaining Wall Analysis and Design Example

A cantilever retaining wall is loaded as shown below. Design the retaining wall in accordance with EN1997-1:2004 incorporating Corrigendum dated February 2009 and the UK National Annex incorporating Corrigendum No.1.
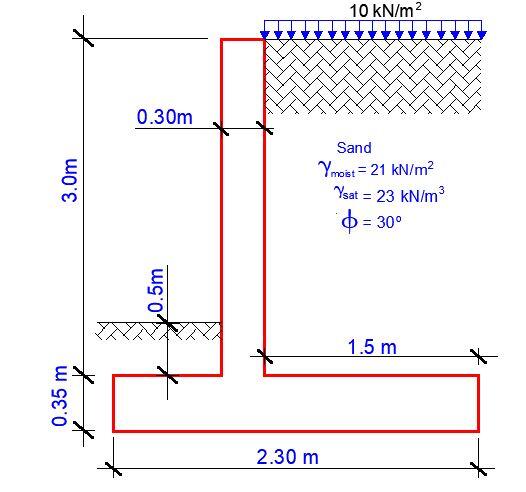
cantilever retaining wall analysis

Retaining wall details
Stem type;  Cantilever
Stem height;  hstem = 3000 mm
Stem thickness; tstem = 300 mm
Angle to rear face of stem; α = 90 deg
Stem density;  γstem = 25 kN/m3
Toe length; ltoe = 500 mm
Heel length;  lheel = 1500 mm
Base thickness;  tbase = 350 mm
Base density; γbase = 25 kN/m3
Height of retained soil;  hret = 2500 mm
Angle of soil surface; β = 0 deg
Depth of cover; dcover = 500 mm
Depth of excavation; dexc = 200 mm

Retained soil properties
Soil type; Medium-dense well graded sand
Moist density; γmr = 21 kN/m3
Saturated density; γsr = 23 kN/m3
Characteristic effective shear resistance angle; φ’r.k = 30 deg
Characteristic wall friction angle; δr.k = 0 deg

Base soil properties
Soil type; Medium-dense well graded sand
Soil density; γb = 18 kN/m3
Characteristic cohesion; c’b.k = 0 kN/m2
Characteristic effective shear resistance angle; φ’b.k = 30 deg
Characteristic wall friction angle; δb.k = 15 deg
Characteristic base friction angle;  δbb.k = 30 deg

Loading details
Variable surcharge load; SurchargeQ = 10 kN/m2

Retaining wall geometry
Base length; lbase = ltoe + tstem + lheel = 2300 mm
Moist soil height;  hmoist = hsoil = 3000 mm
Length of surcharge load; lsur = lheel = 1500 mm
– Distance to vertical component;  xsur_v = lbase – (lheel / 2) = 1550 mm
Effective height of wall; heff = hbase + dcover + hret = 3350 mm
– Distance to horizontal component; xsur_h = heff / 2 = 1675 mm

Area of wall stem; Astem = hstem × tstem = 0.9 m2
– Distance to vertical component; xstem = ltoe + tstem / 2 = 650 mm

Area of wall base; Abase = lbase × tbase = 0.805 m2
– Distance to vertical component; xbase = lbase / 2 = 1150 mm

Area of moist soil;  Amoist = hmoist × lheel = 4.5 m2
– Distance to vertical component; xmoist_v = lbase – (hmoist × lheel2 / 2) / Amoist = 1550 mm
– Distance to horizontal component; xmoist_h = heff / 3 = 1117 mm

Area of base soil; Apass = dcover × ltoe = 0.25 m2
– Distance to vertical component; xpass_v = lbase – [dcover × ltoe × (lbase – ltoe/2)] / Apass = 250 mm
– Distance to horizontal component;  xpass_h = (dcover + hbase) / 3 = 283 mm

Area of excavated base soil; Aexc = hpass × ltoe = 0.15 m2
– Distance to vertical component; xexc_v = lbase – [hpass × ltoe × (lbase – ltoe/2)] / Aexc = 250 mm
– Distance to horizontal component;  xexc_h = (hpass + hbase) / 3 = 217 mm

Design approach 1 – Combination 1

Partial factor set;  A1
Permanent unfavourable action; γG = 1.35
Permanent favourable action; γGf = 1.00
Variable unfavourable action; γQ = 1.50
Variable favourable action; γQf = 0.00

Partial factors for soil parameters – Table A.4 – Combination 1
Soil parameter set; M1
Angle of shearing resistance;  γφ = 1.00
Effective cohesion; γc’ = 1.00
Weight density; γg = 1.00

Retained soil properties
Design moist density; γmr‘ = γmr / γg = 21 kN/m3
Design saturated density; γsr‘ = γsr / γg = 23 kN/m3
Design effective shear resistance angle; φ’r.d = tan-1(tan(φ’r.k) / γφ’) = 30 deg
Design wall friction angle;  δr.d = tan-1(tan(δr.k) / γφ’) = 0 deg

Base soil properties
Design soil density; γb‘ = γbg = 18 kN/m3
Design effective shear resistance angle;  φ’b.d = tan-1(tan(φ’b.k) / γφ’) = 30 deg
Design wall friction angle; δb.d = tan-1(tan(δb.k) / γφ’) = 15 deg
Design base friction angle; δbb.d = tan-1(tan(δbb.k) / γφ’) = 30 deg
Design effective cohesion; c’b.d = c’b.k / γc’ = 0 kN/m2

Using Rankine theory
Active pressure coefficient; KA = (1 – sin(φ’r.d)) / (1 + sin(φ’r.d)) = 0.333
Passive pressure coefficient; KP = (1 + sin(φ’b.d)) / (1 – sin(φ’b.d)) = 3.000

Sliding check

Vertical forces on wall
Wall stem; Fstem = γGf × Astem × γstem = 22.5 kN/m
Wall base; Fbase = γGf × Abase × γbase = 20.1 kN/m
Moist retained soil; Fmoist_v = γGf × Amoist × γmr‘ = 94.5 kN/m
Base soil; Fexc_v = γGf × Aexc × γb‘ = 2.7 kN/m
Total;  Ftotal_v = Fstem + Fbase + Fmoist_v + Fexc_v = 139.8 kN/m

Horizontal forces on wall
Surcharge load; Fsur_h = KA × γQ × SurchargeQ × heff = 16.8 kN/m
Moist retained soil;Fmoist_h = γG × KA × γmr‘ × heff2 / 2 = 53 kN/m
Total;  Ftotal_h = Fsur_h + Fmoist_h = 69.8 kN/m

Check stability against sliding
Base soil resistance; Fexc_h = γGfKPγb‘ × (hpass + hbase)2 / 2 = 11.4 kN/m
Base friction; Ffriction = Ftotal_v × tan(δbb.d) = 80.7 kN/m
Resistance to sliding; Frest = Fexc_h + Ffriction = 92.1 kN/m

Factor of safety;  FoSsl = Frest / Ftotal_h = 1.32

PASS – Resistance to sliding is greater than sliding force

Overturning check

Vertical forces on wall
Wall stem; Fstem = γGf × Astem × γstem = 22.5 kN/m
Wall base;  Fbase = γGf × Abase × γbase = 20.1 kN/m
Moist retained soil;  Fmoist_v = γGf × Amoist × γmr‘ = 94.5 kN/m
Base soil; Fexc_v = γGf × Aexc × γb‘ = 2.7 kN/m
Total; Ftotal_v = Fstem + Fbase + Fmoist_v + Fexc_v = 139.8 kN/m

Horizontal forces on wall
Surcharge load;  Fsur_h = KA × γQ × SurchargeQ × heff = 16.8 kN/m
Moist retained soil; Fmoist_h = γG × KA × γmr‘ × heff2 / 2 = 53 kN/m
Base soil; Fexc_h = -γGf × KP × γb‘ × (hpass + hbase)2 / 2 = -11.4 kN/m
Total;  Ftotal_h = Fsur_h + Fmoist_h + Fexc_h = 58.4 kN/m

Overturning moments on wall
Surcharge load; Msur_OT = Fsur_h × xsur_h = 28.1 kNm/m
Moist retained soil; Mmoist_OT = Fmoist_h × xmoist_h = 59.2 kNm/m
Total;  Mtotal_OT = Msur_OT + Mmoist_OT = 87.3 kNm/m

Restoring moments on wall
Wall stem; Mstem_R = Fstem × xstem = 14.6 kNm/m
Wall base; Mbase_R = Fbase × xbase = 23.1 kNm/m
Moist retained soil; Mmoist_R = Fmoist_v × xmoist_v = 146.5 kNm/m
Base soil; Mexc_R = Fexc_v × xexc_v – Fexc_h × xexc_h = 3.1 kNm/m
Total;  Mtotal_R = Mstem_R + Mbase_R + Mmoist_R + Mexc_R = 187.4 kNm/m

Check stability against overturning
Factor of safety; FoSot = Mtotal_R / Mtotal_OT = 2.147

PASS – Maximum restoring moment is greater than the overturning moment

Bearing pressure check

Vertical forces on wall
Wall stem;  Fstem = γG × Astem × γstem = 30.4 kN/m
Wall base;  Fbase = γG × Abase × γbase = 27.2 kN/m
Surcharge load; Fsur_v = γQ × SurchargeQ × lheel = 22.5 kN/m
Moist retained soil; Fmoist_v = γG × Amoist × γmr‘ = 127.6 kN/m
Base soil; Fpass_v = γG × Apass × γb‘ = 6.1 kN/m
Total;  Ftotal_v = Fstem + Fbase + Fsur_v + Fmoist_v + Fpass_v = 213.7 kN/m

Horizontal forces on wall
Surcharge load; Fsur_h = KA × γQ × SurchargeQ × heff = 16.8 kN/m
Moist retained soil; Fmoist_h = γG × KA × γmr‘ × heff2 / 2 = 53 kN/m
Base soil;  Fpass_h = -γGf × KP × γb‘ × (dcover + hbase)2 / 2 = -19.5 kN/m
Total;   Ftotal_h = max(Fsur_h + Fmoist_h + Fpass_h – Ftotal_v × tan(dbb.d), 0 kN/m) = 0 kN/m

Moments on wall
Wall stem;  Mstem = Fstem × xstem = 19.7 kNm/m
Wall base; Mbase = Fbase × xbase = 31.2 kNm/m
Surcharge load;  Msur = Fsur_v × xsur_v – Fsur_h × xsur_h = 6.8 kNm/m
Moist retained soil; Mmoist = Fmoist_v × xmoist_v – Fmoist_h × xmoist_h = 138.5 kNm/m
Base soil;  Mpass = Fpass_v × xpass_v – Fpass_h × xpass_h = 7 kNm/m
Total;  Mtotal = Mstem + Mbase + Msur + Mmoist + Mpass = 203.4 kNm/m

Check bearing pressure
Distance to reaction;  x’ = Mtotal / Ftotal_v = 952 mm
Eccentricity of reaction;  e = x’ – lbase / 2 = -198 mm
Loaded length of base; lload = 2x’ = 1903 mm
Bearing pressure at toe; qtoe = Ftotal_v / lload = 112.3 kN/m2
Bearing pressure at heel; qheel = 0 kN/m2

Effective overburden pressure; q = (tbase + dcoverb‘ = 15.3 kN/m2
Design effective overburden pressure; q’ = q / γg = 15.3 kN/m2

Bearing resistance factors;                                            
Nq = Exp(π × tan(φ’b.d)) × (tan(45 deg + φ’b.d / 2))2 = 18.401
Nc = (Nq – 1)cot(φ’b.d) = 30.14
Nγ = 2(Nq – 1)tan(φ’b.d) = 20.093

Foundation shape factors;                                             
sq = 1
sγ = 1
sc = 1

Load inclination factors;                                                 
H = Fsur_h + Fmoist_h + Fpass_h = 50.3 kN/m
V = Ftotal_v = 213.7 kN/m
m = 2

iq = [1 – H / (V + lload × c’b.d × cot(φ’b.d))]m = 0.585
iγ = [1 – H / (V + lload × c’b.d × cot(φ’b.d))](m + 1) = 0.447
ic = iq – (1 – iq) / (Nc × tan(φ’b.d)) = 0.561

Net ultimate bearing capacity
nf = c’b.dNcscic + q’Nqsqiq + 0.5γb‘lloadNγsγiγ = 318.6 kN/m2

Factor of safety;                                                               
FoSbp = nf / max(qtoe, qheel) = 2.838

PASS – Allowable bearing pressure exceeds maximum applied bearing pressure

Design approach 1 – Combination 2

Partial factor set; A2
Permanent unfavourable action; γG = 1.00
Permanent favourable action;  γGf = 1.00
Variable unfavourable action;   γQ = 1.30
Variable favourable action; γQf = 0.00

Soil parameter set; M2
Angle of shearing resistance; γf’ = 1.25
Effective cohesion; γc’ = 1.25
Weight density; γg = 1.00

Retained soil properties
Design moist density;  γmr‘ = γmrg = 21 kN/m3
Design saturated density; γsr‘ = γsrg = 23 kN/m3
Design effective shear resistance angle; φ’r.d = tan-1(tan(φ’r.k) / γφ’) = 24.8 deg
Design wall friction angle; δr.d = tan-1(tan(δr.k) / γφ’) = 0 deg

Base soil properties
Design soil density;  γb‘ = γbg = 18 kN/m3
Design effective shear resistance angle;   φ’b.d = tan-1(tan(φ’b.k) / γφ’) = 24.8 deg
Design wall friction angle; δb.d = tan-1(tan(δb.k) / γφ’) = 12.1 deg
Design base friction angle;  δbb.d = tan-1(tan(δbb.k) / γφ’) = 24.8 deg
Design effective cohesion;  c’b.d = c’b.kc’ = 0 kN/m2

Using Rankine theory
Active pressure coefficient;                                           
KA = (1 – sin(φ’r.d)) / (1 + sin(φ’r.d)) = 0.409

Passive pressure coefficient;                                        
KP = (1 + sin(φ’b.d)) / (1 – sin(φ’b.d)) = 2.444

Sliding check

Vertical forces on wall
Wall stem; Fstem = γGf × Astem × γstem = 22.5 kN/m
Wall base;  Fbase = γGf × Abase × γbase = 20.1 kN/m
Moist retained soil;Fmoist_v = γGf × Amoist × γmr‘ = 94.5 kN/m
Base soil;Fexc_v = γGf × Aexc × γb‘ = 2.7 kN/m
Total; Ftotal_v = Fstem + Fbase + Fmoist_v + Fexc_v = 139.8 kN/m

Horizontal forces on wall
Surcharge load;  Fsur_h = KA × γQ × SurchargeQ × heff = 17.8 kN/m
Moist retained soil;  Fmoist_h = γG × KA × γmr‘ × heff2 / 2 = 48.2 kN/m
Total;  Ftotal_h = Fsur_h + Fmoist_h = 66 kN/m

Check stability against sliding
Base soil resistance; Fexc_h = γGf × KP × γb‘ × (hpass + hbase)2 / 2 = 9.3 kN/m
Base friction; Ffriction = Ftotal_v × tan(dbb.d) = 64.6 kN/m
Resistance to sliding;  Frest = Fexc_h + Ffriction = 73.9 kN/m

Factor of safety; FoSsl = Frest / Ftotal_h = 1.119

PASS – Resistance to sliding is greater than sliding force

Overturning check

Vertical forces on wall
Wall stem;  Fstem = γGf × Astem × γstem = 22.5 kN/m
Wall base;  Fbase = γGf × Abase × γbase = 20.1 kN/m
Moist retained soil;  Fmoist_v = γGf × Amoist × γmr‘ = 94.5 kN/m
Base soil;  Fexc_v = γGf × Aexc × γb‘ = 2.7 kN/m
Total;  Ftotal_v = Fstem + Fbase + Fmoist_v + Fexc_v = 139.8 kN/m

Horizontal forces on wall
Surcharge load; Fsur_h = KA × γQ × SurchargeQ × heff = 17.8 kN/m
Moist retained soil; Fmoist_h = γG × KA × γmr‘ × heff2 / 2 = 48.2 kN/m
Base soil; Fexc_h = -γGf × KP × γb‘ × (hpass + hbase)2 / 2 = -9.3 kN/m
Total; Ftotal_h = Fsur_h + Fmoist_h + Fexc_h = 56.7 kN/m

Overturning moments on wall
Surcharge load; Msur_OT = Fsur_h × xsur_h = 29.8 kNm/m
Moist retained soil;  Mmoist_OT = Fmoist_h × xmoist_h = 53.8 kNm/m
Total; Mtotal_OT = Msur_OT + Mmoist_OT = 83.7 kNm/m

Restoring moments on wall
Wall stem; Mstem_R = Fstem × xstem = 14.6 kNm/m
Wall base;  Mbase_R = Fbase × xbase = 23.1 kNm/m
Moist retained soil; Mmoist_R = Fmoist_v × xmoist_v = 146.5 kNm/m
Base soil; Mexc_R = Fexc_v × xexc_v – Fexc_h × xexc_h = 2.7 kNm/m
Total; Mtotal_R = Mstem_R + Mbase_R + Mmoist_R + Mexc_R = 186.9 kNm/m

Check stability against overturning
Factor of safety; FoSot = Mtotal_R / Mtotal_OT = 2.234

PASS – Maximum restoring moment is greater than overturning moment

Bearing pressure check

Vertical forces on wall
Wall stem; Fstem = γG × Astem × γstem = 22.5 kN/m
Wall base; Fbase = γG × Abase × γbase = 20.1 kN/m
Surcharge load;  Fsur_v = γQ × SurchargeQ × lheel = 19.5 kN/m
Moist retained soil; Fmoist_v = γG × Amoist × γmr‘ = 94.5 kN/m
Base soil; Fpass_v = γG × Apass × γb‘ = 4.5 kN/m
Total; Ftotal_v = Fstem + Fbase + Fsur_v + Fmoist_v + Fpass_v = 161.1 kN/m

Horizontal forces on wall
Surcharge load; Fsur_h = KA × γQ × SurchargeQ × heff = 17.8 kN/m
Moist retained soil;  Fmoist_h = γG × KA × γmr‘ × heff2 / 2 = 48.2 kN/m
Base soil; Fpass_h = -γGf × KP × γb‘ × (dcover + hbase)2 / 2 = -15.9 kN/m
Total; Ftotal_h = max(Fsur_h + Fmoist_h + Fpass_h – Ftotal_v × tan(δbb.d), 0 kN/m) = 0 kN/m

Moments on wall
Wall stem; Mstem = Fstem × xstem = 14.6 kNm/m
Wall base;  Mbase = Fbase × xbase = 23.1 kNm/m
Surcharge load; Msur = Fsur_v × xsur_v – Fsur_h × xsur_h = 0.4 kNm/m
Moist retained soil; Mmoist = Fmoist_v × xmoist_v – Fmoist_h × xmoist_h = 92.6 kNm/m
Base soil; Mpass = Fpass_v × xpass_v – Fpass_h × xpass_h = 5.6 kNm/m
Total; Mtotal = Mstem + Mbase + Msur + Mmoist + Mpass = 136.4 kNm/m

Check bearing pressure
Distance to reaction; x’ = Mtotal / Ftotal_v = 847 mm
Eccentricity of reaction;  e = x’ – lbase / 2 = -303 mm
Loaded length of base; lload = 2x’ = 1693 mm
Bearing pressure at toe; qtoe = Ftotal_v / lload = 95.2 kN/m2
Bearing pressure at heel; qheel = 0 kN/m2

Effective overburden pressure; q = (tbase + dcoverb‘ = 15.3 kN/m2

Design effective overburden pressure; q’ = q/γg = 15.3 kN/m2

Bearing resistance factors;                                            
Nq = Exp[πtan(φ’b.d)] × [tan(45 deg + φ’b.d / 2)]2 = 10.431
Nc = (Nq – 1) × cot(φ’b.d) = 20.418
Nγ = 2(Nq – 1) × tan(φ’b.d) = 8.712

Foundation shape factors;                                             
sq = 1
sγ = 1
sc = 1

Load inclination factors;                                                 
H = Fsur_h + Fmoist_h + Fpass_h = 50.1 kN/m
V = Ftotal_v = 161.1 kN/m
m = 2

iq = [1 – H / (V + lload × c’b.d × cot(φ’b.d))]m = 0.475
iγ = [1 – H / (V + lload × c’b.d × cot(f’φb.d))](m + 1) = 0.327
ic = iq – (1 – iq) / (Nc × tan(φ’b.d)) = 0.419

Net ultimate bearing capacity
nf = c’b.dNcscic + q’Nqsqiq + 0.5γb‘lload Nγsγiγ = 119.1 kN/m2

Library item: Drained bearing output

Factor of safety;                                                               
FoSbp = nf / max(qtoe, qheel) = 1.252

PASS – Allowable bearing pressure exceeds maximum applied bearing pressure

Analysis summary

DescriptionUnitCapacityAppliedF o SResult
Sliding stabilitykN/m73.9661.119PASS
Overturning stabilitykNm/m187.487.32.147PASS
Bearing pressurekN/m2119.195.21.252PASS

Structural Design

In accordance with EN1992-1-1:2004 incorporating Corrigendum dated January 2008 and the UK National Annex incorporating National Amendment No.1

Concrete details

Concrete strength class; C20/25
Characteristic compressive cylinder strength; fck = 20 N/mm2
Characteristic compressive cube strength; fck,cube = 25 N/mm2
Mean value of compressive cylinder strength; fcm = fck + 8 N/mm2 = 28 N/mm2
Mean value of axial tensile strength; fctm = 0.3(fck)2/3 = 2.2 N/mm2
5% fractile of axial tensile strength;  fctk,0.05 = 0.7fctm = 1.5 N/mm2
Secant modulus of elasticity of concrete; Ecm = 22 kN/mm2(fcm/10)0.3 = 29962 N/mm2
Partial factor for concrete – Table 2.1N; γC = 1.50
Compressive strength coefficient – cl.3.1.6(1); acc = 0.85
Design compressive concrete strength – exp.3.15;    fcd = acc(fckC) = 11.3 N/mm2
Maximum aggregate size; hagg = 20 mm
Ultimate strain – Table 3.1;  εcu2 = 0.0035
Shortening strain – Table 3.1; εcu3 = 0.0035
Effective compression zone height factor; λ = 0.80

Effective strength factor;  h = 1.00
Bending coefficient k1; K1 = 0.40
Bending coefficient k2; K2 = 1.00(0.6 + 0.0014/εcu2) = 1.00
Bending coefficient k3; K3 =0.40
Bending coefficient k4;  K4 = 1.00(0.6 + 0.0014/εcu2) =1.00

Reinforcement details
Characteristic yield strength of reinforcement; fyk = 500 N/mm2
Modulus of elasticity of reinforcement;  Es = 200000 N/mm2
Partial factor for reinforcing steel – Table 2.1N; γS = 1.15
Design yield strength of reinforcement;  fyd = fyk / γS = 435 N/mm2

Cover to reinforcement
Front face of stem; csf = 40 mm
Rear face of stem;  csr = 50 mm
Top face of base;   cbt = 50 mm
Bottom face of base; cbb = 75 mm

Check stem design at base of stem

Depth of section; h = 300 mm

Flexural Design (Bending)

Design bending moment combination 1;
M = 65 kNm/m                                 
d = h – csr – φsr / 2 = 244 mm
K = M / (d2fck) = 0.055
K’ = (2h accC) × [1 – λ(d – K1)/(2K2)] × [λ(d – K1)/(2K2)]
K’ = 0.207

K’ > K – No compression reinforcement is required

Lever arm;  z = min(0.5 + 0.5(1 – 2K / (h × acc / γC))0.5, 0.95)d = 232 mm

Depth of neutral axis; x = 2.5(d – z) = 31 mm

Area of tension reinforcement required; Asr.req = M / (fydz) = 646 mm2/m
Tension reinforcement provided; 12 dia.bars @ 150 c/c ( Asr.prov = 754 mm2/m)
Minimum area of reinforcement – exp.9.1N; Asr.min = max(0.26fctm / fyk, 0.0013)d = 317 mm2/m
Maximum area of reinforcement – cl.9.2.1.1(3);Asr.max = 0.04h = 12000 mm2/m
max(Asr.req, Asr.min) / Asr.prov = 0.856

PASS – Area of reinforcement provided is greater than area of reinforcement required

Deflection control

Reference reinforcement ratio; ρ0 = √(fck) / 1000 = 0.004
Required tension reinforcement ratio; ρ = Asr.req / d = 0.003
Required compression reinforcement ratio; ρ’ = Asr.2.req / d2 = 0.000
Structural system factor – Table 7.4N; Kb = 0.4
Reinforcement factor – exp.7.17; Ks = min(500 / (fykAsr.req / Asr.prov), 1.5) = 1.168

Limiting span to depth ratio – exp.7.16.a; 
min(KsKb[11 + 1.5 × √(fck) ρ0/ρ + 3.2√(fck) × (ρ0/ρ – 1)3/2], 40Kb) = 14.3

Actual span to depth ratio; hstem / d = 12.3

PASS – Span to depth ratio is less than deflection control limit

Rectangular section in shear

Design shear force; V = 57.5 kN/m
CRd,c = 0.18 / γC = 0.120
k = min(1 + √(200 mm / d), 2) = 1.905

Longitudinal reinforcement ratio; ρl = min(Asr.prov / d, 0.02) = 0.003
vmin = 0.035k3/2fck0.5 = 0.412 N/mm2

Design shear resistance – exp.6.2a & 6.2b;                
VRd.c = max(CRd.ck(100ρlfck)1/3, vmin)d
VRd.c = 102.4 kN/m
V / VRd.c = 0.562

PASS – Design shear resistance exceeds design shear force

Horizontal reinforcement parallel to face of stem – Section 9.6

Minimum area of reinforcement – cl.9.6.3(1);             
Asx.req = max(0.25Asr.prov, 0.001tstem) = 300 mm2/m
Maximum spacing of reinforcement – cl.9.6.3(2); ssx_max = 400 mm
Transverse reinforcement provided; H10 dia.bars @ 200 c/c (Asx.prov = 393 mm2/m)

PASS – Area of reinforcement provided is greater than area of reinforcement required

Check base design at toe

Depth of section;  h = 350 mm

Rectangular section in flexure

Design bending moment combination 1;                     
M = 13.8 kNm/m

d = h – cbb – φbb / 2 = 269 mm
K = M / (d2 fck) = 0.010
K’ = (2h × accC) × (1 – λ(d – K1)/(2K2)) × (λ(d – K1)/(2K2))
K’ = 0.207

K’ > K – No compression reinforcement is required

Lever arm;                                                                        
z = min(0.5 + 0.5(1 – 2K / (h × accC))0.5, 0.95)d = 256 mm
Depth of neutral axis; x = 2.5(d – z) = 34 mm

Area of tension reinforcement required; Abb.req = M / (fydz) = 124 mm2/m
Tension reinforcement provided;                                 
12 dia.bars @ 200 c/c ( Abb.prov = 565 mm2/m)

Minimum area of reinforcement – exp.9.1N;               
Abb.min = max(0.26fctm/fyk, 0.0013)d = 350 mm2/m

Maximum area of reinforcement – cl.9.2.1.1(3);         
Abb.max = 0.04h = 14000 mm2/m
max(Abb.req, Abb.min) / Abb.prov = 0.618

PASS – Area of reinforcement provided is greater than area of reinforcement required

Rectangular section in shear

Design shear force;                                                         
V = 53.3 kN/m
CRd,c = 0.18/γC = 0.120
k = min(1 + √(200 mm / d), 2) = 1.862

Longitudinal reinforcement ratio; ρl = min(Abb.prov / d, 0.02) = 0.002

vmin = 0.035 k3/2fck0.5 = 0.398 N/mm2

Design shear resistance – exp.6.2a & 6.2b;                
VRd.c = max(CRd.ck(100ρlfck)1/3, vmin) d
VRd.c = 107 kN/m
V / VRd.c = 0.498

PASS – Design shear resistance exceeds design shear force

Check base design at heel

Depth of section; h = 350 mm

Rectangular section in flexure

Design bending moment combination 1;                     
M = 51.9 kNm/m

d = h – cbt – φbt / 2 = 294 mm
K = M / (d2fck) = 0.030
K’ = (2h × αccC) × (1 – λ(d – K1)/(2K2)) × (λ(d – K1)/(2K2))
K’ = 0.207

K’ > K – No compression reinforcement is required

Lever arm;  z = min(0.5 + 0.5(1 – 2K/(h × αccC))0.5, 0.95)d = 279 mm
Depth of neutral axis;  x = 2.5(d – z) = 37 mm

Area of tension reinforcement required;                     
Abt.req = M / (fydz) = 427 mm2/m

Tension reinforcement provided;                                 
12 dia.bars @ 200 c/c (Abt.prov = 565 mm2/m)

Minimum area of reinforcement – exp.9.1N;               
Abt.min = max(0.26fctm/fyk, 0.0013)d = 382 mm2/m

Maximum area of reinforcement – cl.9.2.1.1(3);         
Abt.max = 0.04h = 14000 mm2/m
max(Abt.req, Abt.min) / Abt.prov = 0.755

PASS – Area of reinforcement provided is greater than area of reinforcement required

Rectangular section in shear

Design shear force;                                                         
V = 53.5 kN/m
CRd,c = 0.18 / γC = 0.120
k = min(1 + √(200 mm / d), 2) = 1.825

Longitudinal reinforcement ratio;                                  
ρl = min(Abt.prov / d, 0.02) = 0.002
vmin = 0.035k3/2fck0.5 = 0.386 N/mm2

Design shear resistance – exp.6.2a & 6.2b;                
VRd.c = max(CRd.ck (100 ρlfck)1/3, vmin)d
VRd.c = 113.4 kN/m
V / VRd.c = 0.472

PASS – Design shear resistance exceeds design shear force

Secondary transverse reinforcement to base – Section 9.3
Minimum area of reinforcement – cl.9.3.1.1(2);         
Abx.req = 0.2Abb.prov = 113 mm2/m

Maximum spacing of reinforcement – cl.9.3.1.1(3);   
sbx_max = 450 mm

Transverse reinforcement provided;                            
10 dia.bars @ 200 c/c (Abx.prov = 393 mm2/m)

PASS – Area of reinforcement provided is greater than area of reinforcement required

Summary

DescriptionUnitProvidedRequiredUtilisationResult
Stem ρ0 rear face – Flexural reinforcementmm2/m754.0645.70.86PASS
Stem ρ0 – Shear resistancekN/m102.457.50.56PASS
Base top face – Flexural reinforcementmm2/m565.5427.20.76PASS
Base bottom face – Flexural reinforcementmm2/m565.5349.70.62PASS
Base – Shear resistancekN/m107.053.30.50PASS
Transverse stem reinforcementmm2/m392.7300.00.76PASS
Transverse base reinforcementmm2/m392.7113.10.29PASS


How to Apply Wind Load on High-Rise Buildings

The effect of wind on a building gets more significant as the height of the building increases. Due to the various flow scenarios that result from wind’s interaction with structures, wind load analysis on tall buildings is a very complex phenomenon. In a general stream of air flowing in relation to the earth’s surface, wind is made up of several eddies with different diameters and rotational properties. The wind is turbulent or gusty because of these eddies.

Strong winds’ lower atmosphere gustiness is mostly caused by contact with surface structures. While the gustiness of the wind tends to diminish with height, the average wind speed tends to increase over a period of time of the order of ten minutes or more. The size of the eddies affects the dynamic loading on a structure as a result of turbulence. Large eddies that are comparable in size to the structure create well-correlated pressures as they encircle it. On the other hand, minor eddies cause stresses on different regions of a structure that are essentially unrelated to the separation between them.

Some buildings, especially tall or slender ones, react to the influences of wind in a dynamic way. The causes of a structure’s dynamic response to wind are a variety of different occurrences. These include galloping, fluttering, buffeting, and vortex shedding. Due to turbulence buffeting, thin structures are likely to be sensitive to dynamic reactions in the direction of the wind.

Although turbulence buffeting can also cause a transverse or cross-wind reaction, vortex shedding or galloping is more likely to cause one. Flutter is a linked motion that frequently combines torsion and bending and can cause instability. 

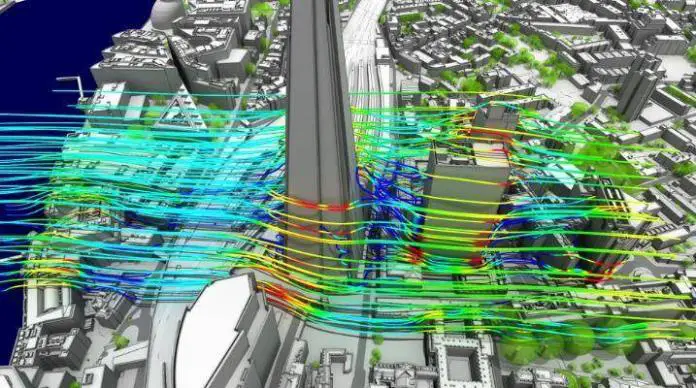
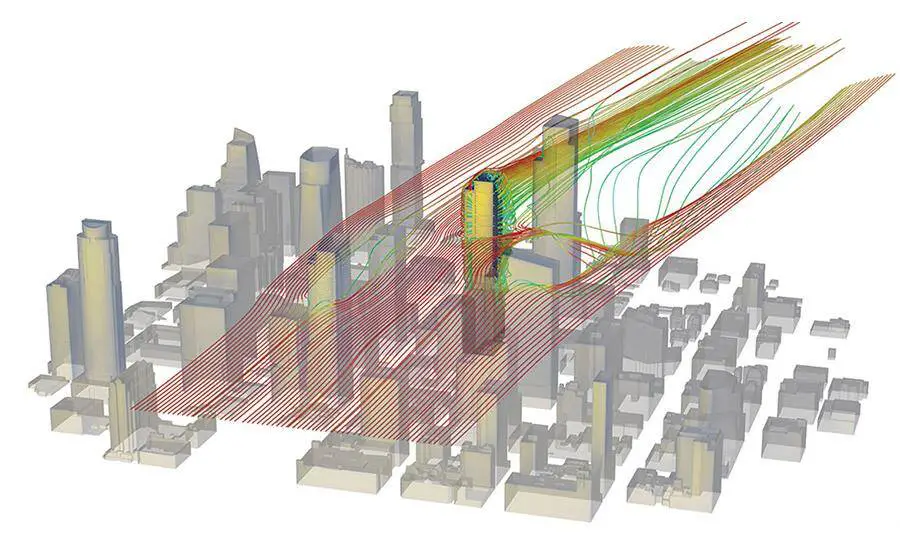
Wind load simulation on a highrise building

Design Wind Load Pressure

The geometry of the structure under consideration, the geometry and proximity of the structures upwind, and the characteristics of the approaching wind all influence the features of wind pressures on that structure. The wind is gusty, which contributes to the pressure fluctuations, but local vortex shedding around the borders of the buildings themselves is also a factor.

If a structure is dynamically wind-sensitive, the varying pressures can cause fatigue damage to it as well as dynamic excitation. Additionally, the pressures are not constant along the surface of the structure but rather change according to position.

When using a design document, it is important to keep in mind the complexity of wind loading. The maximum wind loads that a structure would sustain over the course of its lifetime may differ significantly from those estimated during design due to the numerous unknowns involved. As a result, the success or failure of a structure in a windstorm cannot always be interpreted as a sign of the conservatism or non-conservatism of the Wind Loading Standard.

Buildings and constructions with distinctive shapes or locations are exempt from the Standards’ application. Some types of constructions, such as tall skyscrapers and thin towers, are designed according to wind loading. It frequently becomes appealing to use experimental wind tunnel data instead of the Wind Loading Code coefficients for these buildings.

In this article, wind load analysis has been carried out on a 60m tall high-rise building using the method described in EN 1991-1-4:2005 (General actions – Wind action). The structure is assumed to be located in an area with a basic wind speed of 40 m/s.

Basic Data
Height of building = 60m
Width of a building = 30m
Structure – Framed building
The structure is located at terrain category II (see Table below)

Parameteres

Basic wind velocity
The fundamental value of the basic wind velocity Vb,0 is the characteristic 10 minute mean wind velocity irrespective of wind direction and time of the year, at 10 m above ground level in open-country terrain with low vegetation such as grass, and with isolated obstacles with separations of at least 20 obstacle heights.

The basic wind velocity Vb,0 is calculated from;
Vb = Cdir . Cseason .Vb,0

Where:
Vb is the basic wind velocity defined as a function of wind direction and time of the year at 10m above the ground of terrain category II
Vb,0 is the fundamental value of the basic wind velocity
Cdir is the directional factor (defined in the National Annex, but recommended value is 1.0)
Cseason is the season factor (defined in the National Annex, but recommended value is 1.0)

For the area and location of the building that we are considering;
Basic wind velocity Vb,0 = 40 m/s
Vb = Cdir. Cseason.Vb,0 = 1.0 × 1.0 × 40 = 40 m/s

Mean Wind
The mean wind velocity Vm(z) at a height z above the terrain depends on the terrain roughness and orography, and on the basic wind velocity, Vb, and should be determined using the expression below;

Vm(z) = cr(z). co(z).Vb

Where;
cr(z) is the roughness factor (defined below)
co(z) is the orography factor often taken as 1.0

The terrain roughness factor accounts for the variability of the mean wind velocity at the site of the structure due to the height above the ground level and the ground roughness of the terrain upwind of the structure in the wind direction considered. Terrain categories and parameters are shown in Table 2.0.

cr(z)  = kr. In (z/z0) for zmin ≤ z ≤ zmax
cr(z) = cr.(zmin) for z ≤ zmin

Where:
Z0 is the roughness length
kr is the terrain factor depending on the roughness length Z0 calculated using;

kr = 0.19 (Z0/Z0,II)0.07

Where:
Z0,II = 0.05m (terrain category II)
Zmin is the minimum height = 2 m
z = 60 m
Zmax is to be taken as 200 m
Kr = 0.19 (0.05/0.05)0.07 = 0.19
cr(60) = kr.In (z/z0) = 0.19 × In(60/0.05) = 1.347

Therefore;
Vm(60) = cr(z). co(z).Vb = 1.347 × 1.0 × 40 = 53.88 m/s

Wind turbulence
The turbulence intensity Iv(z) at height z is defined as the standard deviation of the turbulence divided by the mean wind velocity. The recommended rules for the determination of Iv(z) are given in the expressions below;

Iv(z) = σv/Vm = kl/(c0(z).In (z/z0)) for zmin ≤ z ≤ zmax
Iv(z) = Iv.(zmin) for z ≤ zmin

Where:
kl is the turbulence factor of which the value is provided in the National Annex but the recommended value is 1.0
Co is the orography factor described above
Z0 is the roughness length described above.

For the building that we are considering, the wind turbulence factor at 60m above the ground level;

Iv(60) = σv/Vm = k1/[c0(z).In(z/z0)] = 1/[1 × In(60/0.05)] = 0.141

Peak Velocity Pressure
The peak velocity pressure qp(z) at height z is given by the expression below;

qp(z) = [1 + 7.Iv(z)] 1/2.ρ.Vm2(z) = ce(z).qb

Where:
ρ is the air density, which depends on the altitude, temperature, and barometric pressure tobe expected in the region during wind storms (recommended value is 1.25kg/m3)

ce(z) is the exposure factor given by;
ce(z) = qp(z)/qb
qb is the basic velocity pressure given by; qb = 0.5.ρ.Vb2

qp(60m) = [1 + 7(0.141)] × 0.5 × 1.25 × 53.882 = 3605.23 N/m2

Therefore, qp(60m) = 3.605 kN/m2

External Pressure Coefficients
From Table 7.1 of EN 1991-1-4:2005 (E)
For the building, taking the height to width ratio h/d = 2.0
Pressure coefficient for windward side = +0.8
Pressure coefficient for leeward side = –0.6
The net pressure coefficient Cpe10 = +0.8 – (–0.6) = 1.4
The net external surface pressure on the structure = qp(z) Cpe10 = 3.6057 × 1.4 = 5.05 kN/m2
Therefore, we = 5.05 kN/m2

Detailed Calculation

Wind loading of a high-rise building in accordance with EN1991-1-3:2005+A1:2010 and the UK national annex.

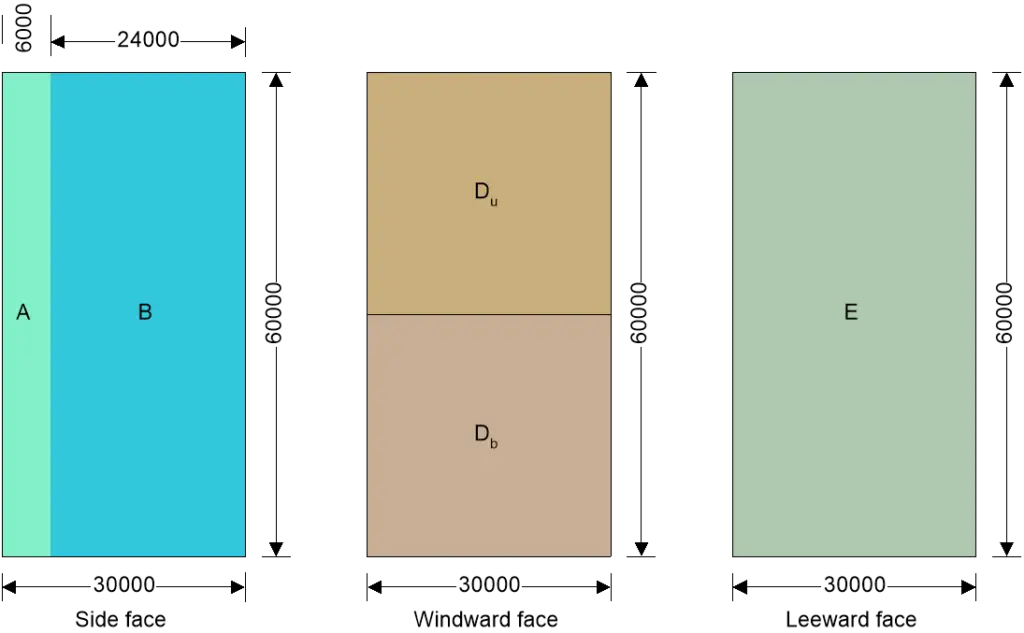
image 26

Building data
Type of roof; Flat
Length of building;  L = 30000 mm
Width of building; W = 30000 mm
Height to eaves;  H = 60000 mm
Eaves type;   Sharp
Total height;  h = 60000 mm

Basic values
Location; Ibadan, Nigeria
Wind speed velocity (FigureNA.1);   vb,map = 40.0 m/s
Distance to shore;  Lshore = 250.00 km
Altitude above sea level; Aalt = 100.0m
Altitude factor;  calt = Aalt/1m × 0.001 + 1 = 1.100
Fundamental basic wind velocity;  vb,0 = vb,map × calt = 44.0 m/s
Direction factor; cdir = 1.00
Season factor;  cseason = 1.00
Shape parameter K; K = 0.2
Exponent n;  n = 0.5
Air density;  ρ = 1.226 kg/m3

Probability factor;  cprob = [(1 – K × ln(-ln(1-p)))/(1 – K × ln(-ln(0.98)))]n = 1.00
Basic wind velocity (Exp. 4.1); vb = cdir × cseason × vb,0 × cprob = 44.0 m/s
Reference mean velocity pressure;   qb = 0.5 × ρ × vb2 = 1.187 kN/m2

Orography
Orography factor not significant; co = 1.0

Terrain category; Country
Displacement height (sheltering effect excluded);   hdis = 0mm

The velocity pressure for the windward face of the building with a 0 degree wind is to be considered as 2 parts as the height h is greater than b but less than 2b (cl.7.2.2)

The velocity pressure for the windward face of the building with a 90 degree wind is to be considered as 2 parts as the height h is greater than b but less than 2b (cl.7.2.2)

Peak velocity pressure  – windward wall (lower part) – Wind 0 deg

Reference height (at which q is sought);  z = 30000mm
Displacement height (sheltering effects excluded);   hdis = 0 mm
Exposure factor (Figure NA.7);  ce = 3.05
Library item: Peak velocity factors  output
Peak velocity pressure;  qp = ce × qb = 3.62 kN/m2

Structural factor
Structural damping; ds = 0.100
Height of element;  hpart = 30000 mm
Size factor (Table NA.3); cs = 0.895
Dynamic factor (Figure NA.9); cd = 1.000
Structural factor; csCd = cs × cd = 0.895

Peak velocity pressure  – windward wall (upper part) – Wind 0 deg and roof
Reference height (at which q is sought); z = 60000mm
Displacement height (sheltering effects excluded);   hdis = 0 mm
Exposure factor (Figure NA.7);  ce = 3.50
Peak velocity pressure; qp = ce × qb = 4.16 kN/m2
Structural damping;  ds = 0.100
Height of element; hpart = 30000 mm
Size factor (Table NA.3);  cs = 0.907
Dynamic factor (Figure NA.9); cd = 1.000
Structural factor; csCd = cs × cd = 0.907

Structural factor
Structural damping; ds = 0.100
Height of element; hpart = 60000 mm
Size factor (Table NA.3); cs = 0.888
Dynamic factor (Figure NA.9); cd = 1.000
Structural factor; csCd = cs × cd = 0.888

Peak velocity pressure  – windward wall (lower part) – Wind 90 deg

Reference height (at which q is sought);  z = 30000mm
Displacement height (sheltering effects excluded);   hdis = 0 mm
Exposure factor (Figure NA.7); ce = 3.05
Peak velocity pressure; qp = ce × qb = 3.62 kN/m2

Structural factor
Structural damping; ds = 0.100
Height of element;  hpart = 30000 mm
Size factor (Table NA.3); cs = 0.895
Dynamic factor (Figure NA.9);  cd = 1.000
Structural factor; csCd = cs × cd = 0.895

Peak velocity pressure  – windward wall (upper part) – Wind 90 deg and roof
Reference height (at which q is sought);  z = 60000mm
Displacement height (sheltering effects excluded);   hdis = 0 mm
Exposure factor (Figure NA.7);  ce = 3.50
Peak velocity pressure; qp = ce × qb = 4.16 kN/m2
Structural damping; ds = 0.100
Height of element; hpart = 30000 mm
Size factor (Table NA.3); cs = 0.907
Dynamic factor (Figure NA.9); cd = 1.000
Structural factor; csCd = cs × cd = 0.907

Structural factor
Structural damping; ds = 0.100
Height of element; hpart = 60000 mm
Size factor (Table NA.3);  cs = 0.888
Dynamic factor (Figure NA.9); cd = 1.000
Structural factor;  csCd = cs × cd = 0.888

Peak velocity pressure for internal pressure
Peak velocity pressure – internal (as roof press.);  qp,i = 4.16 kN/m2

Pressures and forces
Net pressure; p = csCd × qp × cpe – qp,i × cpi;
Net force;  Fw = pw × Aref;

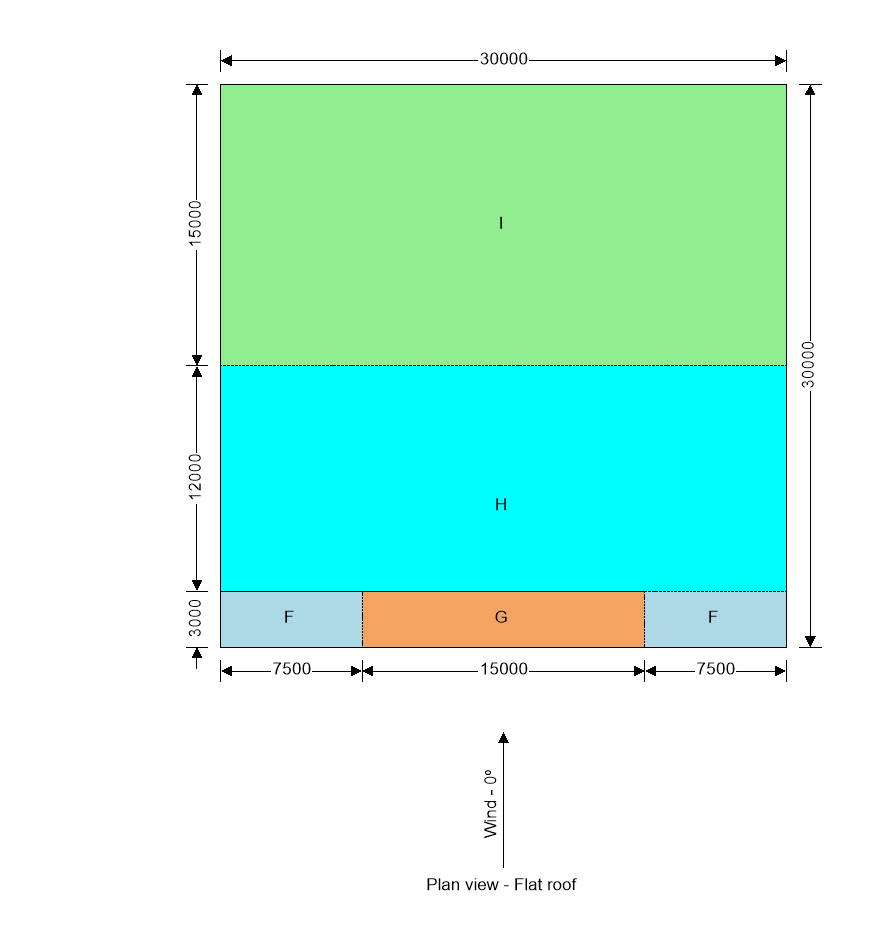
Roof load case 1 – Wind 0, cpi 0.20, -cpe

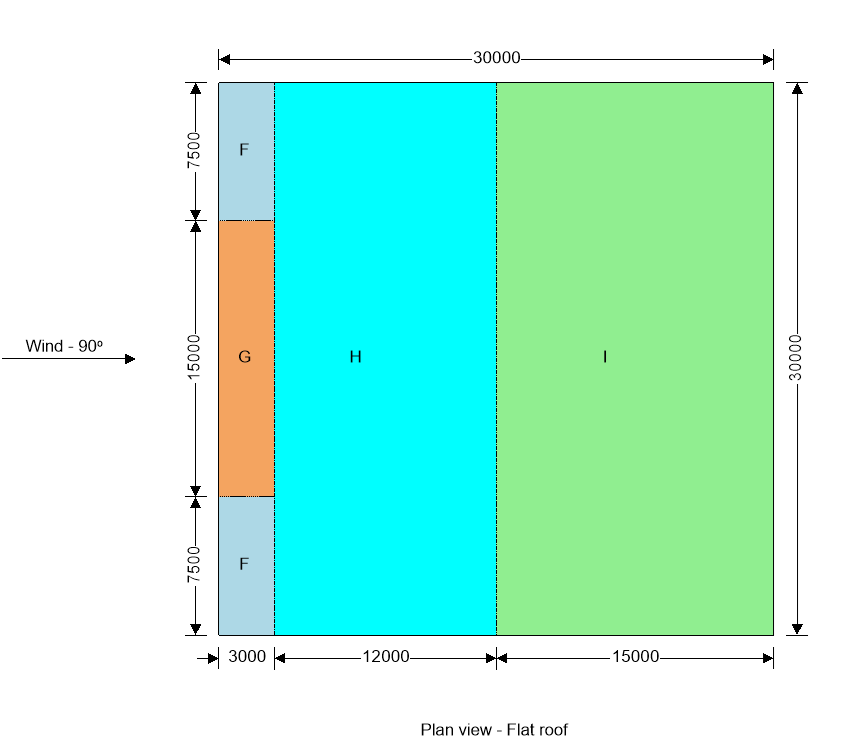
wind load
ZoneExt pressure coeff
cpe
Peak velocity pressure
qp (kN/m2)
Net pressure element,
pe (kN/m2)
Net pressure structure
ps (kN/m2)
Area
Aref (m2)
Net force element
Fw,e (kN)
Net force structure
Fw,s (kN)
F (-ve)-2.004.16-9.15-8.2245.00-411.69-369.93
G (-ve)-1.404.16-6.65-6.0045.00-299.41-270.18
H (-ve)-0.704.16-3.74-3.42360.00-1347.33-1230.43
I (-ve)-0.204.16-1.66-1.57450.00-748.52-706.77

Total vertical net force;  Fw,v = -2577.31 kN
Total horizontal net force; Fw,h = 0.00 kN

Walls load case 1 – Wind 0, cpi 0.20, -cpe

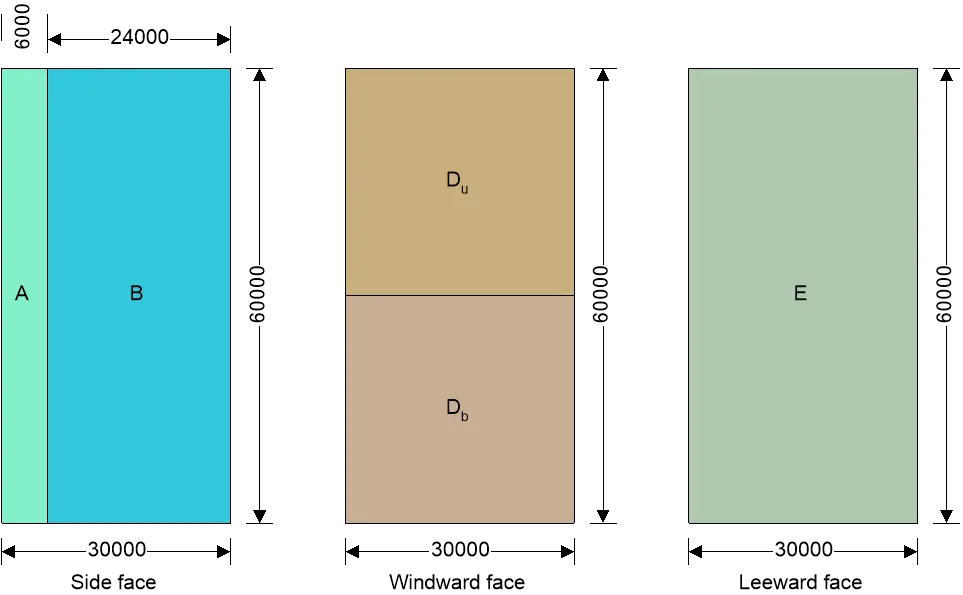
image 24
ZoneExt pressure coeff
cpe
Peak velocity pressure
qp (kN/m2)
Net pressure element,
pe (kN/m2)
Net pressure structure
ps (kN/m2)
Area
Aref (m2)
Net force element
Fw,e (kN)
Net force structure
Fw,s (kN)
A-1.204.16-5.82-5.36360.00-2095.85-1928.18
B-0.804.16-4.16-3.851440.00-5988.15-5541.03
Db0.803.622.071.76900.001859.331585.51
Du0.804.162.502.18900.002245.551966.11
E-0.554.16-3.12-2.911800.00-5613.89-5229.65

Overall loading

Equivalent leeward net force for upper section;                  
Fl = Fw,wEs / Aref,wE × Aref,wu = -2614.8 kN

Net windward force for upper section;                         
Fw = Fw,wus = 1966.1 kN

Lack of correlation (cl.7.2.2(3) – Note);                       
fcorr = 0.89; as h/W is 2.000

Overall loading upper section;                                      
Fw,u = fcorr × (Fw – Fl + Fw,h) = 4065.6 kN

Equiv leeward net force for bottom section;                
Fl = Fw,wEs / Aref,wE × Aref,wb = -2614.8 kN

Net windward force for bottom section;                       
Fw = Fw,wbs = 1585.5 kN

Lack of correlation (cl.7.2.2(3) – Note);                       
fcorr = 0.89; as h/W is 2.000

Overall loading bottom section;                                    
Fw,b = fcorr × (Fw – Fl) = 3727.8 kN

Roof load case 2 – Wind 0, cpi -0.3, +cpe

ZoneExt pressure coeff
cpe
Peak velocity pressure
qp (kN/m2)
Net pressure element,
pe (kN/m2)
Net pressure structure
ps (kN/m2)
Area
Aref (m2)
Net force element
Fw,e (kN)
Net force structure
Fw,s (kN)
F (+ve)-2.004.16-7.07-6.1445.00-318.12-276.37
G (+ve)-1.404.16-4.57-3.9245.00-205.84-176.62
H (+ve)-0.704.16-1.66-1.34360.00-598.81-481.91
I (+ve)0.204.162.081.99450.00935.65893.90

Total vertical net force;  Fw,v = -41.00 kN
Total horizontal net force; Fw,h = 0.00 kN

Walls load case 2 – Wind 0, cpi -0.3, +cpe

ZoneExt pressure coeff
cpe
Peak velocity pressure
qp (kN/m2)
Net pressure element,
pe (kN/m2)
Net pressure structure
ps (kN/m2)
Area
Aref (m2)
Net force element
Fw,e (kN)
Net force structure
Fw,s (kN)
A-1.204.16-3.74-3.28360.00-1347.33-1179.66
B-0.804.16-2.08-1.771440.00-2994.07-2546.96
Db0.803.624.153.84900.003730.633456.80
Du0.804.164.574.26900.004116.853837.40
E-0.554.16-1.04-0.831800.00-1871.30-1487.06

Overall loading

Equivalent leeward net force for upper section;                  
Fl = Fw,wEs / Aref,wE × Aref,wu = -743.5 kN

Net windward force for upper section;                         
Fw = Fw,wus = 3837.4 kN

Lack of correlation (cl.7.2.2(3) – Note);                       
fcorr = 0.89; as h/W is 2.000

Overall loading upper section;                                      
Fw,u = fcorr × (Fw – Fl + Fw,h) = 4065.6 kN

Library item: Overall loading output

Equiv leeward net force for bottom section;                
Fl = Fw,wEs / Aref,wE × Aref,wb = -743.5 kN

Net windward force for bottom section;                       
Fw = Fw,wbs = 3456.8 kN

Lack of correlation (cl.7.2.2(3) – Note);                       
fcorr = 0.89; as h/W is 2.000

Overall loading bottom section;                                    
Fw,b = fcorr × (Fw – Fl) = 3727.8 kN

Roof load case 3 – Wind 90, cpi 0.20, -cpe

image 27
ZoneExt pressure coeff
cpe
Peak velocity pressure
qp (kN/m2)
Net pressure element,
pe (kN/m2)
Net pressure structure
ps (kN/m2)
Area
Aref (m2)
Net force element
Fw,e (kN)
Net force structure
Fw,s (kN)
F (-ve)-2.004.16-9.15-8.2245.00-411.69-369.93
G (-ve)-1.404.16-6.65-6.0045.00-299.41-270.18
H (-ve)-0.704.16-3.74-3.42360.00-1347.33-1230.43
I (-ve)-0.204.16-1.66-1.57450.00-748.52-706.77

Total vertical net force; Fw,v = -2577.31 kN
Total horizontal net force; Fw,h = 0.00 kN

Walls load case 3 – Wind 90, cpi 0.20, -cpe

image 28
ZoneExt pressure coeff
cpe
Peak velocity pressure
qp (kN/m2)
Net pressure element,
pe (kN/m2)
Net pressure structure
ps (kN/m2)
Area
Aref (m2)
Net force element
Fw,e (kN)
Net force structure
Fw,s (kN)
A-1.204.16-5.82-5.36360.00-2095.85-1928.18
B-0.804.16-4.16-3.851440.00-5988.15-5541.03
Db0.803.622.071.76900.001859.331585.51
Du0.804.162.502.18900.002245.551966.11
E-0.554.16-3.12-2.911800.00-5613.89-5229.65

Overall loading

Equiv leeward net force for upper section;                  
Fl = Fw,wEs / Aref,wE × Aref,wu = -2614.8 kN

Net windward force for upper section;                         
Fw = Fw,wus = 1966.1 kN

Lack of correlation (cl.7.2.2(3) – Note);                       
fcorr = 0.89; as h/L is 2.000

Overall loading upper section;                                      
Fw,u = fcorr × (Fw – Fl + Fw,h) = 4065.6 kN

Library item: Overall loading output

Equiv leeward net force for bottom section;                
Fl = Fw,wEs / Aref,wE × Aref,wb = -2614.8 kN

Net windward force for bottom section;                       
Fw = Fw,wbs = 1585.5 kN

Lack of correlation (cl.7.2.2(3) – Note);                       
fcorr = 0.89; as h/L is 2.000

Overall loading bottom section;                                    
Fw,b = fcorr × (Fw – Fl) = 3727.8 kN

Roof load case 4 – Wind 90, cpi -0.3, +cpe

ZoneExt pressure coeff
cpe
Peak velocity pressure
qp (kN/m2)
Net pressure element,
pe (kN/m2)
Net pressure structure
ps (kN/m2)
Area
Aref (m2)
Net force element
Fw,e (kN)
Net force structure
Fw,s (kN)
F (+ve)-2.004.16-7.07-6.1445.00-318.12-276.37
G (+ve)-1.404.16-4.57-3.9245.00-205.84-176.62
H (+ve)-0.704.16-1.66-1.34360.00-598.81-481.91
I (+ve)0.204.162.081.99450.00935.65893.90

Total vertical net force; Fw,v = -41.00 kN
Total horizontal net force;  Fw,h = 0.00 kN

Walls load case 4 – Wind 90, cpi -0.3, +cpe

ZoneExt pressure coeff
cpe
Peak velocity pressure
qp (kN/m2)
Net pressure element,
pe (kN/m2)
Net pressure structure
ps (kN/m2)
Area
Aref (m2)
Net force element
Fw,e (kN)
Net force structure
Fw,s (kN)
A-1.204.16-3.74-3.28360.00-1347.33-1179.66
B-0.804.16-2.08-1.771440.00-2994.07-2546.96
Db0.803.624.153.84900.003730.633456.80
Du0.804.164.574.26900.004116.853837.40
E-0.554.16-1.04-0.831800.00-1871.30-1487.06

Overall loading

Equiv leeward net force for upper section;                  
Fl = Fw,wEs / Aref,wE × Aref,wu = -743.5 kN

Net windward force for upper section;                         
Fw = Fw,wus = 3837.4 kN

Lack of correlation (cl.7.2.2(3) – Note);                       
fcorr = 0.89; as h/L is 2.000

Overall loading upper section;                                      
Fw,u = fcorr × (Fw – Fl + Fw,h) = 4065.6 kN

Library item: Overall loading output

Equiv leeward net force for bottom section;                
Fl = Fw,wEs / Aref,wE × Aref,wb = -743.5 kN

Net windward force for bottom section;                       
Fw = Fw,wbs = 3456.8 kN

Lack of correlation (cl.7.2.2(3) – Note);                       
fcorr = 0.89; as h/L is 2.000

Overall loading bottom section;                                    
Fw,b = fcorr × (Fw – Fl) = 3727.8 kN

Simple Proofs Why Shorter Spans Are More Critical in Slab Design

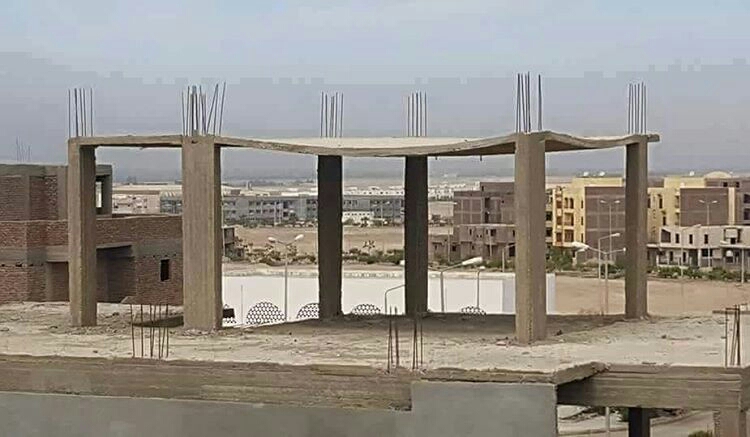
A slab is a structural member whose depth is considerably smaller than the lateral dimensions. They provide useful surfaces for floors in buildings and support the occupancy loads. Reinforced concrete slabs may be supported by beams, columns, walls, or masonry. When a slab is supported on two opposite sides, they are referred to as one-way slabs because the load is transferred from the slab to the beam in the perpendicular direction.

one%2Bway%2Bslab
Typical one-way slab system

However, if a slab is supported by beams on the four sides, and the ratio of length to width is greater than 2, majority of the load is transferred to the short direction to the supporting beams, and one-way action is obtained in effect, even though supports are provided on all sides.

The structural action of one-way slabs may be visualized in terms of the deflected surface. This can be approximated as a cylindrical surface, and curvatures and bending moments are parallel to the short side Lx. The slab is normally analysed a beam of a unit strip, with the bending moment, shear forces, and reinforcement determined per unit strip.

56777
Cylindrical one-way bending action of a thin pate

In many design circumstances, rectangular slabs have dimensions where the ratio of the longer side to the shorter side is less than 2 (and are also supported in such a way that two-way action results). When loaded, such slabs bend into a dished surface rather than a cylindrical one. This means that at any point the slab is curved in both principal directions, and since bending moments are proportional to curvatures, moments also exist in both directions.

dttttu
Two-way bending action of a thin plate

BHXXrA jYR

To resist these moments, the slab must be reinforced in both directions, by at least two layers of bars perpendicular, respectively, to two pairs of edges. The slab must be designed to take a proportionate share of the load in each direction.

Why are Short Span Critical in Slabs?

Whenever civil engineering students enter a structural design classroom for the first time, they are told that the shorter span is more critical in the design of slabs. This is usually source of wonder for first timers because by mere instincts, the longer span should be more critical.

This article shows very simple proofs why the short span is more critical in slabs.

Deflection of centre-strip approach

This approach offers an extremely simplified concept that shows that the load transmitted to the shorter span is greater than the load transmitted to the longer span.

Let us consider the two way action of the slab shown below;

ert

Looking at the centre-strips highlighted in red, a little consideration will show that at the intersection point of the strips, the deflection is equal. Logical right?

Let the uniform load  on the longer strip be qy
Let the uniform load on the shorter strip be qx

We can therefore say that;

Deflection at centre = 5qyLy4/384EI = 5qxLx4/384EI
5qyLy4/384EI = 5qxLx4/384EI
qyLyqxLx4

We can verify from the above relationships that;
qx/qy LyLx4

Since Ly > Lx, we can accept that the load on the short span (qx) is greater than the load on the long span (qy) since Ly/Lx > 1.0
This is an oversimplification of the behaviour of slabs though.

Yield Line Approach

The yield line method was developed to determine the limit state of slabs by considering the yield lines that occur at the slab collapse mechanism. The yield lines are usually approximated to originate at the corners, forming at an angle of 45° until they intersect. These yield lines usually show trapezoidal loads going to the longer supporting beam of the slab, and triangular loads going to the shorter supporting beam.

Let us assume that the slab is subjected to a unit pressure load (1 kN/m2)

Ly = 6m
Lx = 5m

Area of trapezium = 8.6825 m2
Area of triangle = 6.316 m2

Therefore;
The load parallel to the short span (Px) = 2 × 8.6825m2 × 1 kN/m2 = 17.365 kN
The load parallel to the long span (Py) = 2 × 6.316m2 × 1 kN/m2 = 12.632 kN

Total load on slab = (5 × 6)m2 × 1 kN/m2 = 30 kN

Therefore, you can see why the shorter span is more heavily loaded based on the yield line pattern.

Finite Element Analysis

When we carry out finite element analysis on slabs, the result offers an insight;
Let us check out the slab investigated above using finite element analysis results from Staad Pro.

SER

Let us assume that the slab is subjected to a unit pressure load (1 kN/m2)

Ly = 6m
Lx = 5m
Thickness of slab = 150 mm
v = 0.2
E = 21.7 kN/mm2

From the result, the bending moment parallel to the short span is given below;

In the longer direction;

my

If you look at the results above, the moments parallel to the the short span is more critical than the moment parallel to the longer side.

Conclusion

The load transferred to supporting beams through the short span of the slab is heavier than the load transferred through the long span of the slab. For a one way slab, the slab is analysed as a beam of unit width , and the main reinforcement is provided parallel to the short span, while distribution bars are provided parallel to the long span. Minimum steel can be used as distribution bars.

But for two way slabs, the slab is designed for strength in the two principal directions, but the main bars are placed at the bottom, parallel to the short span, while the other is placed near to the bottom (on top of the bottom bar) parallel to the long span

An Introduction To Isogeometric Analysis (IGA)

1.0 Introduction
Isogeometric Analysis (IGA) is a computational approach that integrates Finite Element Analysis (FEA) and Computer Aided Design (CAD). Isogeometric Analysis is developed for the purpose of utilizing the same data set in both design and analysis (Raknes, 2011). In today’s CAD and FEA packages one have to convert the data generated in design to a data set suitable for FEA. Converting the data is not trivial, as the computational geometric approach is different in CAD and FEA. IGA makes it possible to utilize the NURBS geometry, which is the most used basis in CAD packages, in FEA directly. Isogeometric analysis is thus a great tool for optimizing models, as one easily can make refinements and perform testing and analysis during design and development.

2.0 CAD and FEA
CAD systems are characterised by “exact” (small gaps within predefined tolerances are allowed) descriptions of the inner and outer shells of the object and 3D models are sufficiently accurate for production purposes (Ferreira, 2014). In FEA the object is represented with a description of composed structures of finite elements, where there is a cruder representation of the shape of inner and outer hulls. In addition FEA needs compact geometric descriptions, where unnecessary detail is removed to focus the analysis on essential properties of the objects, namely, the simulation is performed only in the regions of interest to study the physical problem.

Right now, numerical simulation often involves using the Finite Element Method (FEM) where the geometry model, derived from CAD, usually will suffer a reparameterization of the CAD geometry by piecewise low order polynomials (mesh), generally applying linear Lagrange polynomials to approximate the geometry. This information transfer between models suitable for design (CAD) and analysis (FEM) is considered being a bottleneck in industry (industrial applications) of today, because it introduces significant approximation errors, or makes the simulations computational costly in FEM models with fine mesh, and entails a huge amount of man-hours to generate a suitable finite element mesh (Ferreira, 2014).

Nowadays most CAD systems use spline basis functions and often Non-Uniform Rational B-Splines (NURBS) of a different polynomial order. For that reason, IGA is based on NURBS, where the main idea is to use the same mathematical description for the geometry in the design process within CAD and the numerical procedures used in FEA simulations. In other words, IGA is characterised by the use of a common spline basis for geometric modelling and Finite Element Analysis of a given object and can be considered a generalisation of FEM analysis (Ferreira, 2014). Much research in application of IGA have been done at various topics of FEA: linear and non-linear static and dynamic analysis of thin-walled structures, fluid mechanics, fluid structure interaction, shape and topology optimisation, vibration analysis, buckling and others.

Isogeometric analysis based on NURBS (Non-Uniform Rational B-splines) was introduced by Tom Hughes (2005) and further expanded by Cortrell et al, (2006). The objectives of IGA are to generalise and improve upon FEA in the following ways:

  • Get volumetric spline models having the expected behaviour according to the Partial Differential Equations system (PDEs) and according with boundary conditions and loads behind the physical phenomena in analysis;
  • Represent common engineering shapes (circles, cylinders, spheres, ellipsoids, etc.) and provide accurate modelling of complex geometries. This means that geometrical errors optimally should be eliminated;
  • Simplify mesh refinement of geometries by eliminating the need for communication with CAD geometry once the initial mesh is constructed;
  • Provide systematic refinements (h, p and k refinements) that exhibit improved accuracy and efficiency compared with classical FEA.
SPACING%2BAND%2BMAPPING%2BIN%2BIGA
3.0 Differences Between Isogeometric Analysis and Finite Element Analysis
The concept of isogeometric analysis is that the basis functions that are used to model the exact geometry are also used as a basis for the solution field. In classical FEA it is the other way around; the basis functions we choose to approximate the unknown solution field is used to approximate the already known geometry (Raknes, 2011). NURBS based Galerkin finite element method is somewhat similar to classical FEA, only now, different basis functions are being used.
For example, in finite element analysis, a circle is an ideal achieved in the limit of mesh refinement (i.e., h-refinement) but never achieved in reality, whereas a circle is achieved exactly for the coarsest mesh in isogeometric analysis, and this exact geometry, and its parameterization, are maintained for all mesh refinements. It is interesting to note that, in the limit, the isogeometric model converges to a polynomial representation on each element, but not for any finite mesh. This is the obverse of finite element analysis in which polynomial approximations exist on all meshes, and the circle is the idealized limit (Cotrell, 2006). The table below shows a comparison between FEA and IGA.


344
Example
Analysis of a CCCC (all sides clamped) thin plate (Kirchoff’s theory)
CLAMPED%2BPLATE
Data
a = 6.0 m
b = 6.0 m
Thickness of plate (h) = 150 mm
Pressure Load (q) = 6.2 kN/m2

Poisson ratio (v) = 0.2
Modulus of elasticity (E) = 21.7 kN/mm2

By Isogeometric Analysis
(a) Meshing

MESHING%2BOF%2BTHE%2BPLATE

(b) Enforcement of Boundary Conditions

ENFORCEMENT%2BOF%2BBOUNDARY%2BCONDITIONS

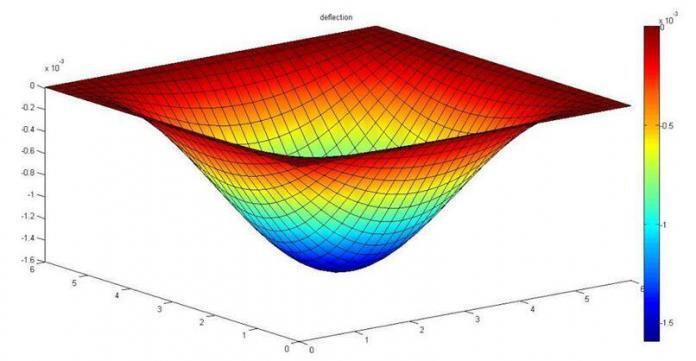
(c) Deflection profile of the plate (MATLAB)

DEFLECTION%2BOF%2BTHE%2BSTRUCTURE

Maximum deflection at mid span =  – 0.001593681267073 m
wmax = 1.59368 mm

Comparing this result with other methods;
Classical solution (Timoshenko) = 1.593 mm
Finite element Analysis (Staad Pro) = 1.560 mm (rectangular mesh size division  = 25 x 25)

References
[1] Ferreira J.P. (2014): Elasto-plastic analysis of structures using an Isogeometric Formulation. M.Eng thesis presented to the Department of Mechanical Engineering , University of Porto, Portugal

[2] Cottrell J, A. Reali, Y. Bazilevs, and T. Hughes (2006):  “Isogeometric analysis of structural vibrations,” Computer Methods in Applied Mechanics and Engineering, vol. 195, no. 41– 43, pp. 5257 – 5296. John H. Argyris Memorial Issue. Part II. 

[3] Raknes Siv Bente (2011): Isogeometric Analysis and Degenerated Mappings. An M.Sc thesis submitted to the Department of Mathematical Sciences, Norwegian University of Science and Technology.

[4] Timoshenko S. And S. Woinowsky-Krieger (1959): Theory of plates and shells. McGraw-Hill Book Company, Inc


Design of Bolted Beam Splice Connections | EN 1993

In the construction of steel structures, there is always a need to join steel members for the purpose of continuity. It is not always possible to have the full lengths of members to span the desired length due to production, handling, and transportation issues. As a result, it is very common to bolt or weld two or more steel members, so as to achieve the desired length.

A bolted beam splice connection is a structural joint used in the construction of steel beams. It is designed to connect two or more beams end-to-end to form a longer beam, increasing the span length or overall structural capacity. The design of a bolted beam splice connection involves several considerations to ensure its strength, stability, and reliability.

The design of a bolted beam splice connection involves careful consideration of load transfer, bolted connection details, splice configuration, stiffness requirements, structural analysis, connection detailing, and material properties. By implication, all the anticipated design forces acting at the point of the beam splice must be taken into consideration during the design.

Therefore, the design involves performing structural analysis to determine the forces and moments acting on the connection. This analysis considers the applied loads, beam properties, and connection geometry. Finite element analysis or other advanced analysis methods may be employed to evaluate the connection’s behaviour under different loading conditions.

In this article, we are going to look at a design example of a beam splice connection (beam-to-beam connection using steel plates). This joint should be able to transmit bending, shear, and axial forces.

Installation of bolted beam splice connection on site

Design and functions of Bolted Splice Connections

The primary function of a beam splice connection is to transfer the loads between the beams effectively. The connection should be designed to transfer axial forces, shear forces, and bending moments from one beam to another without significant deformation or failure.

The connection typically consists of bolts, washers, and nuts. High-strength bolts are commonly used due to their ability to withstand heavy loads. The number, size, and grade of bolts are determined based on the design requirements and the applied loads.

The configuration of the splice connection depends on the structural requirements and the type of loads being transferred. Common types include full-depth end plate splices, extended end plate splices, and flange plate splices. The choice of splice configuration is influenced by factors such as the beam profile, connection stiffness, and fabrication constraints.

The stiffness of the splice connection plays a crucial role in maintaining the overall structural integrity and load distribution. Adequate stiffness helps to limit deflections and minimize differential movement between the spliced beams. The connection should be designed to ensure that it does not introduce excessive additional stiffness or flexibility to the overall beam system.

Design Example

Let us design a bolted beam splice connection for a UB 533 x 210 x 101 kg/m section, subjected to the following ultimate limit state loads;

MEd = 610 kNm
VEd = 215 kN
NEd = 55 kN

At serviceability limit state;
MEd,ser = 445 kNm
VEd,ser = 157 kN
NEd,ser = 41 kN

Properties of UB 533 x 210 x 101
h = 536.7 mm
b = 210 mm
d = 476.5 mm
tw = 10.8 mm
tf = 17.4 mm
r = 12.7 mm
A = 129 cm2
Iy = 61500 cm4
Iz = 2690 cm4
Wel,y = 2290 cm3
Wpl,y = 2610 cm3;
hw = h – 2tf = 476.5 mm

Cover plates
Let us assume 20 mm thick cover plates for the flanges and 15 mm thick plates for the web. The thickness and dimension to be confirmed later in the post.

Bolts
M24 preloaded class 8.8 bolts
Diameter of bolt shank d = 24mm
Diameter of hole d0 = 26mm
Shear area As = 353 mm2

Materials Strength
Beam and cover plates;
fy,b = fy,wp = 275 N/mm2
fu,b = fu,wp = 410 N/mm2

Bolts
Nominal yield strength fyb = 640 N/mm2
Nominal ultimate strength fub = 800 N/mm2

Partial Factors for Resistance (BS EN 1993-1- NA.2.15)
Structural Steel
γm0 = 1.0
γm1 = 1.0
γm2 = 1.1

Parts in connections
γm2 = 1.25 (bolts, welds, plates in bearing)
γm3 = 1.0 (slip resistance at ULS)
γm3,ser = 1.1 (slip resistance as SLS)

Step 1: Internal Forces at Splice
For a splice in flexural member, the parts subject to shear (the web cover plates) must carry, in addition to the shear force and moment due to the eccentricity of the centroids of the bolt groups on each side, the proportion of moment carried by the web, without any shedding to the flanges.

The second moment of area of the web is;
Iw = [(h – 2tf)3tw/12]
Iw = [(476.53 × 10.8)/12] × 10-4 = 9737 cm4

Therefore the web will carry 9737/61500 = 15.8% of the moment in the beam (assuming an elastic stress distribution), while the flange will carry the remaining 84.2%.

The area of the web is;
Aw = 476.5 × 10.8 × 10-2 = 51.462 cm2
Therefore, the web will carry 51.462/129 = 39.8% of the axial force in the beam, while the flange will carry the remaining 60.1%.

Forces at ULS
The force in each flange due to bending is therefore given by;
Ff,M,Ed = 0.842 × [(MEd)/(h – tf)]
Ff,M,Ed = 0.842 × [(610 × 106)/(536.7 – 17.4)] × 10-3 = 989 kN

And the force in each flange due to axial force is given by;
Ff,N,Ed = 0.601 × (55/2) = 16.53 kN

Therefore
Ftf,Ed = 989 – 16.53 = 972.47 kN
Fbf,Ed = 989 + 16.53 = 1005.53 kN

The moment in the web = 0.158 × 610 = 96.38 kNm
The shear force in the web = 215 kN
The axial force in the web = 0.398 × 55 = 21.89 kN

Forces at SLS
The force in each flange due to bending is therefore given by;
Ff,M,Ed = 0.842 × [(MEd,ser)/(h – tf)]
Ff,M,Ed = 0.842 × [(445 × 106)/(536.7 – 17.4)] × 10-3 = 721.53 kN

And the force in each flange due to axial force is given by;
Ff,N,Ed = 0.601 × (41/2) = 12.3205 kN

Therefore
Ftf,Ed = 721.53 – 12.32 = 709.21 kN
Fbf,Ed = 721.53 + 12.32 = 733.85 kN

The moment in the web = 0.158 × 445 = 70.31 kNm
The shear force in the web = 157 kN
The axial force in the web = 0.398 × 41 = 16.318 kN

Choice of Bolt Number and Configuration
Resistances of Bolts
The shear resistance of bolts at ultimate limit state
For M24 bolts in single shear = 132 kN
For M24 bolts in double shear = 265 kN

Flange Splice
For the flanges, the force of 1005.53 kN at ULS can be provided by 8 M24 bolts in single shear.

The full bearing resistance of an M24 bolt in a 20 mm cover plate (without reduction for spacing and edge distance) is;

Fb,max,Rd = (2.5fudt)/γm2
Fb,max,Rd = [(2.5 × 410 × 24 × 20)/1.25] × 10-3 = 393.6 kN

This is much greater than the resistance of the bolt in single shear, and thus the spacings do not need to be such as to maximise the bearing distance. Four lines of 2 bolts at a convenient spacing may be used.

Web Splice
For the web splice, consider one or two lines of 4 bolts on either side of the centreline. The full bearing resistance on the 10.8 mm web is;
Fb,max,Rd = (2.5fudt)/γm2
Fb,max,Rd = [(2.5 × 410 × 24 × 10.8)/1.25] × 10-3 = 212.54 kN

This is less than the resistance in double shear, and will therefore determine the resistance at ULS. To achieve this value, the spacings will need to be;
e1 ≥ 3d0 = 3 × 26 = 78mm
p1 ≥ 15d0/4 = (15 × 26)/4 = 97.5 mm
e2 ≥ 1.5d0 = 1.5 × 26 = 39 mm
p2 ≥ 3d0 = 3 × 26 = 78mm

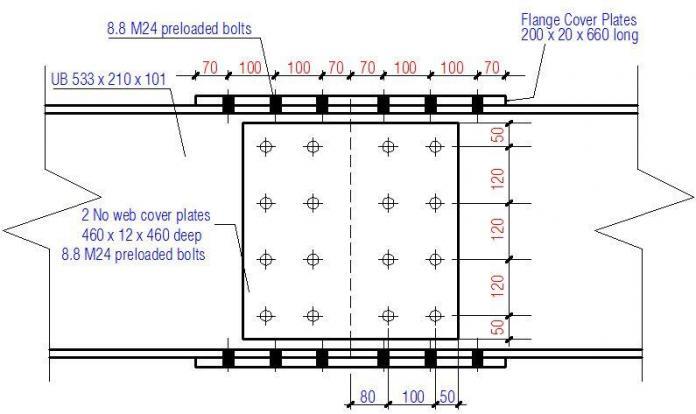
Initially, try 4 bolts at a vertical spacing of 120mm at a distance of 80mm from the centreline of the splice.

e56

The additional moment due to the eccentricity of the bolt group is;
Madd = 215 × 0.08 = 17.2 kNm


Bolt forces at ULS
Force/bolt due to vertical shear = 215/4 = 53.75 kN
Force/bolt due to axial compression = 21.89/4 = 5.47 kN
Force/bolt due to moment (considering top and bottom bolts only) = (96.38 + 17.2)/0.36 = 315.5 kN
Thus, a single row is adequate.

Considering the second line of bolts at a horizontal pitch of 100mm
Force/bolt due to vertical shear = 215/4 = 53.75 kN
Force/bolt due to axial compression = 21.89/4 = 5.47 kN
Force/bolt due to moment (considering top and bottom bolts only) = (96.38 + 17.2)/0.36 = 315.5 kN

e57

The additional moment due to eccentricity of this bolt group is;
Madd = 215 × (0.08 + 0.1/2) = 27.95 kN.m

The polar moment of inertia of the blot group is given by;
Ibolts = 6 × 1202 + 8 × (100/2)2 = 106400 mm2

The horizontal component of the force on each top and bottom bolt is;
FM,horiz = {[(96.38 + 27.95) × 120]/106400} × 103 = 140.22 kN

The vertical component of the force on each top and bottom bolt is;
FM,vert = {[(96.38 + 27.95) × 50]/106400} × 103 = 58.425 kN

Therefore, the resultant force on the most highly loaded bolt is;
Fv,Ed = sqrt[(53.75 + 58.425)2 + (140.22 + 5.47)2] = 183.87 kN

This is less than the full bearing resistance, and is therefore satisfactory for such a bolt spacing.

Chosen Joint Configuration

e58

Summary of cover plate dimensions and bolt spacing

Flange cover plates; 
Thickness tfp = 20 mm
Length hfp = 660 mm
Width bfp = 200 mm
End distance e1,fp = 70 mm
Edge distance e2,fp = 30 mm

Spacing
In the direction of the force   p1,f  = 100 mm
Transverse to direction of force   p2,f  = 120 mm
Across the joint in direction of force   p1,f,j  = 120 mm

Web cover plates; 
Thickness twp = 12 mm
Length hwp = 460 mm
Width bwp = 460 mm
End distance e1,wp = 50 mm
Edge distance e2,wp = 50 mm


Spacing
Vertically   p1,w  = 120 mm
Horizontally  p2,w = 100 mm
Horizontally across the joint   p1,w,j  = 160 mm

Resistance of flange splices
Resistance of net section
The resistance of a flange cover plate in tension (Nt,fp,Rd) is the lesser of Npl,Rd and Nu,Rd.

Here;
Nu,Rd = (0.9Anet,tpfu,fp)/γM2

Where;
Anet,fp = (bfp – 2d0)tfp = [200 – (2 × 26)] × 20 = 2960 mm
Therefore;
Nu,Rd = [(0.9 × 2960 × 410 )/1.1] × 10-3 = 992.945 kN

Npl,Rd = (Afpfy,fp)/γM0 = [(200 × 20 × 275)/1.0] × 10-3 = 1100 kN

Since 1100 kN > 992.945 KN
Nt,fp,Rd = 992.945 kN

For the flange in tension;
Ftf,Ed = 989 – 16.53 = 972.47 kN

Therefore, the tension resistance of a flange cover plate is adequate.

Block Tearing Resistance;
n1,fp = 3 and n2,fp = 2;

The resistance to block tearing (Nt,Rd,fp) is given by:
Nt,Rd,fp = {(fu,fpAnt,fp)/γm2} + {[Anv,fp(fy,fp/√3)]/γm0}

Where:
Ant,fp = tfp(2e2,fp – d0)
Ant,fp = 20 × [(2 × 40) – 26] = 1080 mm2

Anv,fp = 2tfp[(n1,fp – 1)p1,fp + e1,fp – (n1,fp – 0.5)d0]
Anv,fp = 2 × 20[(3 – 1) × 100 + 70 – (3 – 0.5) × 26] =  8200 mm2

Therefore;
Nt,fp,Rd = {[(410 × 1080)/1.1] + [(8200 × 265/√3)/1.0]} × 10-3 = 1657.127 kN

Resistance of cover plate to compression flange
Local buckling resistance between the bolts need not be considered if:
p1/t ≤ 9ε
ε = sqrt(235/fy,fp) = sqrt(235/265) = 0.94
9ε = 9 × 0.94 = 8.46

Here, the maximum spacing of bolt across the centreline of the splice p1,f,j  = 120 mm
p1,f,j/tfp = 120/20 = 6

Since 8.46 > 6, no local buckling verification required.

RESISTANCE OF WEB SPLICE
Resistance of web cover plate in shear;
The gross shear area is given by:
Vwp,g,Rd = (hwptwpfy,wp/1.27γm0√3)

For two web cover plates;
Vwp,g,Rd = 2{[(460 × 12)/1.27] × [275/√3]} × 10-3 = 1380.185 kN
VEd = 215 kN. Therefore, the shear resistance is adequate.

The net shear area is given by:

e59

Vwp,net,Rd = Av,wp,net(fu,wp/√3)/γm2
Av,net = (hwp – 3d0)twp
= (460 – 3 × 26) × 12 = 4584 mm2

For two web cover plates;
Vn,Rd = {2 × [4584 × (410/√3)]/1.1} × 10-3 = 1972.9 kN
Therefore, shear resistance is adequate.

Resistance to block tearing

e60

Vb,Rd = (fu,wpAnt)/γm2 + (fy,wpAnv.Anv)/γm0√3

For a single vertical line of bolts;
Ant = twp(e2 – d0/2)
Ant = 12 × (50 – 26/2) = 444 mm2
Anv = twp – e1 – (n1 – 0,5)d0)
Anv = 12 × [460 – 50 – (3 – 0.5)26] = 4140 mm2

For two web plates
Vb,Rd = 2 × {[(410 × 460)/1.1] + [(275 × 4140)/(√3 × 1.0)]} × 10-3 = 1657.53 kN

VRd = min{1657.53,  1972.9, 1380.185 }
VRd = 1380.185 kN

VEd/VRd = 215/1380.185 = 0.1557 < 1.0
This is ok.

Resistance of beam web
Resistance of net shear area
Vn,w,Rd = [Av,net(fu/√3)]/γm2

Where;
Av,net = Av – 3d0tw
Av = A – 2btf + (tw + 2r)tf but not less than ηhwtw

A= 12900 – (2 × 210 × 17.4) + (10.8 + 2 × 12.7) × 17.4 = 6221.88 mm2
A= 6221.88 – (3 × 26 × 10.8) = 5379.48 mm2

Thus;
Vn,w,Rd = {[5379.48 × (410/√3)]/1.1} × 10-3 = 1157.632 kN
This is ok.

Resistance of web cover plate to combined bending, shear, and axial force

Vwp,Rd = 1380.185 kN
Vsub>Ed = 215 kN < 1380.185 kN

Therefore, the effects of shear can be neglected
Awp = 12 × 460 = 5520 mm2

Modulus of the cover plate = (12 × 4602)/6 = 423200 mm3

Nwp,Rd = 12 × 460 × 275 × 10-3 = 1518 kN

Therefore, for two web cover plates
Mc,wp,Rd = [(2 × 423200 × 275)/1.0] × 10-6 = 232.76 kNm

For two web cover plates;
Npl,Rd = 2 × 1518 = 3036 kN

Mwp,Ed = 96.38 + 27.95 = 124.33 kNm
Nwp,Ed = 21.89 kN

Mwp,Ed/Mc,wp,Rd + Nwp,Ed/Nwp,Rd
124.33/232.76 + (21.89/3036) = 0.541 < 1.0

Therefore, the bending resistance of the web cover plates is adequate.

Thank you for visiting Structville today, and God bless.


Use of Rice Husk Ash in Concrete: Literature Review

1.0 Introduction
A pozzolan is a siliceous or aluminosiliceous material that, in finely divided form and in the presence of moisture, chemically reacts with the calcium hydroxide released by the hydration of portland cement to form calcium silicate hydrate and other cementitious compounds. Pozzolans are generally categorized as supplementary cementitious materials or mineral admixtures (Kosmatka et al, 2003). On their own, pozzolans possess little or no cementitious value, but when ground in fine form and in the presence of water will react with calcium hydroxide and develop cementitious properties.


Rice husk ash (RHA) has been used as a highly reactive pozzolanic material to improve the microstructure of the interfacial transition zone (ITZ) between the cement paste and the aggregate in high-performance concrete (Biu et al, 2005). Rice husk ash has also been reported to improve the properties of concrete or cement paste due to the pozzolanic reaction and its role as a micro-filler. It is often thought that the first function (pozzolanic reaction) is most important. The partial replacement of cement by rice husk ash in cement paste and mortar would provide micro-structure improvement, pore filling effect and better packing characteristics of the mixer (Kondraivendhan, 2012).
rice husks
One of the major highlights in the use RHA as cementitious material is based on environmental considerations. Rice milling industry generates a lot of rice husk during milling of paddy which comes from the fields. Rice husk ash (RHA) is about 25% by weight of rice husk when burnt in boilers.  It is estimated that about 70 million tones of RHA is produced annually worldwide. This RHA is a great environment threat causing damage to the land and the surrounding area in which it is dumped (http://www.ricehuskash.com/product.htm).
Studies have shown that RHA resulting from the burning of rice husks at control temperatures have physical and chemical properties that meet ASTM (American Society for Testing and Materials) Standard C 618-94a. At burning temperatures of 550 °C – 800 °C, amorphous silica is formed, but at higher temperatures crystalline silica is produced (Reddy and Alvarez, 2006). Amorphous silica is best for the production of concrete.  Rice husk contains about 75 % organic volatile matter and the balance 25% of the weight of this husk is converted into ash during the firing process, and is known as rice husk ash (RHA). This RHA in turn contains around 85% – 90% amorphous silica. So for every 1000 kgs of paddy milled , about 220 kgs (22 %) of husk is produced, and when this husk is burnt in the boilers, about 55 kgs (25 %) of RHA is generated (http://www.ricehuskash.com/product.htm).


2.0 Chemical Properties of RHA
According to Chandrasekhar et al (2003), the chemical composition of rice husk is found to vary from one sample to another due to the differences in the type of paddy, crop year, climate and geographical conditions. Here are samples of variation in chemical properties of RHA from various research works;
According to Habeeb and Mamoud (2010) (Malaysia);
tyue
According to Ganiron (2013) (Saudi – Arabia);
tyue2
According to Egbe-Ngu Ntui Ogork et al (2015) (Nigeria);
nty


According to Oyewumi et al (2014) (Nigeria):
NTYY
According to research done by Naveen et al (2015) (India):
rew
 Thus with all these results, you can verify that the chemical properties of RHA varies, so it is very important that before any RHA sample is used, chemical analysis should be carried out.
 
3.0 Effect of RHA on Compressive Strength of Concrete
In this section, we are going to present some research works that have been carried out by various scholars on RHA.
 
Emmanuel and Akaangee (2015) [Nigeria] collected 4.7kg of RH and weighed it using Sartorius-2 weighing scale. 1.085kg of rice hush ash was obtained after an open burning of the rice husk in a local furnace for two hours at a temperature range of 600°C to 700°C. The finely divided ash was left to cool for 24 hours inside the furnace. It was then grounded forfour minutes to obtain a finer particle size with the aid of a disc-mill, sieved manually using a 45 micro meter sieve to ensure proper fineness of the ash. From their result, the compressive strength of the concrete were as follows;
tyd
From their result,  compressive strength of cubes increases with age of curing and decreases as the percentage of rice husk ash content increases. The major setback in their research work was that 40mm x 40mm x 160mm moulds were used to prepare the concrete samples, and the target design strength was not specified, including the mix ratio adopted. But the major highlight of the research work was that maximum compressive strength was obtained at 15% replacement of OPC with RHA.


Dahiya et al (2015) [India] carried out partial replacement of grade 42.5 Portland cement with 20% RHA. In their result, they discovered that the initial setting time increased from 30 minutes to 60 minutes. The concrete samples were cast using 150mm x 150mm x 150mm mould, and the target strength was M20. The Compressive Strength of M20 (0% RHA) concrete at 3, 7 and 28 days are 14.50, 20.50 and 30.3 respectively. Whereas on replacing cement with 20% of RHA it comes out to be 13.40, 21.60 and 30.70 respectively. In the highlight of his research, water demand increased from 0.6 to 0.8 to achieve a slump 75mm – 100mm, but strength gain was almost the same at 20% replacement.
Naveen et al (2015) (India) carried out a research on the effect of RHA on compressive strength of concrete. He worked on target strengths of M30 and M60. The summary of his mix design for M30 concrete is given below;
gtyo
Grade 53 ordinary portland cement was used for this research, and water to cement ratio of 0.43 to 0.35 was used. The mould size employed was 150mm x 150mm x 150mm, and 60 specimens of this was prepared. The result of the compressive strength is given below;
rq
From his research, the maximum compressive strength was obtained at 10% replacement. The result was also the same considering M60 grade of concrete.
Oyewumi et al (2014) [Nigeria] investigated the effect of RHA in concrete, and the proportioning of the materials is as shown below;
grt
The result of the test is as given below;
t666
From the result, it can be seen that none of the partial replacement met or the control target strength of 27.47 Mpa.  The closest for 28 day strength however came at 10% partial replacement. This is in contrast with two previous results.


Bolla et al (2015) [India] carried out a research on the effect of  partial replacement of cement with RHA on concrete. The cement has been replaced by rice husk ash accordingly in the range of 0%, 5%, 10%, 15%, and 20% by weight of cement for mix. Concrete mixtures were produced, tested and compared in terms of compressive strengths with the conventional concrete. These tests were carried out to evaluate the mechanical properties for the test results of 7, 28, 60 days for compressive strengths. The cement used for this test was grade 53, and cube sizes of 150mm x 150mm x 150mm were used.
Results of the test are given below;
edd
From this result, the maximum compressive strength was attained at 10% replacement. The author reported that the RHA has a minimum silicon dioxide of 90%.
Tsado et al (2014) [Nigeria] carried out the comparative analysis of properties of some artificial pozzolana in concrete production, which included rice husk ash, corn cub ash, and sheanut shell ash. However, we will focus on the result from RHA. A little consideration from his research showed that the silicon dioxide content of the RHA was too low at 48.44% (Bida, Niger state Nigeria). The chemical analysis result of the samples is given below;
drrr
The sample was prepared as 1:2:4 mix ratio, with a water to cement ratio of 0.6. 60 number of 150mm cubes were prepared, and the result of the test is given below;
tryy
From the result, none of the partial replacement met the 28 days strength of the control mix design. The closest with considerable value came at 10% partial replacement.


Zareei et al (2017) [Iran] evaluated the durability and mechanical properties of rice husk ash as a partial replacement of cement in high strength concrete containing micro silica. The research presented resulted from various ratios of rice husk ash (RHA) on concrete indicators through 5 mixture plans with proportions of 5, 10, 15, 20 and 25% RHA by weight of cement in addition to 10% micro-silica (MS). This was compared with a reference mixture with 100% Portland cement. Tests results indicated the positive relationship between 15% replacement of RHA with increase in compressive strengths by about 20%. The optimum level of strength and durability properties generally gain with addition up to 20%, beyond that is associated with slight decrease in strength parameters by about 4.5%.
The chemical properties of the RHA used for the research is given below;
456
In the batching, 8 cubes of 100mm x 100mm x 100mm samples were prepared, and a water to cement ratio of 0.4 was maintained throughout the test. The mix design of the test is given below;
rt5
The compressive strength of the entire batch is given below;
rrr
From the result, you can see that the maximum compressive strength was obtained at 20% replacement. Note that this research is aimed at high strength concrete, and Micro-Silica (MS) has been added.
Abalaka and Okoli (2013) [Nigeria] carried out test on strength development and durability of concrete containing pre-soaked rice husk ash. The aim of the research was to determine the optimum ordinary Portland cement (OPC) replacement with RHA resulting from the reactivity of pre-soaked RHA and the effects of presoaked RHA on durability properties (coefficient of water absorption and sorptivity) of concrete at the age of 90 days.
The mix proportion of the experiment is as given below;
The characteristic chemical composition of the RHA is given below;
dff
100mm x 100mm x 100mm steel moulds were used for the experiment, and the resulting compressive strength of the mixture is as given below;
frtt
From the above test, the maximum compressive strength was achieved at 15% replacement. Note that FOSROC’s Conplast P505 (plasticizer conforrming to BS EN 934) was used to improve workability.


Ujene and Achuenu (2013) [Nigeria] carried out research to determine the compressive strength of concrete prepared with various agricultural wastes across Nigeria. To ensure uniformity of the data, the research is restricted to percentage replacement of 10%, 20% and 30% of cement with local binders using design strengths of 25 Mpa and 30 Mpa at 7, 14 and 28 days curing.
The designation of the alternative binders used in the research is given below;
de
The results of the findings are as follows;
drt
drrr
From the result, we can see that for grade 25, partial replacement of 10% exceeded the target design strength. This was also the same situation for grade 30 concrete.
Summary of research works
(1) Optimum replacement of cement with RHA occurs between 10 – 20% replacement.
(2) Performance in terms of increased compressive strength increases when plasticizers are used.
(3) Water requirement increases as the percentage of RHA increases. From the literature reviewed in this post, best performance was observed at water to cement ratio less than 0.4
(4) Plasticizer is therefore recommended when using RHA for concrete production.
References
[1] Bolla R.K.,  Ratnam M.K.M.V.,  Raju U. R. (2015): Experimental Studies on Concrete with Rice Husk Ash as a Partial Replacement of Cement Using Magnesium Sulphate Solution. IJIRST –International Journal for Innovative Research in Science & Technology| Volume 1 | Issue 7 | December 2015 ISSN (online): 2349-6010
 
[2] Bui DD, Hu J, and Stroeven P, (2005): Particle size effect on the strength of rice husk ash blended gap-graded Portland cement concrete. Cement and Concrete Composites, 27( 2005) pp357-66.
 
[3]Dahiya A., Himanshu,  Kumar N.,  Yadav D. (2015): Effects of Rice Husk Ash on Properties of Cement Concrete. International Journal of Advanced Technology in Engineering and Science Vol. No. 3, Issue No 12 ISSN 2348-7550 pp 59 – 63
[4] Egbe-Ngu Ntui Ogork, Okorie A.U., Augustine U.E. (2015): Hydrochloric Acid Aggression in Groundnut Shell Ash (GSA)-Rice Husk Ash (RHA) Modified Concrete. Scholars Journal of Engineering and Technology (SJET) ISSN 2321-435X (Online) Sch. J. Eng. Tech., 2015; 3(2A):129-133
 
[5] Emmanuel A., Akaangee N.C. (2015): Evaluation of the properties of Rice Hush Ash as a Partial Replacement for Ordinary Portland cement. International Journal of Scientific Research Engineering & Technology (IJSRET), ISSN 2278 – 0882 Volume 4, Issue 7, July 2015
 
[6] Ganiron Jr T.U. (2013): Effects of Rice Hush as Substitute for Fine Aggregate in Concrete Mixture. International Journal of Advanced Science and Technology Vol.58, (2013), pp.29-40 http://dx.doi.org/10.14257/ijast.2013.58.03
 
[7] Habeeb G.A.,  Mahmud H.B. (2010): Study on properties of rice husk ash and its use as cement replacement material. Materials Research Print version ISSN 1516-1439 Mat. Res. vol.13 no.2 São Carlos Apr./June 2010 http://dx.doi.org/10.1590/S1516-14392010000200011
 
[8] Kondraivendhan B. (2012): Strength and Flow Behaviour of Rice Husk Ash
Blended Cement Paste and Mortar. Asian Journal of Civil Engineering (BHRC) VOL. 14, NO. 3 (2013) pp 405-416
 
[9] Kosmatka, Steven H.; Kerkhoff, Beatrix; and Panarese, William C. (2003): Design and Control of Concrete Mixtures. EB001, 14th edition, Portland Cement Association, Skokie, Illinois, USA 
 
[10] Naveen S.B., Antil Y. (2015): Effect of Rice Husk on Compressive Strength of Concrete. International Journal on Emerging Technologies 6(1): 144-150(2015) ISSN No. (Print) : 0975-8364 ISSN No. (Online) : 2249-3255
[11] Oyewumi O.D., Abdulkadir T.S., and Ajibola V.M. (2014): Investigation of rice husk ash cementitious constituent in concrete. Journal of Agricultural Technology 2014 Vol. 10(3): 533-542 Available online http://www.ijat-aatsea.com ISSN 1686-9141
 
[12] Reddy D.V., Alvarez, M.B.S. (2006): Marine Durability Characteristics of Rice Husk Ash-Modified Reinforced Concrete. Fourth LACCEI International Latin American and Caribbean Conference for Engineering and Technology (LACCET’2006) “Breaking Frontiers and Barriers in Engineering: Education, Research and Practice” 21-23 June 2006, Mayagüez, Puerto Rico.
 
[13] Tsado T.Y., Yewa M., Yaman S., Yewa F. (2014): Comparative Analysis of Properties of Some Artificial Pozzolana in Concrete Production. International Journal of Engineering and Technology Volume 4 No. 5, May, 2014 ISSN: 2049-3444 pp 251 – 255
[14] Ujene A. O. and Achuenu E. (2013): Comparative Assessment of Compressive Strength of Concrete Containing Agricultural and Environmental Cementitious Wastes in Nigeria. Nigerian Journal of Agriculture, Food and Environment. Vol. 9No (4): pp 37-42
[15] Zareeia S.A., Amerib F., Dorostkarc F., Ahmadic M. (2017): Rice husk ash as a partial replacement of cement in high strength concrete containing micro silica: Evaluating durability and mechanical properties. Case Studies in Construction Materials 7 (2017) 73–81 ISSN 2214-5095 Published by Elsevier Ltd. http://dx.doi.org/10.1016/j.cscm.2017.05.001


Do Commercial Software Make Engineers Better?

In the 1950s, a method of analysis involving discretization of a continuous domain into a set of discrete sub-domains called elements was developed in the field of engineering. This method called the Finite Element Analysis (FEA) is a numerical solution to problems in engineering and mathematics and has been applied extensively in structural engineering.

In the year 1965, NASA issued a request for the development of a structural analysis software tool.  The result of this was NASTRAN (NASA Structural Analysis), which implemented the available FEA technology to solve structural problems.

In the 1970s, the commercialisation of finite element analysis began in full force and gave birth to finite element modelling. Apart from FEA, design packages also sprang up within that period. For instance, DECIDE (DEsk-top Computers in DEsign) package was written by A.W. Beeby and H.P.J. Taylor in the mid-1970s, when they were both in the Cement and Concrete Association. The program was covering all aspects of design in accordance with CP110, from structural analysis to bar curtailment.

Also around 1980, OASYS software was developed by Ove Arup Partnership for Hewlett-Packard 9845S system. The program was produced to include a large number of various aspects of structural analysis and design, and other aspects like surveying, drainage, road works, thermal behavior of sections etc. The CP110 design package of the program contained programs for analysis and design of continuous beams, rectangular and irregular columns, flat slabs, foundation, etc.

While all these were going on, in 1982, Autodesk made Autocad commercially available for drafting and computer-aided designs. From that moment till now, numerous computer packages have been developed to assist engineers in analysis, design, simulation, and drafting.

We have ANSYS, Staad Pro, Etabs, SAP, Safe, STRAP, Tekla, Orion, and so many packages too numerous to mention. There are also many computer programs written with packages like FORTRAN, MS Excel VBA, MATLAB etc, which serve the purpose of helping the engineer solve a specific problem.

structural design

These packages have made life easier for design engineers in the office by considerably lowering the man-hours involved on the analysis, design, and drawing of structures. This means that working drawings, costing, and presentations can be done faster prior to kicking off of constructions. On the other hand, it has made it easier for corrections and modifications to be made to a structure, with their effects appropriately accounted for.

But the question still remains, ‘Do all these programs and packages make a design engineer better?

The answer is relative. An engineer is an individual who has been trained in an accredited institution, with appropriate years of experience and professional license to practice the profession of engineering. An engineer is expected to improve on the job, by following up with relevant technological advancements in the field, attending seminars and conferences, and networking with his colleagues.

For instance, a new construction procedure might demand a new method of reinforcement detailing and it expected that a modern engineer keeps up with all these developments.

Back to the issue of engineering software, if an engineer is proficient in the use of say computer programs, does that make him better than an engineer who can use just two programs? The first answer that will come to mind is probably ‘NO’. This is because the knowledge of computer programs does not make an engineer.

What makes a complete engineer is his personality, competence, knowledge, training, background on engineering practice, and years of experience. For engineers, the knowledge of software is not an end itself, but an alternative means to an end. These packages are here to help engineers work faster and more efficiently, and that is why they are programmed to request our input before they can give us an output.

I was involved in a project in Lagos Nigeria, and when I looked at the structural drawing, it was a complete waste of resources. The residential building was to go four storeys high, and no span was longer than 7m. At the ground floor, a column section of 900mm x 300mm was provided with 10Y25 (Asprov = 4910 mm2) as reinforcement. On the first floor of the same column, 28Y25 (Asprov = 13748 mm2) was provided!!

The drawing in question has been approved and construction has commenced already. Based on the design results, the designer would have asked questions. But a certain software gave him the result, and he submitted it just like that without probably reviewing the output. Even if there were unbalanced moments due to eccentricity or structural arrangement that is causing heavy bending on the column, it is his duty to scrutinize the arrangement. But he is an ‘engineer’ who can use design software, yet he has shown that he has no solid foundation in engineering as far as that output was concerned, or he doesn’t care about cost.

In terms of job opportunities and employability in the industry, the knowledge of a certain software can be an advantage to a candidate. Yes, this is because a design firm might be users of a particular computer program, and they might prefer to hire someone who already has knowledge of that software. But on the other hand, it would still be very disastrous if the desired candidate does not understand the basic theory of structures. It is easier to train someone on how to use a computer program than to train someone on the fundamentals of structural analysis and design. This calls for consideration on the part of employers.

In summary, commercial design software are helpers. We are supposed to do the thinking and design, while computer programs will help us carry out the lengthy calculations. When they produce an inconsistent result, we are supposed to ask why, and review our inputs.

Computer programs do not make better engineers, but they have made engineering as a profession better. That is why Structville remains committed to original and sound knowledge from the first principles. The current curriculum of our universities is sufficient to produce engineers who can handle simple designs after graduation, and lecturers should be willing to ‘teach’ design, and not ‘lecture’ it.

From my experience in the industry so far, the quality of teaching received in the university contributes immensely to the capacity of fresh graduates to carry out structural design independently. If they were ‘lectured‘ and not ‘taught‘, they might spend the rest of their professional career relying solely on computer programs.

Structural design at the undergraduate level should not be an issue of, “take this handout or textbook and study the examples” only. Structural design should be taught passionately from scratch and demonstrated with practical examples to the fullest extent possible.

I will ever be grateful to Prof. C. H. Aginam of the Department of Civil Engineering, Nnamdi Azikiwe University Awka. In the first semester of our 3rd year, he loaded us with knowledge on the deflection of elastic systems, analysis of continuous beams (Clapeyron’s theorem of three moments, slope deflection method, force method), Maxwell’s theorem, Betti’s law, Vereschagin’s rule, Castigliano’s theorem, analysis of portal frames, etc.

When we found ourselves mid-way in the 2nd semester, we were already designing three-storey buildings using pen and calculator from the roof beam to the foundation. I still remember the way he shouts and sweats, writing on the board, and cleaning over and over again, inspecting our notes, making sure every one downloaded and printed a copy of BS 8110-1:1997, ensuring that everyone purchased at least one design textbook of his/her choice. He is a phenomenal teacher.

Benefiting from his wealth of knowledge, I did all my designs with pen and calculator until I went for my Industrial Training in 4th year. It was during my industrial training that I had my first laptop and learned how to use AUTOCAD and a few other design software.

It is the fundamental knowledge of engineering and ingenuity that makes a good engineer; computer programs are here to make our work faster and eliminate human errors from lengthy computations. Once again, it is worth acknowledging that the availability of these design software have made engineering as a discipline better and more efficient. Let us keep getting it right.


How to Calculate the Settlement of Spread Foundation (EC7 Part 2)

In this article, we will discuss an approach described in Annex E of EN 1997-2:2006 (Eurocode 7 Part 2) for determining the elastic settlement of spread foundations. This is based on a semi-empirical method and the result of the MPM test (Menard Pressuremeter Test).

The formula for evaluating the settlement of a spread footing is given below;

settlement%2Bequation


where;
Bo is a reference width of 0.6 m;
B is the width of the foundation;
λd , λc are shape factors given in Table E.2;
α is a rheological factor given in Table E.3;
Ec is the weighted value of EM immediately below the foundation;
Ed is the harmonic mean of EM in all layers up to 8 × B below the foundation;
σv0 is the total (initial) vertical stress at the level of the foundation base;
q is the design normal pressure applied on the foundation.

The Table E.2 and E.3 of EC7-2 are given below;

Table%2BE2
tABLE%2BE3

Solved Example

A 2m x 2m square footing is carrying a quasi-permanent SLS combination load of 1040 kN. The Menard Pressuremeter moduli values are as given in the sketch below. Calculate the settlement of the foundation, if the unit weight of the first layer of soil is 18.0 kN/m3.

Question

Solution

σv0 = 18 kN/m3 × 1.2m = 21.6  kN/m2
q = 1040 kN / (2m × 2m) = 260  kN/m2
B = 2.0m (width of the foundation)
λd = 1.12 (square foundation)
λc = 1.1 (square foundation)
α = 0.67 (normally consolidated clay)
Ec = 16.8 MPa
Ed = 3/[(1/16.8) + (1/27) + (1/33)] =  23.447 MPa
Substituting these values into the settlement equation;

equation

Therefore, the settlement of the foundation is 5.358mm.

What do you think about this approach?
Thank you for visiting Structville today.


Design of Timber Roof Truss

The use of timber as trussed rafters for roofs of buildings is a very popular alternative all over the world. Timber roof trusses are made up of a series of interconnected timber members that are arranged in a triangular pattern. This pattern allows the truss to distribute the weight of the roof evenly across its supports, making it a strong and efficient structural system.

roof truss design
Figure 1: Members of a timber roof truss

The aim of this article is to show the design example of a timber roof truss (trussed rafter). As a direct product of nature, timber has so many variable properties that are more complex than that of concrete, steel, bricks, or aluminium. Some of the characteristics which influence the structural behaviour of timber are;

  • moisture content
  • the direction of applied load (perpendicular or parallel to the grain)
  • duration of loading
  • strength grading of the timber
commercial timber log
Figure 2: Unprocessed timber logs

Steps in the Design of Timber Roof Trusses

Here’s a step-by-step overview of the design process for timber roof trusses:

1. Preliminary Design: In this step, the designer is to determine the roof span, pitch, and overall architectural design of the building. It is important to choose a truss configuration based on structural performance, aesthetic preferences, functional requirements, and available space.

2. Load Analysis: In this case, it is important to identify and analyze all relevant loads, including dead loads (roofing materials, insulation), live loads (snow, occupants), and potential wind or seismic loads. Calculate the total design load that the truss system must support.

3. Material Selection: Choose an appropriate timber species based on its mechanical properties, availability, and durability. It is important to consider factors such as bending strength, compression and tension properties, and resistance to decay.

4. Truss Geometry and Configuration: Based on the chosen truss configuration (e.g., king post, queen post, Howe truss), determine the angles, lengths, and dimensions of each timber member. It is important to ensure that the truss geometry is consistent with both structural and architectural requirements.

5. Member Sizing and Design: Calculate the axial forces, bending moments, and shear forces in each timber member using static equilibrium equations. Size each timber member to withstand the calculated forces while considering factors such as serviceability and durability.

6. Connection Design: Design secure and efficient connections between timber members using appropriate fasteners (nails, screws, bolts) and connectors (metal plates, brackets). Ensure that connections provide load transfer, prevent excessive movement, and account for potential wood shrinkage.

7. Lateral Stability and Bracing: Incorporate diagonal bracing or other lateral stability measures to prevent buckling or twisting of the truss members under lateral loads (wind or seismic forces).

8. Serviceability and Deflection Control: Assess the truss deflection under the designed loads to ensure that it meets acceptable serviceability criteria. Incorporate additional members or adjust member sizes if necessary to control deflection.

9. Fire Resistance and Protective Treatments: Consider fire resistance requirements by choosing fire-rated timber or applying fire-retardant treatments if needed. Apply appropriate protective coatings or treatments to enhance the truss’s durability and resistance to decay.

10. Detailed Drawings and Documentation: Create detailed construction drawings that specify the geometry, dimensions, connections, and material details of the truss members. Prepare design calculations and documentation that outline the design methodology, load assumptions, and member sizing.

Analysis of Timber Roof Trusses

Ideal trusses are theoretical structures in which the members meet at points called nodes. These nodes are idealized as hinges or pins, which means that they cannot transmit bending moments. Loads are applied to ideal trusses only at the nodes. This keeps the truss members free from shear and bending stresses and makes the analysis of the truss much simpler.

However, practical construction does not allow roof trusses to behave exactly as ideal trusses. The members of real-world trusses are not pinned at the nodes, and loads are often applied along the length of the chords. This means that practical trusses must resist bending moments and shear in addition to axial stress.

As a result, the classical methods of analyzing trusses are only valid for ideal trusses. These methods do not account for the bending moments and shear in practical trusses. As a result, the results of classical methods of analysis can be inaccurate for real-world trusses, even though they are usually employed.

Quickly in this post, I am going to carry out a very simple design example of timber roof truss using BS 5268. A lot of information regarding timber as a structural material can be obtained from specialist textbooks. It is worth knowing that the most current design code for timber structures is Eurocode 5.

Timber%2Broof%2Btruss%2Bdesign

Note:
BS 5268 is based on permissible stress design. When using permissible stress design, the margin of safety is introduced by considering structural behaviour under working/service load conditions and comparing the stresses thereby induced with permissible values. The permissible values are obtained by dividing the failure stresses by an appropriate factor of safety. The applied stresses are determined using elastic analysis techniques, i.e.

Stress induced by working loads ≤  (failure stress/factor of safety)

Since BS 5268 is a permissible stress design code, mathematical modelling of the behaviour of timber elements and structures is based on assumed elastic behaviour.

Solved Example

Let us design the roof truss of a building subjected to the following medium-term loads. The configuration of the roof truss is as shown above.

Data
Span of roof truss = 4.8m
Spacing of the truss = 2.0m
Nodal spacing of the trusses = 1.2m
Service class of roof truss: Service class 2

Load Analysis

(i) Dead Loads

On rafter (top chord)
Self-weight of long-span aluminium roofing sheet (0.55mm gauge thickness) = 0.019 kN/m2
Weight of purlin (assume 50mm x 50mm African Mahogany hardwood timber)
Density of African Mahogany = 530 kg/m3 = 0.013  kN/m = (0.013 × 2m)/(2m × 1.2m) = 0.0108 kN/m2
Self-weight of rafter (assume) = 0.05 kN/m2
Total = 0.0885 kN/m2
Weight on plan = 0.0885 × cos 17.35 = 0.08 kN/m2

On Ceiling Tie Member (bottom chord)
Weight of ceiling (10mm insulation fibre board) = 0.077 kN/m2
Weight of services = 0.1 kN/m2
Self weight of ceiling tie = 0.05 kN/m2
Total = 0.227 kN/m2
Therefore the nodal permanent load on rafter (Gk) = 0.08 kN/m2 × 2m × 1.2m = 0.192 kN
Therefore the nodal permanent load on ceiling tie (Gk) = 0.227 kN/m2 × 2m × 1.2m = 0.5448 kN

(ii) Live Load
Imposed load on top and bottom chord (qk) = 0.75 KN/m(treat as medium-term load on plan)
Therefore the nodal permanent load on rafter (Gk) = 0.75 kN/m2 × 2m × 1.2m = 1.8 kN

Analysis of the rafter (top chord)
Span Length = 1.257m
Load = (0.0885 + 0.75) × 2m = 1.667 kN/m

Timber%2BTruss%2BRafter

Results
Analysis of the structure for the loads gave the following results;

on%2Bstaad


All load values are medium-term loads;

Medium-term load is defined in this case by:
Dead load + temporary imposed load

Top Chord Result
Axial force = 10.1 kN (Compression)
Bending Moment = 0.2 kNm
Length of member = 1.26 m

Design of the Top Chord
Let us try 38mm x 100mm timber
Strength class C18

Compression parallel to grain (σc,g,||) = 7.1 N/mm2
σc,adm,|| = σc,g,|| ×  k× k3 × k8 × k12

Bending parallel to grain (σm,g,||) = 5.8 N/mm2
σm,adm,|| = σm,g,|| ×  k× k3 × k6 × k× k8

k= wet exposure (does not apply in this case)
k= duration factor = 1.25 (medium-term loading)
k= shape factor = 1.0 (rectangular section)
k= Depth of section 72mm < h < 300mm
k= (300/h)0.11 = (300/100)0.11 = 1.128
k= Load sharing factor (does not apply since the spacing of the rafters exceed 610 mm).

Section Properties
Area = 3.8 × 10mm2
Zxx = 63.3 × 10mm3
Zyy = 24.1 × 10mm3
Ixx = 3.17 × 10mm4
Iyy = 0.457 × 10mm4
rxx = 28.9 mm
ryy = 11 mm

Applied bending stress
σm,a,|| = M/Z = (0.2 × 10⁶)/(63.6 × 103) = 3.144 N/mm2

Axial compressive stress
σc,a,|| = P/A = (10.1 × 10³)/(3.8 × 103) = 2.657 N/mm2

Check for slenderness
Effective length (Le) = 1260 mm (assuming pin end connection)

λ = Le/r = 1260/28.9 = 43.598 < 52 Ok  (clause 2.11.4)

Medium-term load
Compression parallel to grain (σc,g,||) = 7.1 N/mm2

Emin = 6000 N/mm2

k3 = 1.25 (Table 17)

σc,|| = 7.1 × 1.25 = 8.88 N/mm2

E/σc,|| = 6000/8.88 = 675.67
Slenderness λ = 43.598

We can obtain the value of k12 by interpolating from Table 22 of the code
We are interpolating for E/σc,|| = 675.67 and  λ = 43.598

E/σc,||           40         50
600           0.774       0.692
700           0.784       0.711

On interpolating (bivariate interpolation);
k12 = 0.7545

σc,adm,|| = σc,g,|| ×  k× k3 × k8 × k12
σc,adm,|| = 7.1 ×  1.0× 1.25 × 1.0 × 0.7545 = 6.699 N/mm2

σm,adm,|| = σm,g,|| ×  k× k3 × k6 × k× k8
σm,adm,|| = 5.8 ×  1.0× 1.25 × 1.0 × 1.128 × 1.0 = 8.178 N/mm2

Euler critical stress σ=  π2Emin2

σ=  π2(6000)/(43.598)= 31.154 N/mm2

For combined bending and compression

For%2Bcombined%2Bbending%2Band%2Bcompression

σm,a,|| =  3.144 N/mm2
σc,a,|| = 2.657 N/mm2
σc,adm,|| =  6.699 N/mm2
σm,adm,|| =  8.178 N/mm2
σ=  31.154 N/mm2

[3.144/(6.699 × 0.9034)] + [2.657/6.699] = 0.919 < 1.0
Therefore, 38mm x 100mm GS C18 Timber is adequate for the rafter

Consider portion over nodes (at supports)
Bending moment = 0.28 kN.m
Axial load (taking the average at that joint) = (10.81 + 8.43)/2 = 9.62 kN

Applied bending stress
σm,a,|| = M/Z = (0.28 × 10⁶)/(63.6 × 103) = 4.40 N/mm2

Axial compressive stress
σc,a,|| = P/A = (9.62 × 10³)/(3.8 × 103) = 2.531 N/mm2

At node point, λ < 5.0, and the rafter is designed as a short column at this point;

σc,adm,|| = σc,g,|| ×  k× k3 × k8
σc,adm,|| = 7.1 ×  1.0× 1.25 × 1.0  = 8.875 N/mm2

The interaction formula for this scenario is given below;

m,a,|| / σm,adm,||] + [σc,ma,|| / σc,adm,||] ≤ 1.0

[4.40 / 8.178] + [2.531 / 8.875] = 0.8232 < 1.0

This shows that the section is satisfactory for rafter.

Analysis of Tie Element
Span Length = 1.2m
Load = (0.227 + 0.75) × 2m = 1.954 kN/m

Results
Axial force = 9.74 kN (tension)
Bending Moment = 0.22 kNm
Length of member = 1.2m

Design of the Bottom Chord (ceiling tie)
Let us still try 38mm x 100mm timber
Strength class C18

Tension parallel to grain (σt,g,||) = 3.5 N/mm2
σt,adm,|| = σt,g,|| ×  k× k3 × k8 × k14
(width of section) k14 = (300/h)0.11 = (300/100)0.11 = 1.128
σt,adm,|| = 3.5 × 1.0× 1.25× 1.0 × 1.128 = 4.935 N/mm2

Bending parallel to grain (σm,g,||) = 5.8 N/mm2
σm,adm,|| = 5.8 ×  1.0× 1.25 × 1.0 × 1.128 × 1.0 = 8.178 N/mm2

Applied bending stress
σm,a,|| = M/Z = (0.22 × 10⁶)/(63.6 × 103) = 3.459 N/mm2

Axial tensile stress
σc,a,|| = P/Effective Area = (9.74 × 10³)/(3.8 × 103) = 2.563 N/mm2

Note: When the ceiling tie is connected to rafter by the means of a bolt, the projected area of the bolt hole must be subtracted from the gross area of the section.

Combined tension and bending
m,a,|| / σm,adm,||] + [σt,ma,|| / σt,adm,||] ≤ 1.0

[3.459 / 8.178] + [2.563 / 4.935] = 0.9422 < 1.0

This is ok.

Consider portion over nodes (at supports)
Bending moment = 0.3 kN.m
Axial load (taking the average at that joint) = (9.5 + 9.74)/2 = 9.62 kN

Applied bending stress
σm,a,|| = M/Z = (0.3 × 10⁶)/(63.6 × 103) = 4.7169 N/mm2

Axial tensile stress
σc,a,|| = P/Effective Area = (9.62 × 10³)/(3.8 × 103) = 2.531 N/mm2

Combined tension and bending
m,a,|| / σm,adm,||] + [σt,ma,|| / σt,adm,||] ≤ 1.0

[4.7169/ 8.178] + [2.531 / 4.935] = 1.089

In this case, the tie element may be increased to 38mm x 175mm or the grade of the timber could be changed to accommodate the combined flexural and axial stress in the member.

Check for deflection
Deflection of trussed rafter under full load = 6.095 mm (calculated on Staad)
Permissible deflection = 14 mm

Deflection is ok.

That is it for now. Thank you so much for visiting Structville today and God bless you. Remember to share with your folks.

Member Design of a 22m Span Steel Roof Truss

Introduction

We all need a roof over our head. Nowadays, architects frequently use roof pattern and design to enhance the aesthetics and functionality of a building, and it is very important that engineers follow up and ensure that the structural integrity of such roof systems are guaranteed. On the 10th of December 2016, the roof a church building collapsed at Uyo in Akwa Ibom state Nigeria, leaving about 60 people dead, and many other injured. This is why such designs are to be taken seriously, especially when the span is large.

truss

Large span construction of roof systems is usually found in public or commercial buildings. This comes in handy especially when there is need to have a large uninterrupted floor area. However, the efficiency of trusses in dealing with long span structures has been widely recognised in the structural engineering community, but there is no doubt that the longer the span, the more complex the design.


Some basic considerations in the design of trusses
(1)The connection design is as important as the member design. The connections could be welded or bolted or both.
(2) 2D idealisation of the structure is usually very sufficient for analysis and design.
(3) Joints are hardly pinned in reality, but the use of pinned joint is usually encouraged for the purpose of analysis and design.
(4) Trusses can be analysed as having continuous top and bottom chords, with the internal members pinned. In this case, loads can be applied at locations other than the joints with the resulting bending moment appropriately accounted for in the design.
(5)  It is usually important to consider out of plane buckling for compression members in trusses. However, purlins usually take care of the top chord, while bracing can be used to take care of the bottom chord.

Read Also…
Design of Roof Purlins

(6) For efficient structural performance, it is recommended that the truss span to depth ratio be kept between 10 to 15.
(7) In the layout of truss systems, it is more preferable (in terms of economy and efficiency) to have the shorter members in compression and the longer members in tension.
(8) Welded connections offer more advantages in terms of  deflection behaviour of trusses. Slack displacements are possible in bolted connections especially when non-preloaded bolts are used.
(9) In the design of compression members, buckling is the most critical.
(10) When member lines do not intersect at a node, it is important that the moment that arises due to the eccentricity be included in the design.


Design Example
The structural layout of a roof system is given below;

roof%2Blayout

We are required to carry out the member design of the trusses for this 23m span open hall. The design data is given below;

Data
Design code: BS EN 1993-1-1:2005
Design wind pressure: 1.5 kN/m2
Variable load = 0.75 kN/m2

To make this post simpler and shorter, a 29 page fully referenced design paper for all the trusses in the roof system has been attached.

Click HERE to download the calculation sheet in PDF format (premium).

Thank you for visiting Structville today, and remember to tell your colleagues about us.

truss33

Read Also...
Practical Analysis and Design of Roof Trusses